Adduser Command in Linux
Job-ready Online Courses: Click for Success - Start Now!
In this article, you will learn what adduser is, and why it is used, then compare it with the useradd command, look at how to install it in different Linux distros, and look into the syntax and options of the adduser command.
Only then will we look at some practical examples of the useradd command in the command line of Ubuntu 20.04. So pay attention, grab a snack if you need and read on!
What is the adduser command in linux?
Adduser is a command-line-based utility in Linux-based operating systems that helps in creating users on the desktop. The adduser command is very similar to the “useradd” command. Yup! Don’t get confused, useradd and adduser are 2 slightly different commands.
The main difference between the 2 is that useradd is a native binary compiled with the system and adduser on the other hand is a Perl script that uses the useradd binary in the background. Don’t worry, we will compare both the commands in great detail in the next section.
We all know that Linux is a multi-user architecture, meaning more than one person can interact with the same system at the same time. It is the system administrator’s job to manage these users wisely, tasks like creating users, removing users, creating groups, removing groups, and assigning users to different groups come under user management. One such user management command is useradd.
What is the difference between useradd and adduser commands?
In this series of Linux articles, we have already seen the command “useradd” (if you haven’t, you better read that first!), it sounds and functions very similar to the adduser command. It must be noted that both are actually not the same. In this section, we shall not only compare both these commands but also find out which command ‘you’ need to use.
The commands basically perform the same functions – creating users, but there are different. To put it in layman’s language, the adduser command is intended for the user or administrator, and the useradd command is intended for the system. But we are not here for layman’s language, are we?
Technically speaking, the “adduser” command provides a high-level interface for adding new users, and the “useradd” command provides a low-level interface. Most Linux users prefer and suggest the useradd command is more user-friendly and has more features?
The useradd command has an interactive prompt that asks you for information about the new user account you are trying to add. Useradd also receives very few updates when compared to the useradd command, and needs to remain backward compatible.
As an average Joe (basic Linux user), it is recommended for you to use the “adduser” command instead of “useradd”. However, if you are a little more mainstream like a developer, use the “useradd” in your scripts or programs you create, to ensure compatibility across different distros and future updates.
Installing linux adduser command
The useradd command already comes preinstalled in most distributions of Linux. But by some chance, if you do not have it or you may have uninstalled it, follow the command shown below with respect to your Linux distro to install the adduser command.
Installing adduser in Debian based Linux distributions
To install the adduser command on Debian based Linux distributions like Ubuntu, Kali, Mint OS, Parrot OS, Pure OS, AntiX, Deepin, etc, use the command shown below:
sudo apt-get install adduser
Installing adduser in RHEL based Linux distributions
To install the adduser command on Debian based Linux distributions like Alma Linux, Rockt Linux, Oracle Linux, clear OS, Euro Linux, etc, use the command shown below:
sudo yum install adduser
Installing adduser in RHEL based Linux distributions
To install the adduser command on Debian based Linux distributions like Fedora Spins, Clear OS, Qubes, Berry Linux, Korora, Arquetype, etc, use the command shown below:
sudo dnf install adduser
Syntax of linux adduser command
The syntax of the adduser command is really simple:
adduser <username> <options>
Let us take a closer look at the fields present in the adduser command:
1. <username>
This field takes in the name of the user you are creating
2. <options>
This field takes in a range of options that specify how the adduser command should function.
Options used with the adduser command
In typical Linux fashion, useradd also has a long list of options that we can use to perform various tasks, let us look at some of them.
1. –conf <filename>
This option uses the file you specified instead of the “/etc/adduser.conf” file while creating a new user.
2. –disabled login
This option does not run passwd to set the password. The user can’t use his/her account until the password is set.
3. –force-badname
This option forces the adduser command to apply only a weak check for the validity of the name.
4. –gecos <gecos>
This option sets the gecos field for the new user-generated. The adduser command does not ask for finger information if this option is given.
5. –gid ID
This option forces the new groupid to be the given number when creating a new user. This option puts the user in that group.
6. –group
This option when combined with the option “–system” creates a group with the same name and ID as the system user is created. If at all you did not use it with the option “–system”, a group with the given name is created.
7. –home<dir>
This option uses the directory you specified as the home directory of the new user rather than the default specified in the configuration file.
8. –shell<shell>
This option uses the shell you specified as the new user’s login shell rather than the default specified in the configuration file.
9. –ingroup<group>
This option adds the newly created user to the group you specified instead of the default defined by the “USERS_GID” environment variable configuration file.
10. –no-create-home
This option does not create a home directory for the user being created.
11. –quiet
This option suppresses informational messages and only shows warnings and errors. This option helps in debugging.
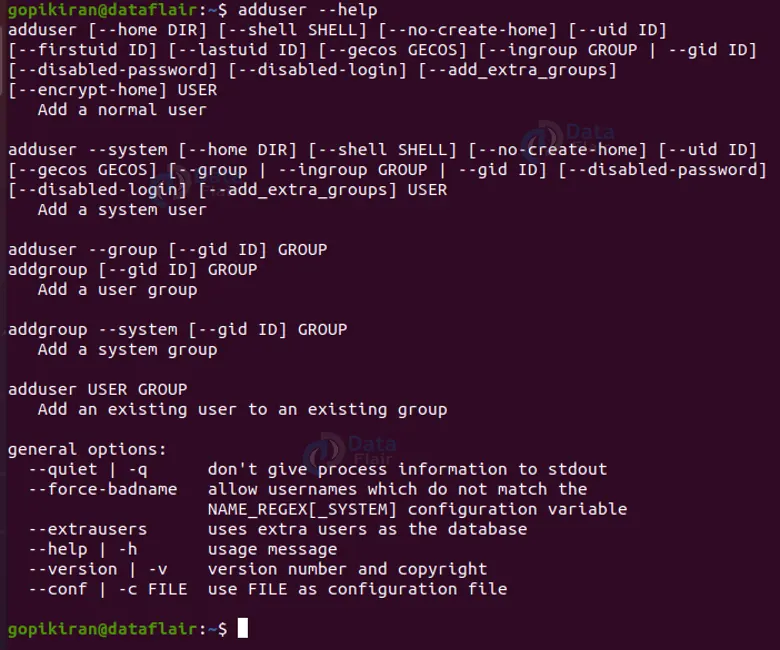
12. –help
This option prints out the help menu as shown below:
13. –debug
This option provides verbose to the output to understand what is happening. As the name suggests, we use this option for debugging.
14. –uid<ID>
This option forced the new userid to be the number you specified. However, the adduser command will fail, if the user id you specified is already taken by another user.
15. –firstuid <ID>
This option overrides the first uid in the range that the uid is chosen from. This option overrides the “FIRST_UID” specified in the configuration file.
16. –lastuid <ID>
This option overrides the last uid in the range that the uid is chosen from.
17. –add_extra_groups
This option adds the new user to extra groups defined in the configuration file.
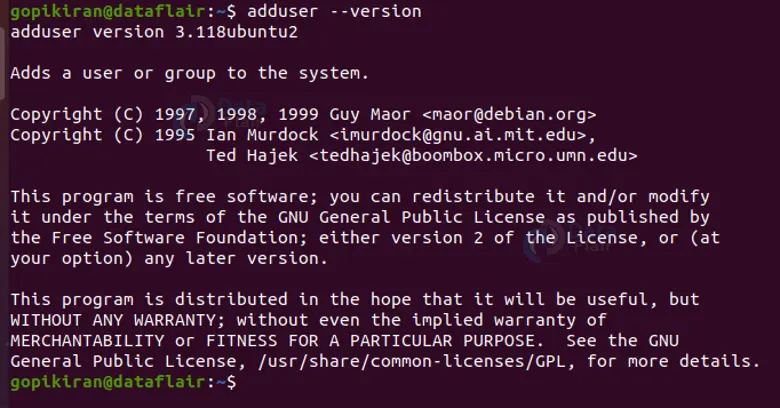
18. –version
This option displays the information regarding the version of the useradd command you are using in your system.
What happens when you create a user in Linux?
Before we learn how to use the adduser command to create users, let us first look at what the system does when creating a new user.
When we are creating a user in Linux, the system does the following:
1. It assigns a UID to the new user.
2. It creates another new /home directory for the new user.
3. Sets the default shell as /bin/sh for the new user
4. Creates a private user group named after the username you entered.
5. Contents of the directory “/etc/skel” are copied to the home directory of the new user.
6. It copies files containing environmental variables for the user’s session like .bashrc, .bash_profile, and .bash_logout to the new user’s home directory.
Now that we have laid down the fundamentals, let us now look at a few practical examples of the useradd command just to get a rough idea of how it works and how to use it.
Adding a new user
To add a new user simply type the command “sudo adduser <username>”. To use the adduser command, you either need to be the root user or use the sudo command for elevated privileges.
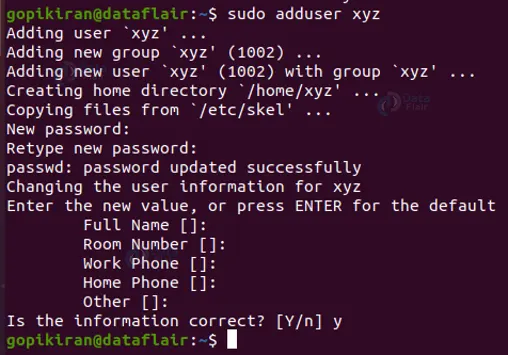
Notice that when you use the above command, an interactive prompt shows up which asks you to enter different information like password, full name, phone number, and more.
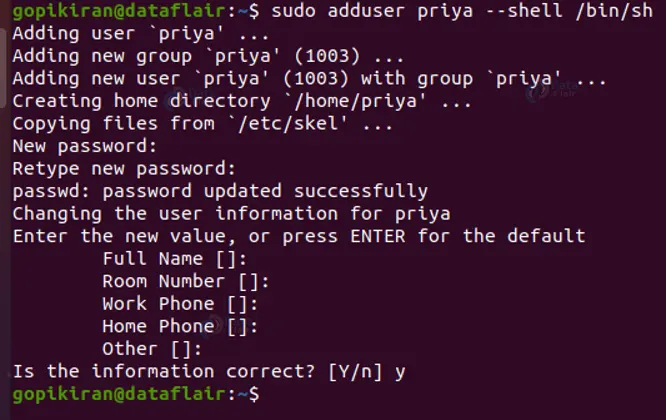
Adding a user with a different shell
If you want to change the default bash shell for the new user, you can pair the adduser command with the option “–shell” followed by the path as shown:
sudo adduser <username> --shell <path>
Adding a user with a different configuration file
If you don’t want to use the default configuration file and want to specify another, pair the adduser command with the option “–conf” followed by the filename as shown below:
sudo adduser <username> --conf <filename.conf>

The command shown in the screenshot above takes the configurations from the custom_config file and will create the new as per custom_config filename configurations.
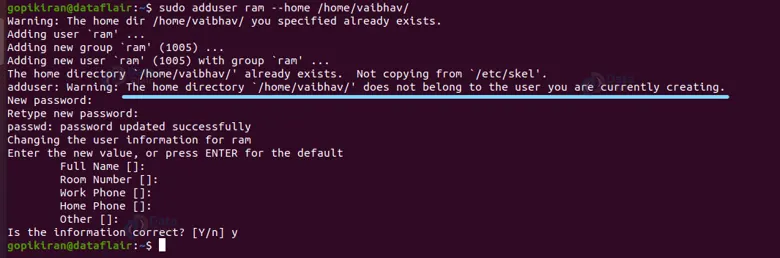
Adding a user with a different home directory
If you want to create a new user with another home directory, use the option “–home” followed by the path of the new home directory as shown:
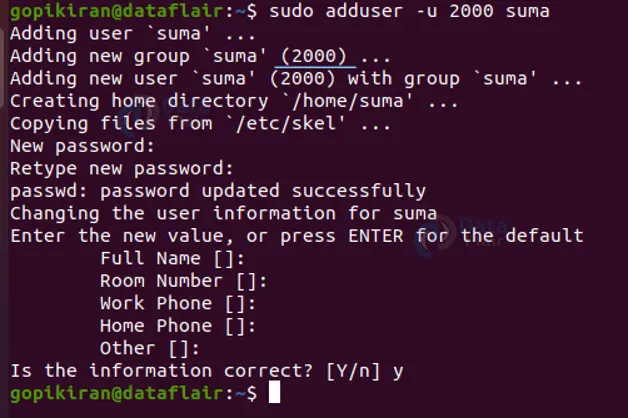
Specifying the user id of a new user
To specify the UID of a new user, use the option “-u” followed by the UID you want to give. You must be careful not to give an already taken UID. use the following syntax:
sudo adduser -u <UID> <username>
Creating a user without a home directory
If you wish to create a new user without a home directory simply pair the adduser command with the option “-M” as shown below:
sudo adduser -M demo_user8
Creating a system user
Wait, what is a system user? Well, in Linux there are generally 2 types of users:
1. System user
The system user, also known as the root is the one that creates normal users. The best part is that the system user is automatically created when you first install the operating system. Moreover, you can also create system users for particular applications and programs.
2. Normal user
The normal users are the ones that are created by the system or root user, actually, even users with sudo privileges can create normal users
To create a system user, you can either use the option“–system” as shown:
sudo adduser --system <username>

Adding a new user into a group
If you wish to add a new user into a group, simply pair the adduser command with the option “–group”, it will automatically add the user into the default group. Once the command has been successfully executed, you will get a message saying that the user has been added to a group. It also prints the GID of the group.

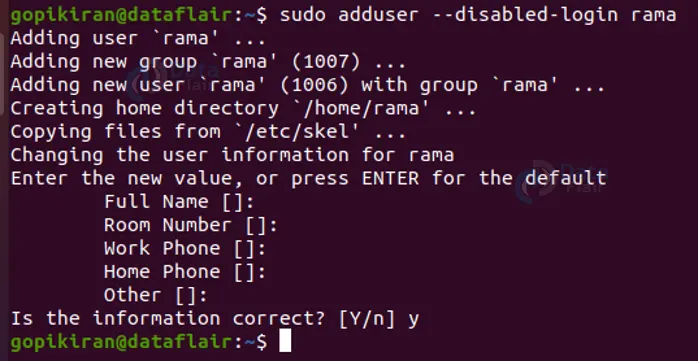
Not setting a password for the new user
In most of the outputs shown above, when we were creating a new user, the system prompted us to create a password for the user, but what if we don’t want to? Well, we can use the option “–disable-login”. Upon using this option, the useradd command automatically skips the part of setting the password. Use the following syntax:
sudo adduser --disables-login <username>
Summary
As you have seen, the adduser command is one of the tools that help in creating new users, and with its various options, we can perform tasks like creating a home directory, assigning a UID and GID to a user, specifying a shell, bypassing password, and so many more.
You have now learned what the adduser command is, why we use it, what happens when we create a new user in Linux, the syntax and options of the useradd command, which command should you use between “useradd” and “adduser”, and 10 beautiful practical examples of the useradd command.
Your opinion matters
Please write your valuable feedback about DataFlair on Google


