Apache Ambari Cluster Setup 2025 – Installing and Configuring
Expert-led Courses: Transform Your Career – Enroll Now
Today, in this Apache Ambari Tutorial, we will discuss Ambari Cluster setup. When it comes to install, configure, and deploy our Ambari cluster, we need to use Ambari Cluster Install Wizard.
Moreover, in this Cluster in Ambari, we will discuss the complete installation process of Ambari. At last, we are able to open Ambari web in our web browser.
So, let’s start Apache Ambari Cluster Tutorial with an intro to Ambari Cluster.
What is Apache Ambari Cluster?
An open-source administration and monitoring solution for Apache Hadoop clusters is called Apache Ambari. It makes it simpler for administrators to set up and run large-scale Hadoop clusters by streamlining the deployment, setup, and management of Hadoop and related services.
A group of linked computers known as nodes that the Apache Ambari programme manages collectively as a cluster. These nodes typically consist of worker nodes that perform data processing tasks, such as DataNodes and NodeManagers, as well as the master nodes in charge of managing the cluster, such as the NameNode in HDFS (Hadoop Distributed File System) and the ResourceManager in YARN (Yet Another Resource Negotiator).
Apache Ambari’s major goal is to give administrators a web-based interface and a RESTful API that let them carry out different cluster administration activities, like:
Cluster Setup: By offering a step-by-step guide for choosing the Hadoop components to be installed and configured, Ambari makes the initial cluster setup simpler.
Configuration Management: This feature enables administrators to control the configuration of Hadoop services by modifying settings in accordance with the needs and scalability of the cluster.
Service Monitoring: Ambari offers in-the-moment monitoring of the cluster’s performance and health, enabling administrators to spot problems and take appropriate action.
Service notifications: The technology may send out notifications in the case of major occurrences or service outages, allowing for proactive monitoring and prompt reaction to possible issues.
Security management: Ambari provides security tools including encryption, authentication, and authorisation to safeguard the cluster’s data and resources.
Service Stacks: Ambari enables users to create unique service stacks, allowing for the cluster’s integration of extra services and parts.
In order to install, configure, and deploy our cluster we can use the Ambari Cluster Install Wizard running in our browser, as follows:
- Start the Ambari Server.
- Log in to Apache Ambari.
- Launch the Ambari Cluster install wizard.
- Name your Cluster in Ambari.
- Select version for Ambari Cluster Setup.
- Install options.
- Confirm hosts.
- Choose services.
- Assign masters.
- Assign slaves and clients.
- Customize services.
- Review.
- Install, start and text.
- Complete.
So, let’s learn all these Cluster Setup steps of Apache Ambari in detail.
Ambari Cluster – Start Ambari Server
In order to start Ambari server, run the following command on the Ambari Server host:
ambari-server start
Further, run the following command to check the Ambari Server processes:
ambari-server status
Then also stop the Ambari Server:
ambari-server stop
Make sure, we must prepare to use an existing database before installing our Hadoop cluster, if we plan to use an existing database instance for Hive or for Oozie.
In addition, Ambari runs a database consistency check looking for issues, on Ambari Server start. Ambari Server start will abort and display the following message if any issues are found: DB configs consistency check failed.
Although, we can also start it by skipping this check by using the below option:
ambari-server start –skip-database-check
By choosing to skip this check, do not make any changes to cluster topology or perform a cluster upgrade until we correct the database consistency issues if we have database issues.
Log in to Apache Ambari
Prerequisites: Make sure Ambari Server must be running.
In order to log in to Ambari Web by using a web browser, steps are:
- First, Point web browser to
http://<your.ambari.server>:8080.
Here, the name of our Ambari server host is <your.ambari.server>.
For instance, a default Ambari server host is located at http://c6401.ambari.apache.org:8080.
- By using the default username/password, Log in to the Ambari Server: admin/admin. Although, it is possible to change these credentials later.
The Ambari Cluster Install wizard exhibits a welcome page, for a new cluster in Ambari.
a. Launch the Ambari Cluster Install Wizard
Further, choose the Launch Install Wizard, from the Ambari welcome page.
Name Your Cluster in Ambari
The steps for naming Ambari Cluster are:
- In order to name our cluster, first, type a name for the cluster we want to create.
- Don’t use white spaces as well as special characters in the name.
- Further, choose next.
Ambari Cluster – Select Version
We will select the software version and method of delivery for our cluster, in this step. We require internet connectivity and configured software in a repository for using a Public Repository.
Selecting Versions in Ambari Cluster
a. Choosing Stack
Ambari attempts to discover what specific version of that Stack is available, while we select a TAB. Refer the table below:
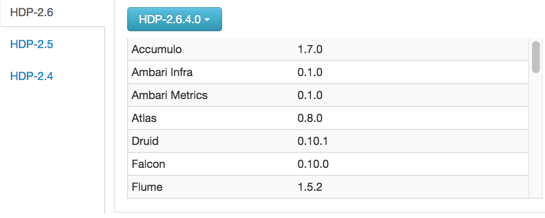
Choosing Stack
b. Choosing Version
The specific Versions will be listed as options in the DROPDOWN, we can choose:
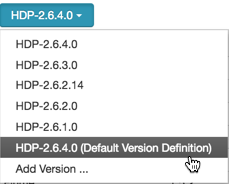
Choosing Version
c. Advanced Options
Advanced repository options are:
- Skip Repository Base URL validation (Advanced):
Ambari will attempt to connect to the repository Base URLs when we click Next, and also validate that we have entered a validate repository. However, an error will display that we must correct before proceeding, if not.
- Use RedHat Satellite/Spacewalk:
Basically, when we plan to use a Local Repository, this option will enable. Make sure, we are responsible for configuring the repository channel in Satellite/Spacewalk and confirming the repositories for the selected stack version are available on the hosts in the cluster when we choose this option for the software repositories.
Ambari Cluster Install Options
The Cluster Install wizard prompts us for general information about how we want to set it up, to build up the cluster. Also, make sure that we need to supply the FQDN of each of our hosts. When we set up password-less SSH, the wizard also needs to access the private key file we created.
In addition, the wizard can locate, access, and interact securely with all hosts in the cluster, by using the host names and key file information.
Steps are:
- Enter the list of hostnames, one per line, in Target Hosts.
To indicate larger sets of hosts, we can use ranges inside brackets.
- Further, we need to select Perform manual registration, if we do not want Ambari to automatically install the Ambari Agents.
- Now, to continue, choose Register and Confirm.
Confirm Hosts in Ambari Cluster
This step helps us to confirm that Ambari has located the correct hosts for our cluster or not. Also, it checks those hosts to ensure that to continue the installation process, they have the correct directories, packages, and processes are not.
Additionally, it is possible to erase them by selecting the appropriate checkboxes and clicking the grey Remove Selected button if any hosts were selected in error. Also, click the small white Remove button in the Action column, to remove a single host.
Although, we may notice a yellow box there which indicates, some warnings were encountered during the check process, at the bottom of the screen.
Moreover, choose next, when we are satisfied with the list of hosts.
Choose Services in Ambari Cluster
We are presented with the choice of Services to install in the cluster, on the basis of Stack chosen during the Select Stack step. Make sure that a Stack comprises many services.
In order to choose the services that we want to deploy, steps are:
- Either, choose all to select all listed services or choose none to clear all selections.
- Further, to define a set of services to install now, choose or clear individual checkboxes.
- Ultimately, choose next, after selecting the services to install now.
Assign Masters in Clusters in Ambari
Steps for it are:
- Select host name from the drop-down menu for that service, in order to change the host assignment for a service.
- Further, click the green – icon next to the host address we want to remove, to remove a ZooKeeper instance.
- Finally, choose Next, when satisfied with the assignments.
Assign Slaves and Clients
There are some slave components in cluster wizard to appropriate hosts in our cluster. For Example NodeManagers, DataNodes, and RegionServers.
Steps are:
- To select all of the hosts in the column or none of the hosts, use all or none, respectively.
- Makes sure, the host is also running one or more master components, if a host has an asterisk next to it. So, to see which master components are on that host, hover the mouse over the asterisk.
- By using the checkboxes next to specific hosts, Fine-tune selections.
- Finally, choose Next, when we are satisfied with our assignments.
Ambari Cluster Customize Services
These are the best services as the steps present us a set of tabs which helps to review and modify our cluster setup.

Ambari Cluster Customize Services.
a. Directories
On the basis of mount points available in our environment, Ambari chooses reasonable defaults. Yet we are strongly encouraged to review the default directory settings recommended by Ambari.
b. Service Account Users and Groups
The service account users and groups are the operating system. It accounts for the service components that will run as Ambari will automatically create the users and groups locally on the hosts if these users do not exist on our hosts. Moreover, Ambari will use those accounts, if these users already exist.
Although, we might not allow group mod or user mode operations, depending on how our environment is configured. Also, we must be sure all users and groups are already created.
Along with it, we must be sure to select the Skip group modifications option on the Misc tab, if this is the case. It says to Ambari to not modify group membership for the service users.
So, choose next, after Customizing Services.
Review of Ambari Cluster
Basically, the step review shows the assignments we have made. Also, we can Check to ensure that everything is correct. Further, we can use the left navigation bar to return to the appropriate screen, if we need to make changes.
Then choose print, to print the information for later reference.
Moreover, choose to deploy, when we are satisfied with our choices.
Install, Start and Test
Well, at this step we can see the progress of the installation process on the screen. So, Ambari installs, starts, as well as runs a simple test on each component. And, at the top of the screen in the progress bar, the overall status of the process displays and in the main section, host-by-host status displays.
Although make sure, during this process, we can not refresh the browser it may interrupt the progress indicators.
Further, click the link in the message column for the appropriate host, to see specific information on what tasks have been completed per host. Also click the individual task to see the related log files, in the tasks pop-up.
By using the Show drop-down list, we can select filter conditions. Click open or to copy the contents to the clipboard, use copy, to see a larger version of the log contents.
Choose next, when successfully installed and started the services appears.
Completion of Cluster Setup
Ultimately, the summary page offers us a summary list of the accomplished tasks. So, choose complete. And, in this way, Ambari Web opens in our web browser.
So, this was all in the Apache Ambari Cluster. Hope you like our explanation.
Conclusion: Ambari Cluster
Hence, in this Apache Ambari Cluster tutorial, we have seen a detailed description on how to Install, Configure, and Deploy Apache Ambari Cluster.
Moreover, we discussed every step in detail to understand the Ambari Cluster setup in one go. Hope it helps! Please share your experience on Cluster in Ambari, your feedback is valuable to us.
Did we exceed your expectations?
If Yes, share your valuable feedback on Google


