Flask-Mail Extension
Job-ready Online Courses: Dive into Knowledge. Learn More!
Flask-Mail is an extension for Flask that provides a simple interface to send emails from your Flask application. With Flask-Mail, you can send email notifications to users, send newsletters, or any other kind of email communication from your Flask application.
Installation and Configuration of Flask Mail
pip install Flask-Mail
After installation, you can configure Flask-Mail in your Flask application using the following configuration variables:
app.config['MAIL_SERVER'] = 'smtp.gmail.com'
app.config['MAIL_PORT'] = 465
app.config['MAIL_USE_SSL'] = True
app.config['MAIL_USERNAME'] = '[email protected]'
app.config['MAIL_PASSWORD'] = 'your-email-password'
Creating an Email Message:
To create an email message, you need to import the Message class from the flask_mail module. Then, you can create a new message object and set its properties like sender, recipient, subject, body, etc.
from flask_mail import Message

msg = Message('Hello', sender='[email protected]', recipients=['[email protected]'])
msg.body = "Hello, This is a test email from Flask-Mail"
Sending Email using Flask-Mail Extension:
To send an email using Flask-Mail, you need to import the Mail class from the flask_mail module and create a mail object. Then, you can call the send() method on the mail object to send the email.
from flask_mail import Mail

mail = Mail(app)

mail.send(msg)
Handling Email Errors:
If there is any error while sending the email, Flask-Mail will raise an exception. This helps us to catch exceptions and handle the error accordingly.
try:
    mail.send(msg)
    return 'Email sent successfully'
except Exception as e:
    return str(e)
Here are some common use cases for Flask-Mail:
1. Sending password reset emails to users
2. Sending email notifications to users on specific events like registration, purchase, etc.
3. Sending newsletters to subscribers
4. Sending automated email responses
Flask-Mail provides various configuration options to customize the email sending process like changing the email server, port, SSL, TLS, and authentication method.
Here is an example configuration for using the Gmail SMTP server:
app.config['MAIL_SERVER'] = 'smtp.gmail.com'
app.config['MAIL_PORT'] = 465
app.config['MAIL_USE_SSL'] = True
app.config['MAIL_USERNAME'] = '[email protected]'
app.config['MAIL_PASSWORD'] = 'your-email-password'
To use Flask-Mail in your Flask application, you need to create a mail object and initialize it with your Flask application:
from flask import Flask
from flask_mail import Mail

app = Flask(__name__)
app.config['SECRET_KEY'] = 'your-secret-key'

# configure Flask-Mail
app.config['MAIL_SERVER'] = 'smtp.gmail.com'
app.config['MAIL_PORT'] = 465
app.config['MAIL_USE_SSL'] = True
app.config['MAIL_USERNAME'] = '[email protected]'
app.config['MAIL_PASSWORD'] = 'your-email-password'

# create a mail object
mail = Mail(app)
Now, you can create an email message using the Message class and send it using the send() method of the Mail object:
from flask_mail import Message

msg = Message('Hello', sender='[email protected]', recipients=['[email protected]'])
msg.body = "Hello, This is a test email from Flask-Mail"

mail.send(msg)
You can also customize the email message by adding attachments or using HTML content:
from flask_mail import Message

msg = Message('Hello', sender='[email protected]', recipients=['[email protected]'])
msg.body = "Hello, This is a test email from Flask-Mail"
msg.html = "<p>Hello,<br>This is a test email from <b>Flask-Mail</b></p>"
with app.open_resource("path/to/image.png") as fp:
    msg.attach("image.png", "image/png", fp.read())

mail.send(msg)
In case of any error while sending the email, Flask-Mail will raise an exception. You can catch this exception and handle the error accordingly:
from flask_mail import Message, Mail, BadHeaderError
from flask import render_template

@app.route('/send-mail')
def send_mail():
    try:
        msg = Message("Hello", sender="[email protected]", recipients=["[email protected]"])
        msg.body = "Hello, This is a test email from Flask-Mail"
        mail.send(msg)
        return "Email sent successfully"
    except BadHeaderError as e:
        return str(e)
In the above example, we are catching the BadHeaderError exception, which is raised when the email message contains invalid headers.
Here are some additional features of Flask-Mail:
1. Support for multiple email recipients and CC/BCC fields
2. Built-in support for plain text and HTML email messages
3. Support for sending email messages with attachments
4. Support for adding custom email headers
5. Email authentication support for SMTP servers
6. Integration with Flask’s error handling mechanism to handle email delivery errors
7. Configurable email throttling to prevent abuse of the email server
Flask-Mail offers various configuration options to customize the email sending process. These options include the email server’s hostname, port number, encryption protocol, authentication method, and timeout settings. With these configuration options, you can easily adapt the email sending process to fit your needs and preferences.
Here is an example of how to configure Flask-Mail to use a Gmail SMTP server:
app.config['MAIL_SERVER'] = 'smtp.gmail.com'
app.config['MAIL_PORT'] = 587
app.config['MAIL_USE_TLS'] = True
app.config['MAIL_USERNAME'] = '[email protected]'
app.config['MAIL_PASSWORD'] = 'your-email-password'
With Flask-Mail, you can easily create and send email messages using the Message class. Here is an example of how to create and send a plain text email message:
from flask_mail import Message

msg = Message('Hello', sender='[email protected]', recipients=['[email protected]'])
msg.body = "This is a DataFlair Mail"
mail.send(msg)
You can also send HTML email messages using Flask-Mail:
from flask_mail import Message

msg = Message('Hello', sender='[email protected]', recipients=['[email protected]'])
msg.html = "<p>Hello, This is a test email from <b>Flask-Mail</b></p>"
mail.send(msg)
Flask-Mail also supports sending email messages with attachments. Here is an example of how to send an email message with an attachment:
from flask_mail import Message
from flask import Flask

app = Flask(__name__)
app.config['MAIL_SERVER'] = 'smtp.gmail.com'
app.config['MAIL_PORT'] = 587
app.config['MAIL_USE_TLS'] = True
app.config['MAIL_USERNAME'] = '[email protected]'
app.config['MAIL_PASSWORD'] = 'your-email-password'
app.config['MAIL_DEFAULT_SENDER'] = '[email protected]'

mail = Mail(app)

with app.open_resource('path/to/attachment.pdf') as pdf:
    msg = Message('Attachment Test', recipients=['[email protected]'])
    msg.body = "Hello, This is a test email from Flask-Mail with an attachment"
    msg.attach('attachment.pdf', 'application/pdf', pdf.read())
    mail.send(msg)
In addition, Flask-Mail provides integration with Flask’s error handling mechanism to handle email delivery errors. You can configure Flask-Mail to send email notifications to a designated email address when an email delivery error occurs. Here is an example of how to configure Flask-Mail to send error emails:
from flask_mail import Mail
from flask import Flask
from logging.handlers import SMTPHandler

app = Flask(__name__)
app.config['MAIL_SERVER'] = 'smtp.gmail.com'
app.config['MAIL_PORT'] = 587
app.config['MAIL_USE_TLS'] = True
app.config['MAIL_USERNAME'] = '[email protected]'
app.config['MAIL_PASSWORD'] = 'your-email-password'
app.config['MAIL_DEFAULT_SENDER'] = '[email protected]'
app.config['MAIL_ERROR_SENDER'] = '[email protected]'
app.config['MAIL_ERROR_RECIPIENT'] = '[email protected]'

mail = Mail(app)

if not app.debug:
    # Configure the SMTP handler to send error emails
    auth = (app.config['MAIL_USERNAME'], app.config['MAIL_PASSWORD'])
    secure = () if app.config['MAIL_USE_TLS'] else None
    mail_handler = SMTPHandler(
        mailhost=(app.config['MAIL_SERVER'], app.config['MAIL_PORT']),
        fromaddr=app.config['MAIL_ERROR_SENDER'],
        toaddrs=[app.config['MAIL_ERROR_RECIPIENT']],
        subject='Application Error',
        credentials=auth,
        secure=secure
    )
    mail_handler.setLevel(logging.ERROR)
    app.logger.addHandler(mail_handler)
Bulk Emails using Flask
With the help of the strong and adaptable Flask-Mail extension, developers can quickly deliver emails from their web applications. One of Flask-many Mail’s advantages is that it supports a wide range of email servers and protocols, making it a fantastic option for coders who need to collaborate with a number of email providers.
When you need to send a lot of emails at once, Flask-Mail can be especially helpful in a variety of situations. For instance, you might need to deliver a batch of password reset requests or an update to your newsletter to all of your users.
Use Flask-mail.connect() Mail’s method to send a big number of emails all at once. When all the messages have been sent, this technique automatically closes the connection to your email host while maintaining it open. Here’s an illustration:
from flask import Flask
from flask_mail import Mail, Message

app = Flask(__name__)
app.config['MAIL_SERVER'] = 'smtp.gmail.com'
app.config['MAIL_PORT'] = 465
app.config['MAIL_USE_SSL'] = True
app.config['MAIL_USERNAME'] = '[email protected]'
app.config['MAIL_PASSWORD'] = 'yourpassword'

mail = Mail(app)

with mail.connect() as conn:
    for user in users:
        message = '...'
        subject = "hello, %s" % user.name
        msg = Message(recipients=[user.email],
                      body=message,
                      subject=subject)

        conn.send(msg)
The quantity of emails that can be sent through a single link may be restricted by some mail servers. By selecting the MAIL MAX EMAILS setting, you can determine how many emails can be sent before disconnecting.
Additionally, Flask-Mail offers a variety of configuration choices to let you alter how emails are sent. You can configure the email server’s hostname, port number, encryption scheme, login strategy, and timeout, for instance. Using the following example, you can select these options:
app.config['MAIL_SERVER'] = 'smtp.gmail.com'
app.config['MAIL_PORT'] = 465
app.config['MAIL_USE_SSL'] = True
app.config['MAIL_USERNAME'] = '[email protected]'
app.config['MAIL_PASSWORD'] = 'yourpassword'
app.config['MAIL_DEFAULT_SENDER'] = '[email protected]'
app.config['MAIL_MAX_EMAILS'] = 5
app.config['MAIL_ASCII_ATTACHMENTS'] = False
You can fine-tune the email sending process to satisfy the unique requirements of your application by customising these configuration options.
For developers who need to send emails from their web apps, Flask-Mail is a great option. Flask-Mail offers a flexible and user-friendly API that makes it straightforward to complete the task whether you need to send one email or a batch of hundreds.
Attachments
Flask makes it simple to create web applications rapidly. Sending emails is one of the most crucial aspects of any web application, and Flask makes it simple with its built-in support for Flask-Mail.
You can read the contents of a file using Flask’s open resource function and then give the contents to the attach method of the Message object to add attachments to your emails. Here’s an illustration:
from flask import Flask, render_template
from flask_mail import Mail, Message

app = Flask(__name__)
app.config['MAIL_SERVER'] = 'smtp.gmail.com'
app.config['MAIL_PORT'] = 465
app.config['MAIL_USE_SSL'] = True
app.config['MAIL_USERNAME'] = '[email protected]'
app.config['MAIL_PASSWORD'] = 'your-email-password'

mail = Mail(app)

@app.route('/send-mail')
def send_mail():
    with app.open_resource('image.png') as fp:
        msg = Message('Test Email with Attachment',
                      sender='[email protected]',
                      recipients=['[email protected]'])
        msg.body = 'This is a test email with an attachment.'
        msg.attach('image.png', 'image/png', fp.read())
        mail.send(msg)
    return 'Mail sent successfully!'

if __name__ == '__main__':
    app.run(debug=True)
In this illustration, we’ll open the image.png file and read its information using the open resource function. The contents are then sent to the Message object’s attach function to be added as an attachment to the email. Finally, we transmit the email by using the Mail object’s send method.
It’s important to note that you might need to adjust the MAIL ASCII ATTACHMENTS configuration variable to True if you’re using a mail relay that changes the content of your email. To prevent problems with non-ASCII characters, this will change the filenames of your attachments to their equivalents in ASCII.
Finally, using Flask’s built-in attach and open resource functions makes adding attachments to emails a quick and easy procedure.
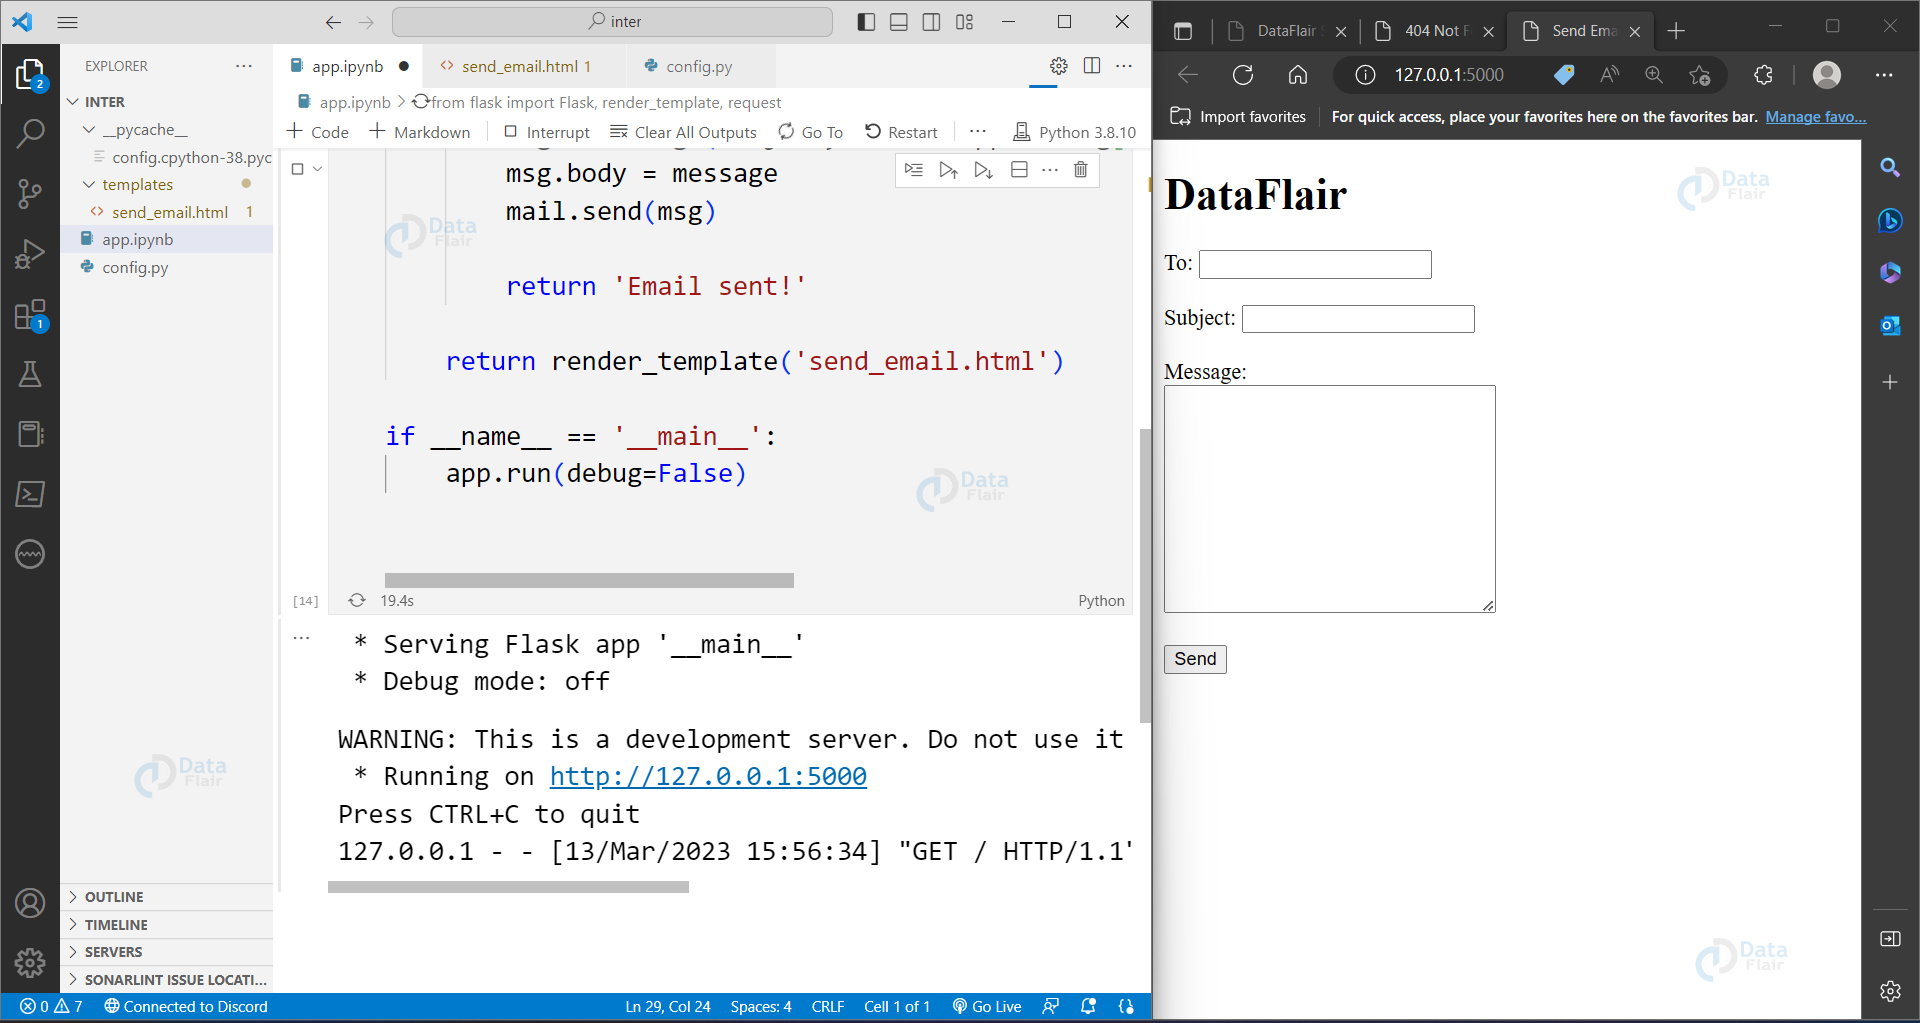
Example code for mail sending:
app.py:
from flask import Flask, render_template, request
from flask_mail import Mail, Message
from config import Config


app = Flask(__name__)
app.config.from_object(Config)
mail = Mail(app)


@app.route('/')
def index():
    return render_template('send_email.html')


@app.route('/send_email', methods=['GET', 'POST'])
def send_email():
    if request.method == 'POST':
        to = request.form['to']
        subject = request.form['subject']
        message = request.form['message']

        msg = Message(subject, sender=app.config['MAIL_USERNAME'], recipients=[to])
        msg.body = message
        mail.send(msg)

        return 'Email sent!'

    return render_template('send_email.html')


if __name__ == '__main__':
    app.run(debug=False)
config.py:
class Config:
    MAIL_SERVER = 'smtp.gmail.com'
    MAIL_PORT = 465
    MAIL_USE_SSL = True
    MAIL_USERNAME = '[email protected]'
    MAIL_PASSWORD = 'your_email_password'
send_email.html:
<!DOCTYPE html>
<html>
  <head>
    <title>Send Email</title>
  </head>
  <body>
    <h1>DataFlair</h1>
    <form action="/send_email" method="post">
      <label for="to">To:</label>
      <input type="email" name="to" required><br><br>
      <label for="subject">Subject:</label>
      <input type="text" name="subject" required><br><br>
      <label for="message">Message:</label><br>
      <textarea name="message" rows="10" cols="30" required></textarea><br><br>
      <input type="submit" value="Send">
    </form>
  </body>
</html>
Conclusion
In conclusion, we can say that Flask-Mail is a valuable extension for Flask applications that need to send email messages. Flask-Mail simplifies the process of sending emails and handling delivery errors. It has an easy-to-use API and supports multiple email servers and protocols.
Flask-Mail integrates seamlessly with Flask’s error handling mechanism. With Flask-Mail, you can send various types of emails such as user verification, password reset requests, or newsletter updates. It can help you streamline the email sending process and improve the overall email communication of your application. So, if you’re looking for a reliable and efficient way to send email messages in Flask, consider using Flask-Mail.
Your 15 seconds will encourage us to work even harder
Please share your happy experience on Google