Swift E-Learning App – Break Barriers, Achieve Excellence
Interactive Online Courses: Elevate Skills & Succeed Enroll Now!
Welcome to this project on building an E-learning app using SwiftUI. In this project, we’ll walk you through the process of creating a simple E-learning app that allows users to browse different courses and view videos within those courses. By the end of this project, you’ll have a functional E-learning app that you can customize and enhance according to your needs.
About Swift E-Learning App Project
The objective of this project is to create an E-learning app that provides a user-friendly interface for browsing courses and watching videos. The app will utilize SwiftUI for building the user interface and will incorporate features like thumbnail images, video lists, and a video player using the WebView component.
Prerequisites for E-Learning App using Swift Project
Before we begin, make sure you have the following:
- Xcode installed on your machine (version 13.0 or later)
- Basic knowledge of SwiftUI and the Swift programming language
Download Swift E-Learning App Project
Please download the source code of Swift E-Learning App Project: Swift E-Learning App Project Code.
Steps to Create an E-Learning App Project Using Swift
Step 1: Create a new SwiftUI project in Xcode.
Step 2: Create a Model to store Course and Videos data.
Step 3: Designing the CourseRowView view.
Step 4: Designing the CourseListView view
Step 5: Designing the VideoRowView view.
Step 6: Designing the VideoListView view
Step 7: Designing the VideoPlayerView view
Step 8: Creating the WebView
Step 9: Creating View Model for loading Courses
Step 10: Integrating the ContentView with CourseListView
Step 1: Create a new SwiftUI project in Xcode.
a. Open Xcode and Click on the “Create a new Xcode Project” option.

b. Now select the platform as “iOS” and the application type as “App”.
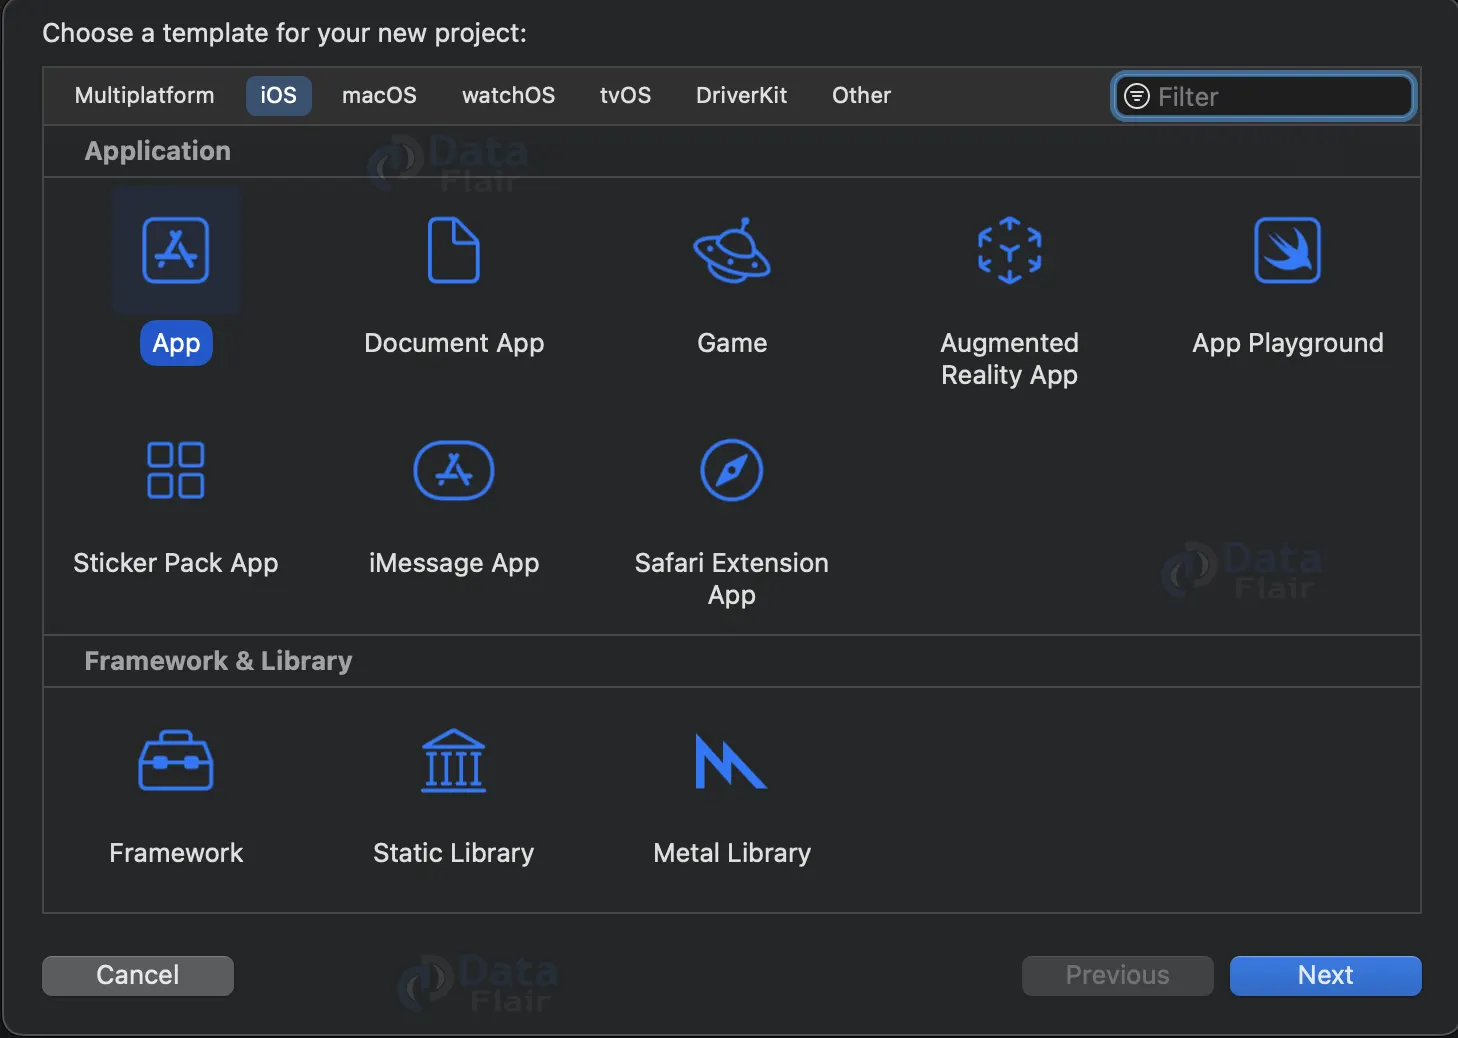
c. Now, Enter the name of the app, and organization identifier, and select SwiftUI interface for building the UI of the app. Also, select Swift as the language for creating the app.

d. Select the folder where you want to save the app and click on Create.
e. Now your project is ready for development, and you will see something like below.

Step 2: Create a Model to store Course and Videos data.
a. Create a new swift file called “Model.swift”.
b. This file defines the data models used in the app, namely Course and Video.
c. The Course struct represents a course and contains properties like course_thumbnail, course_name, and course_videos.
d. The Video struct represents a video within a course and contains properties like video_link, video_thumbnail, and video_title.
import Foundation


struct Course: Codable {
    let course_thumbnail: String
    let course_name: String
    let course_videos: [Video]
}
struct Video: Codable {
    let video_link: String
    let video_thumbnail: String
    let video_title: String
}
Step 3: Designing the CourseRowView view.
This view will display a single course item in a list format, including the thumbnail and name.
a. Create a new swift view file called “CourseRowView.swift”.
b. This file contains the CourseRowView view, which represents a single course in the course list.
c. The view displays the course’s thumbnail image, name, and other relevant details.
d. The CachedAsyncImage component is used to asynchronously load and cache the course thumbnail image.
import SwiftUI
import CachedAsyncImage


struct CourseRowView: View {
    let course: Course

    var body: some View {
        VStack(alignment: .leading) {
            Spacer(minLength: 5)
            CachedAsyncImage(url: URL(string: course.course_thumbnail),transaction: Transaction(animation: .easeInOut)) { phase in
                if let image = phase.image {
                    image
                        .resizable()
                        .scaledToFit()
                        .clipShape(RoundedRectangle(cornerRadius: 10))
                        .transition(.opacity)
                } else {
                    HStack {
                        Spacer()
                        Image(systemName: "photo")
                            .imageScale(.large)
                        Spacer()
                    }
                }
            }
            Text(course.course_name)
                .font(.headline)
            Spacer(minLength: 2)

        }
    }
}
Step 4: Designing the CourseListView view
This view will display all the course items in a list format.
a. Create a new swift view file called “CourseListView.swift”.
b. This file contains the CourseListView view, which displays a list of courses.
c. The CourseListView view is embedded in a NavigationView and shows a list of courses using the SwiftUI List view.
d. Each course in the list is represented by a CourseRowView view.
e. Tapping on a course navigates the user to the VideoListView view, passing the corresponding course’s videos.
import SwiftUI


struct CourseListView: View {
    @ObservedObject var viewModel: CourseViewModel

    var body: some View {
        NavigationView {
            List(viewModel.courses, id: \.course_name) { course in
                NavigationLink(destination: VideoListView(videos: course.course_videos)) {
                    CourseRowView(course: course)
                }
            }
            .navigationBarTitle("Courses")
        }
    }
}
Step 5: Designing the VideoRowView view.
This view will display a single video item in a list format, including the thumbnail and name.
a. Create a new swift view file called “VideoRowView.swift”.
b. This file contains the VideoRowView view, which represents a single video in the video list.
c. The view displays the video’s thumbnail image, title, and eye icon, indicating whether the video has been watched or not.
d. The eye icon’s color is determined based on the value stored in UserDefaults.
e. Tapping on a video row marks the video as watched by updating the corresponding value in UserDefaults.
import SwiftUI
import CachedAsyncImage


struct VideoRowView: View {
    let video: Video

    var body: some View {
        VStack(alignment: .leading) {
            Spacer(minLength: 5)
            CachedAsyncImage(url: URL(string: video.video_thumbnail),transaction: Transaction(animation: .easeInOut)) { phase in
                if let image = phase.image {
                    image
                        .resizable()
                        .scaledToFit()
                        .clipShape(RoundedRectangle(cornerRadius: 10))
                        .transition(.opacity)
                } else {
                    HStack {
                        Spacer()
                        Image(systemName: "photo")
                            .imageScale(.large)
                        Spacer()
                    }
                }
            }
            HStack{
                Text(video.video_title)
                    .font(.headline)
                    .multilineTextAlignment(.leading)

                Image(systemName: UserDefaults.standard.bool(forKey: video.video_title) ? "eye.fill" : "eye.slash.fill")
                    .foregroundColor(UserDefaults.standard.bool(forKey: video.video_title) ? .green : .red)
                    .frame(alignment: .trailing)
                    .scaledToFit()

            }
        }
        .onAppear {
            if !UserDefaults.standard.bool(forKey: video.video_title) {
                UserDefaults.standard.set(false, forKey: video.video_title)
            }
        }
        .onTapGesture {
            UserDefaults.standard.set(true, forKey: video.video_title)
        }
    }
}
Step 6: Designing the VideoListView view
This view will display all the video items in a list format.
a. Create a new swift view file called “VideoRowView.swift”.
b. This file contains the VideoListView view, which displays a list of videos for a selected course.
c. Similar to the CourseListView, the VideoListView is embedded in a NavigationView and uses the SwiftUI List view to show the videos.
d. Each video in the list is represented by a VideoRowView view.
e. Tapping on a video navigates the user to the VideoPlayerView view, passing the video link and title.
import SwiftUI


struct VideoListView: View {
    let videos: [Video]

    var body: some View {
        List(videos, id: \.video_title) { video in
            NavigationLink(destination: VideoPlayerView(videoLink: video.video_link, title: video.video_title)) {
                VideoRowView(video: video)
            }
        }
        .navigationBarTitle("Videos")
    }
}
Step 7: Designing the VideoPlayerView view
a. Create a new swift view file called “VideoRowView.swift”.
b. This file contains the VideoPlayerView view, which displays the web view to play the selected video.
c. The WebView component is used to load the video link and show it in the web view.
d. The video’s title is displayed in the navigation bar.
import SwiftUI


struct VideoPlayerView: View {
    let videoLink: String
    let title: String

    var body: some View {
        WebView(urlString: videoLink)
            .navigationBarTitle(title)
    }
}
Step 8: Creating the WebView
a. Create a new swift view file called “VideoRowView.swift”.
b. This file contains the WebView struct, which is a UIViewRepresentable that wraps the WKWebView component.
c. The WebView struct is responsible for loading the provided URL string into the web view.
import SwiftUI
import WebKit


struct WebView: UIViewRepresentable {
    let urlString: String

    func makeUIView(context: Context) -> WKWebView {
        guard let url = URL(string: urlString) else {
            return WKWebView()
        }
        let request = URLRequest(url: url)
        let webView = WKWebView()
        webView.load(request)
        return webView
    }

    func updateUIView(_ uiView: WKWebView, context: Context) {

    }
}
Step 9: Creating View Model for loading Courses
a. Create a new swift file called “CourseViewModel.swift”.
b. This file contains the CourseViewModel class, which is responsible for loading the course data from a JSON file.
c. The CourseViewModel class is an ObservableObject that publishes the loaded courses using the @Published property wrapper.
d. The course data is loaded from the courses.json file included in the app bundle.
import Foundation


class CourseViewModel: ObservableObject {
    @Published var courses: [Course] = []

    init() {
        if let url = Bundle.main.url(forResource: "courses", withExtension: "json") {
            do {
                let data = try Data(contentsOf: url)
                let decoder = JSONDecoder()
                self.courses = try decoder.decode([Course].self, from: data)
            } catch {
                print("Error decoding JSON: \(error)")
            }
        }
    }
}
Step 10: Integrating the ContentView with CourseListView
a. Open “ContentView.swift” file.
b. Inside the ContentView struct, create an instance of the CourseViewModel and
pass it in the CourseListView inside the ContentView view.
import SwiftUI


struct ContentView: View {
    let viewModel = CourseViewModel()

    var body: some View {
        CourseListView(viewModel: viewModel)
    }
}
struct ContentView_Previews: PreviewProvider {
    static var previews: some View {
        ContentView()
    }
}
Output
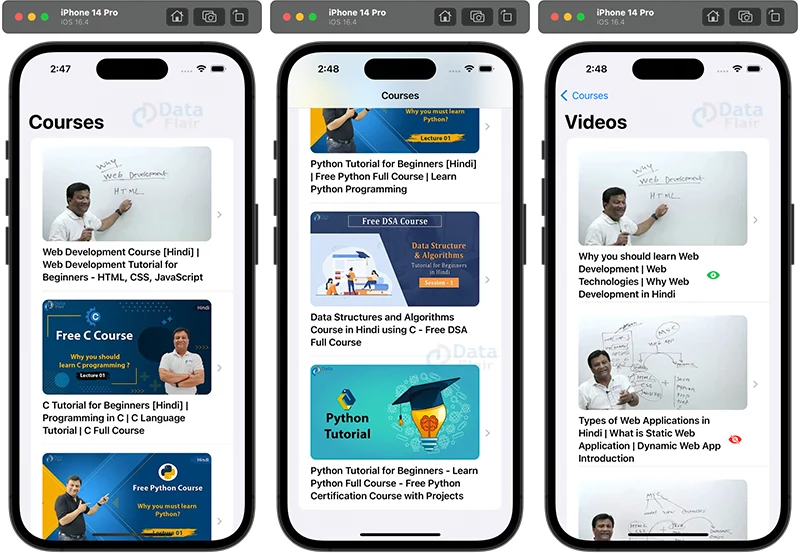

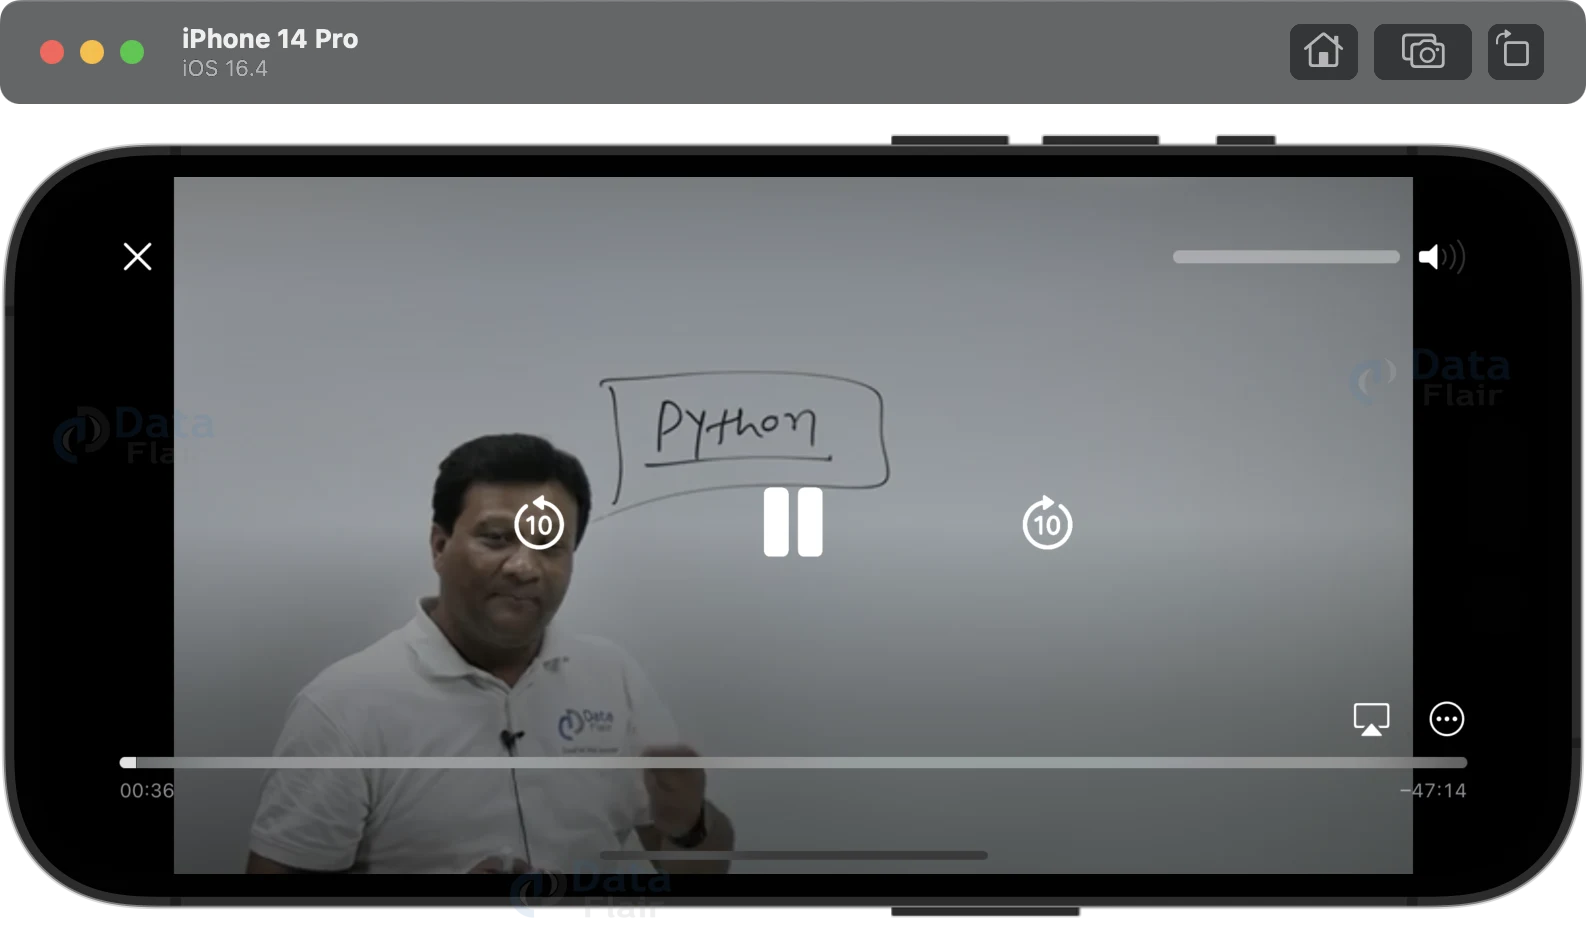
Summary
Congratulations! You have successfully created an E-learning app using SwiftUI. You’ve learned how to build the user interface, navigate between views, display thumbnail images, and play videos using the WebView component. This is just the beginning, and you can continue to enhance the app by adding more features based on your needs. Keep exploring SwiftUI and have fun building amazing E-learning experiences!
If you are Happy with DataFlair, do not forget to make us happy with your positive feedback on Google