Swift Cab Booking App – Ride with Ease, Book with Confidence
Placement-ready Online Courses: Your Passport to Excellence - Start Now
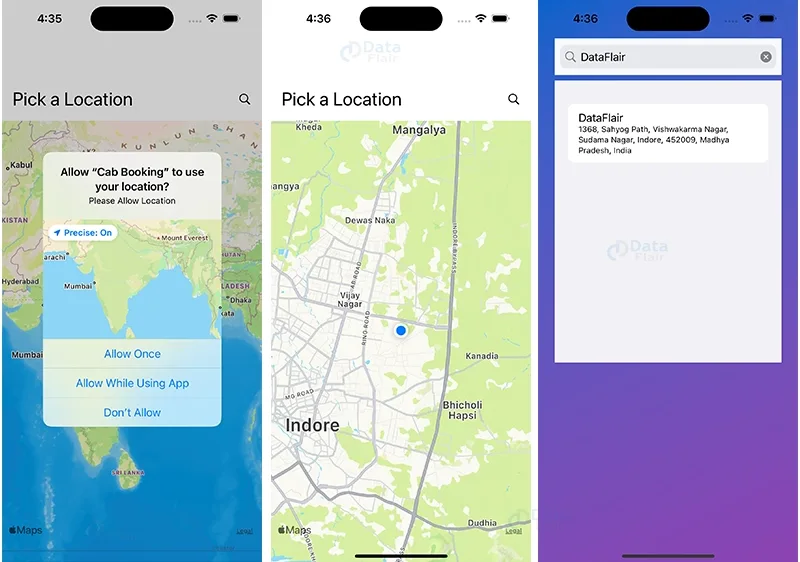
In this project, we will learn how to create a Cab Booking app using SwiftUI and Firebase Firestore. The app will allow users to book a cab by selecting their source and destination locations on a map. We will use MapKit for location and map services and Firebase Firestore to store the booking details.
About Swift Cab Booking App Project
The objective of this project is to create a fully functional Cab Booking app that allows users to book cabs by selecting source and destination locations on a map. The app will store the booking details in Firebase Firestore.
Prerequisites for Cab Booking App Project using Swift
To follow along with this project, you need the following:
- Xcode 12 or later installed on your Mac.
- Basic knowledge of SwiftUI and Swift programming language.
- An active Firebase account and a new Firestore project set up.
Download Swift Cab Booking App Project
Please download the source code of Swift Cab Booking App from the following link: Swift Cab Booking App Project Code.
Steps to Create a Cab Booking App Project Using Swift
Step 1: Create a new SwiftUI project in Xcode.
Step 2: Set Up Firebase Firestore
Step 3: Designing the MapView
Step 4: Designing the SearchView
Step 5: Designing the BookedView
Step 6: Designing the Loader View
Step 7: Designing the Home View
Step 8: Connecting Views in ContentView
Step 1: Create a new SwiftUI project in Xcode.
a. Open Xcode and click on the “Create a new Xcode Project” option.

b. Now select the platform as “iOS” and the application type as “App”.

c. Now, Enter the name of the app, and organization identifier, and select SwiftUI interface for `building the UI of the app. Also, select Swift as a language for creating the app.

d. Select the folder where you want to save the app and click on Create.

e. Now your project is ready for development, and you will see something like below.

Step 2: Set Up Firebase Firestore
a. Go to the Firebase console and create a new project.

b. Complete All the Steps in the order it guides you to complete

c. After Completing all the tasks, your project in Xcode will look like this.

d. Enable Firestore for your project by selecting the Firestore Database in then following the guide. Now your Firestore will be created and will look like below.

Make sure you have the necessary Firebase configurations added to your Xcode project.
Step 3: Designing the MapView
a. Create a new Swift file called “MapView.swift” in your project.
b. Define a SwiftUI view named MapView as given below code.
import SwiftUI
import MapKit
import CoreLocation
struct MapView : UIViewRepresentable {

    // Create a coordinator to handle interactions between the MapView and the rest of the app
    func makeCoordinator() -> Coordinator {
        return MapView.Coordinator(parent1: self)
    }

    // Bindings to various properties that are used to update the UI
    @Binding var map : MKMapView
    @Binding var manager : CLLocationManager
    @Binding var alert : Bool
    @Binding var source : CLLocationCoordinate2D!
    @Binding var destination : CLLocationCoordinate2D!
    @Binding var name : String
    @Binding var distance : String
    @Binding var time : String
    @Binding var show : Bool

    // Create the initial MapView
    func makeUIView(context: Context) ->  MKMapView {
        // Set up the delegate and gesture recognizer
        map.delegate = context.coordinator
        manager.delegate = context.coordinator
        map.showsUserLocation = true
        let gesture = UITapGestureRecognizer(target: context.coordinator, action: #selector(context.coordinator.tap(ges:)))
        map.addGestureRecognizer(gesture)
        return map
    }

    // Update the MapView
    func updateUIView(_ uiView:  MKMapView, context: Context) {
    }

    // The coordinator handles interactions between the MapView and the rest of the app
    class Coordinator : NSObject,MKMapViewDelegate,CLLocationManagerDelegate{

        var parent : MapView

        init(parent1 : MapView) {
            parent = parent1
        }

        // Handle changes to the user's location authorization status
        func locationManager(_ manager: CLLocationManager, didChangeAuthorization status: CLAuthorizationStatus) {
            if status == .denied{
                self.parent.alert.toggle()
            }
            else{
                self.parent.manager.startUpdatingLocation()
            }
        }

        // Handle updates to the user's location
        func locationManager(_ manager: CLLocationManager, didUpdateLocations locations: [CLLocation]) {
            let region = MKCoordinateRegion(center: locations.last!.coordinate, latitudinalMeters: 10000, longitudinalMeters: 10000)
            self.parent.source = locations.last!.coordinate
            self.parent.map.region = region
        }

        // Handle taps on the MapView
        @objc func tap(ges: UITapGestureRecognizer){
            let location = ges.location(in: self.parent.map)
            let mplocation = self.parent.map.convert(location, toCoordinateFrom: self.parent.map)

            // Create a point annotation for the destination
            let point = MKPointAnnotation()
            point.subtitle = "Destination"
            point.coordinate = mplocation

            // Update the destination and name properties
            self.parent.destination = mplocation
            let decoder = CLGeocoder()
            decoder.reverseGeocodeLocation(CLLocation(latitude: mplocation.latitude, longitude: mplocation.longitude)) { (places, err) in
                if err != nil{
                    print((err?.localizedDescription)!)
                    return
                }
                self.parent.name = places?.first?.name ?? ""
                point.title = places?.first?.name ?? ""
                self.parent.show = true
            }

            // Calculate the directions between the source and destination
            let req = MKDirections.Request()
            req.source = MKMapItem(placemark: MKPlacemark(coordinate: self.parent.source))
            req.destination = MKMapItem(placemark: MKPlacemark(coordinate: mplocation))
            let directions = MKDirections(request: req)
            directions.calculate { (dir, err) in
                if err != nil{
                    print((err?.localizedDescription)!)
                    return
                }

                // Update the distance and time properties
                let polyline = dir?.routes[0].polyline
                let dis = dir?.routes[0].distance as! Double
                self.parent.distance = String(format: "%.1f", dis / 1000)
                let time = dir?.routes[0].expectedTravelTime as! Double
                self.parent.time = String(format: "%.1f", time / 60)

                // Add the polyline to the map
                self.parent.map.removeOverlays(self.parent.map.overlays)
                self.parent.map.addOverlay(polyline!)
                self.parent.map.setRegion(MKCoordinateRegion(polyline!.boundingMapRect), animated: true)
            }

            // Add the point annotation to the map
            self.parent.map.removeAnnotations(self.parent.map.annotations)
            self.parent.map.addAnnotation(point)
        }

        // Render the polyline on the map
        func mapView(_ mapView: MKMapView, rendererFor overlay: MKOverlay) -> MKOverlayRenderer {
            let over = MKPolylineRenderer(overlay: overlay)
            over.strokeColor = .red
            over.lineWidth = 3
            return over
        }
    }
}- The MapView struct is a UIViewRepresentable that wraps the MKMapView from MapKit to be used as a SwiftUI view.
- It defines several @Binding properties that allow communication between the SwiftUI view and the underlying MKMapView.
- The makeUIView function creates and configures the MKMapView instance.
- The updateUIView function is called when the view needs to be updated.
- The Coordinator class acts as the delegate for the MKMapView and CLLocationManager and handles various events and user interactions.
Step 4: Designing the SearchView
a. Create a new Swift file called “SearchView.swift” in your project.
b. Define a SwiftUI view named SearchView as given below code.
import SwiftUI
import CoreLocation
import MapKit
struct SearchView: View {

    // State and Binding properties used in the view
    @State var result : [SearchData] = []
    @Binding var show : Bool
    @Binding var map : MKMapView
    @Binding var source : CLLocationCoordinate2D!
    @Binding var destination : CLLocationCoordinate2D!
    @Binding var name : String
    @Binding var distance : String
    @Binding var time : String
    @State var txt = ""
    @Binding var detail : Bool

    var body: some View {

        // A ZStack is used to layer views on top of each other
        ZStack {

            // A gradient background color is added to the ZStack
            LinearGradient(gradient: Gradient(colors: [.blue, .purple]), startPoint: .topLeading, endPoint: .bottomTrailing)
                .edgesIgnoringSafeArea(.all)

            // A GeometryReader is used to get the size of the screen
            GeometryReader{_ in

                // A VStack is used to stack views vertically
                VStack{

                    // A custom SearchBar view is added to the VStack
                    SearchBar(map: self.$map, source: self.$source, destination: self.$destination, result: self.$result, name: self.$name, distance: self.$distance, time: self.$time,txt: self.$txt)

                    // If there is text in the search bar, a list of search results is displayed
                    if self.txt != ""{

                        List(self.result){i in

                            VStack(alignment: .leading){

                                Text(i.name)

                                Text(i.address)
                                    .font(.caption)
                            }
                            .onTapGesture {

                                // When a search result is tapped, the destination is updated and the map is updated
                                self.destination = i.coordinate
                                self.UpdateMap()
                                self.show.toggle()
                            }
                        }
                        .frame(height: UIScreen.main.bounds.height / 2)
                    }
                }
                .padding(.horizontal, 25)
            }
            // A background color is added to the GeometryReader to dismiss the keyboard when tapped
            .background(Color.black.opacity(0.2).edgesIgnoringSafeArea(.all)
            .onTapGesture {
                self.show.toggle()
            })

            // If the detail property is true, a QRCodeView is displayed
            if self.detail {
                QRCodeView()
            }
        }
    }

    // A function to update the map with the new destination
    func UpdateMap(){

        // A point annotation is created for the destination
        let point = MKPointAnnotation()
        point.subtitle = "Destination"
        point.coordinate = destination

        // A CLGeocoder is used to get the name of the destination
        let decoder = CLGeocoder()
        decoder.reverseGeocodeLocation(CLLocation(latitude: destination.latitude, longitude: destination.longitude)) { (places, err) in

            if err != nil{

                print((err?.localizedDescription)!)
                return
            }

            // The name of the destination is set as the title of the point annotation
            self.name = places?.first?.name ?? ""
            point.title = places?.first?.name ?? ""
            // The detail property is set to true to display the QRCodeView
            self.detail = true
        }

        // A MKDirections.Request is created to get the route from the source to the destination
        let req = MKDirections.Request()
        req.source = MKMapItem(placemark: MKPlacemark(coordinate: self.source))
        req.destination = MKMapItem(placemark: MKPlacemark(coordinate: destination))

        let directions = MKDirections(request: req)

        directions.calculate { (dir, err) in

            if err != nil{

                print((err?.localizedDescription)!)
                return
            }

            // The polyline for the route is added to the map
            let polyline = dir?.routes[0].polyline

            // The distance and time for the route are calculated and set as properties
            let dis = dir?.routes[0].distance as! Double
            self.distance = String(format: "%.1f", dis / 1000)

            let time = dir?.routes[0].expectedTravelTime as! Double
            self.time = String(format: "%.1f", time / 60)

            // The previous overlays are removed and the new polyline is added to the map
            self.map.removeOverlays(self.map.overlays)
            self.map.addOverlay(polyline!)

            // The map is centered on the polyline
            self.map.setRegion(MKCoordinateRegion(polyline!.boundingMapRect), animated: true)
        }

        // The previous annotations are removed and the new point annotation is added to the map
        self.map.removeAnnotations(self.map.annotations)
        self.map.addAnnotation(point)
    }
}
struct SearchBar : UIViewRepresentable {

    // Binding properties used in the view
    @Binding var map : MKMapView
    @Binding var source : CLLocationCoordinate2D!
    @Binding var destination : CLLocationCoordinate2D!
    @Binding var result : [SearchData]
    @Binding var name : String
    @Binding var distance : String
    @Binding var time : String
    @Binding var txt : String

    func makeCoordinator() -> Coordinator {

        return SearchBar.Coordinator(parent1: self)
    }

    func makeUIView(context: Context) -> UISearchBar {

        // A UISearchBar is created and configured
        let view = UISearchBar()
        view.autocorrectionType = .no
        view.autocapitalizationType = .none
        view.delegate = context.coordinator

        return view
    }

    func updateUIView(_ uiView:  UISearchBar, context: Context) {


    }

    class Coordinator : NSObject,UISearchBarDelegate{

        var parent : SearchBar

        init(parent1 : SearchBar) {

            parent = parent1
        }

        func searchBar(_ searchBar: UISearchBar, textDidChange searchText: String) {

            // The text in the search bar is set as a property
            self.parent.txt = searchText

            // A MKLocalSearch.Request is created to get the search results
            let req = MKLocalSearch.Request()
            req.naturalLanguageQuery = searchText
            req.region = self.parent.map.region

            let search = MKLocalSearch(request: req)

            DispatchQueue.main.async {

                // The previous search results are removed
                self.parent.result.removeAll()
            }

            search.start { (res, err) in

                if err != nil{

                    print((err?.localizedDescription)!)
                    return
                }

                // The search results are added to the result array
                for i in 0..<res!.mapItems.count{

                    let temp = SearchData(id: i, name: res!.mapItems[i].name!, address: res!.mapItems[i].placemark.title!, coordinate: res!.mapItems[i].placemark.coordinate)

                    self.parent.result.append(temp)
                }
            }
        }
    }
}
struct SearchData : Identifiable {

    // Properties for the search data
    var id : Int
    var name : String
    var address : String
    var coordinate : CLLocationCoordinate2D
}
struct QRCodeView: View {
    var body: some View {

        // A view to display the QR code
        ZStack {
            Color.white
            Text("QR Code")
                .font(.title)
        }
        .frame(width: 200, height: 200)
        .cornerRadius(10)
        .shadow(radius: 10)
    }
}- The SearchView struct represents the search view used to search for locations.
- It contains several @Binding properties to manage the state of the search process and the selected location.
- The view consists of a LinearGradient background and a SearchBar component that allows the user to enter a search query.
- The search results are displayed in a List based on the user’s query.
- When the user selects a location from the list, the UpdateMap function is called to update the map view with the selected location.
Step 5: Designing the BookedView
a. Create a new Swift file called “BookedView.swift” in your project.
b. Define a SwiftUI view named BookedView as given below code.
import SwiftUI
import Firebase
struct Booked : View {

    // Binding properties that are passed in from the parent view
    @Binding var data : Data
    @Binding var doc : String
    @Binding var loading : Bool
    @Binding var book : Bool

    var body: some View{

        // A ZStack is used to layer views on top of each other
        ZStack{

            // A white background color is added to the ZStack
            Color.white

            // A VStack is used to stack views vertically
            VStack{

                // A Spacer is added to center the QR code
                Spacer()

                // An image view is created with the QR code data
                Image(uiImage: UIImage(data: self.data)!)
                    .resizable()
                    .frame(width: 250, height: 250)

                // A text label is added to display the booking ID
                Text("Booking ID : \(self.doc)")
                    .fontWeight(.bold)
                    .padding(.top)

                // Another Spacer is added to push the button to the bottom of the screen
                Spacer()

                // A button is added to cancel the booking
                Button(action: {

                    // The loading and book properties are toggled
                    self.loading.toggle()
                    self.book.toggle()
                    // A reference to the Firestore database is created
                    let db = Firestore.firestore()
                    // The document with the specified ID is deleted
                    db.collection("Booking").document(self.doc).delete { (err) in
                        if err != nil{
                            // If there is an error, it is printed to the console
                            print((err?.localizedDescription)!)
                            return
                        }
                    // The loading property is toggled again
                    self.loading.toggle()
                    }
                }) {

                    // The button text is added
                    Text("Cancel")
                        .foregroundColor(.white)
                        .padding(.vertical, 10)
                        .frame(width: UIScreen.main.bounds.width / 2)
                }
                // The button is styled with a gradient background, white text, and a capsule shape
                .background(LinearGradient(gradient: Gradient(colors: [.blue, .purple]), startPoint: .leading, endPoint: .trailing))
                .clipShape(Capsule())
                .padding(.top, 25)
            }
            .padding()
        }
    }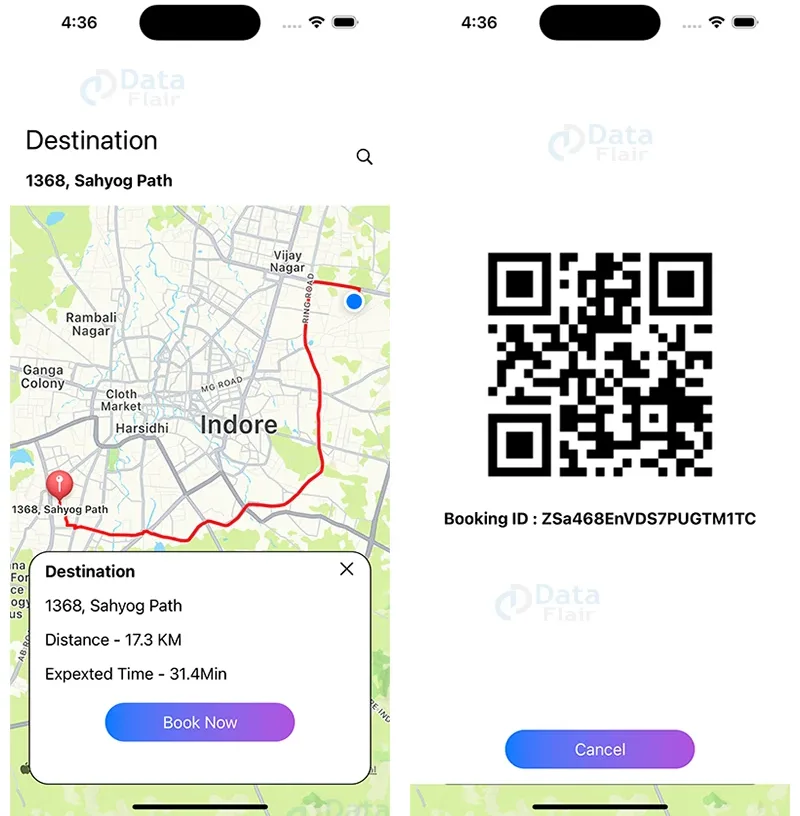
}- The Booked struct represents the view displayed after a successful booking.
- It displays the generated QR code for the booking ID and provides a “Cancel” button to cancel the booking.
- When the cancel button is tapped, the loading and book state properties are toggled, and the booking is deleted from the Firestore database.
Step 6: Designing the Loader View
a. Create a new Swift file called “Loader.swift” in your project.
b. Define a SwiftUI view named Loader view as given below code.
import SwiftUI
struct Loader : View {

    // A state property that toggles the animation
    @State var show = false

    var body: some View{

        // A GeometryReader is used to get the size of the parent view
        GeometryReader{_ in

            // A VStack is used to stack views vertically
            VStack(spacing: 20){

                // A Circle view is created with a red stroke
                Circle()
                    .trim(from: 0, to: 0.7)
                    .stroke(Color.red, style: StrokeStyle(lineWidth: 4, lineCap: .round))
                    .frame(width: 30, height: 30)
                    .rotationEffect(.init(degrees: self.show ? 360 : 0))
                    .onAppear {

                        // The Circle view is animated using a repeatForever animation
                        withAnimation(Animation.default.speed(0.45).repeatForever(autoreverses: false)){

                            self.show.toggle()
                        }
                }

                // A text label is added to display a loading message
                Text("Please Wait....")
            }
            .padding(.vertical, 25)
            .padding(.horizontal, 40)
            .background(Color.white)
            .cornerRadius(12)
        }
        .background(Color.black.opacity(0.25).edgesIgnoringSafeArea(.all))
    }
}- The Loader struct represents a loading indicator view.
- It displays a rotating circle and a “Please Wait…” text.
- The rotation animation is achieved using the show state property and SwiftUI’s withAnimation function.
Step 7: Designing the Home View
a. Create a new Swift file called “Home.swift” in your project.
b. Define a SwiftUI view named Home view as given below code.
import SwiftUI
import MapKit
import CoreLocation
import Firebase
struct Home : View {

    // Map view and location manager
    @State var map = MKMapView()
    @State var manager = CLLocationManager()

    // Alert for location permission
    @State var alert = false

    // Coordinates for source and destination
    @State var source : CLLocationCoordinate2D!
    @State var destination : CLLocationCoordinate2D!

    // Name of destination
    @State var name = ""

    // Distance and time to destination
    @State var distance = ""
    @State var time = ""

    // Show booking details
    @State var show = false

    // Show loading indicator
    @State var loading = false

    // Show booking confirmation
    @State var book = false

    // Document ID for booking
    @State var doc = ""

    // QR code data for booking
    @State var data : Data = .init(count: 0)

    // Show search view
    @State var search = false

    var body: some View{

        ZStack{

            ZStack(alignment: .bottom){

                VStack(spacing: 0){

                    HStack{

                        VStack(alignment: .leading, spacing: 15) {

                            // Show destination or pick a location
                            Text(self.destination != nil ? "Destination" : "Pick a Location")
                                .font(.title)

                            if self.destination != nil{

                                // Show name of destination
                                Text(self.name)
                                    .fontWeight(.bold)
                            }
                        }

                        Spacer()

                        // Show search button
                        Button(action: {

                            self.search.toggle()

                        }) {

                            Image(systemName: "magnifyingglass")
                                .foregroundColor(.black)
                        }

                    }
                    .padding()
                    .padding(.top, UIApplication.shared.windows.first?.safeAreaInsets.top)
                    .background(Color.white)

                    // Show map view
                    MapView(map: self.$map, manager: self.$manager, alert: self.$alert, source: self.$source, destination: self.$destination, name: self.$name,distance: self.$distance,time: self.$time, show: self.$show)
                    .onAppear {

                        // Request location permission
                        self.manager.requestAlwaysAuthorization()

                    }
                    .ignoresSafeArea(.all)
                }

                if self.destination != nil && self.show{

                    ZStack(alignment: .topTrailing){

                        VStack(spacing: 20){

                            HStack{

                                VStack(alignment: .leading,spacing: 15){

                                    // Show destination name, distance and time
                                    Text("Destination")
                                        .fontWeight(.bold)
                                    Text(self.name)

                                    Text("Distance - "+self.distance+" KM")

                                    Text("Expexted Time - "+self.time + "Min")
                                }

                                Spacer()
                            }

                            // Show book now button
                            Button(action: {

                                self.loading.toggle()

                                self.Book()

                            }) {

                                Text("Book Now")
                                    .foregroundColor(.white)
                                    .padding(.vertical, 10)
                                    .frame(width: UIScreen.main.bounds.width / 2)
                            }
                            .background(LinearGradient(gradient: Gradient(colors: [.blue, .purple]), startPoint: .leading, endPoint: .trailing))
                            .clipShape(Capsule())

                        }

                        // Show close button
                        Button(action: {

                            self.map.removeOverlays(self.map.overlays)
                            self.map.removeAnnotations(self.map.annotations)
                            self.destination = nil

                            self.show.toggle()

                        }) {

                            Image(systemName: "xmark")
                                .foregroundColor(.black)
                        }
                    }
                    .padding(.vertical, 10)
                    .padding(.horizontal)
                    .padding(.bottom, UIApplication.shared.windows.first?.safeAreaInsets.bottom)
                    .background(Color.white)
                    .cornerRadius(20)
                    .overlay(
                        RoundedRectangle(cornerRadius: 20)
                            .stroke(Color.black, lineWidth: 1)
                    )
                    .padding(.horizontal, 20)
                }
            }

            // Show loading indicator
            if self.loading{

                Loader()
            }

            // Show booking confirmation
            if self.book{

                Booked(data: self.$data, doc: self.$doc, loading: self.$loading, book: self.$book)
            }

            // Show search view
            if self.search{

                SearchView(show: self.$search, map: self.$map, source: self.$source, destination: self.$destination, name: self.$name, distance: self.$distance, time: self.$time,detail: self.$show)
            }
        }
        .alert(isPresented: self.$alert) { () -> Alert in

            // Show location permission error
            Alert(title: Text("Error"), message: Text("Please Enable Location In Settings !!!"), dismissButton: .destructive(Text("Ok")))
        }
    }

    // Book a ride
    func Book(){

        let db = Firestore.firestore()
        let doc = db.collection("Booking").document()
        self.doc = doc.documentID

        let from = GeoPoint(latitude: self.source.latitude, longitude: self.source.longitude)
        let to = GeoPoint(latitude: self.destination.latitude, longitude: self.destination.longitude)

        // Save booking details to Firestore
        doc.setData(["name":"DataFlair","from":from,"to":to,"distance":self.distance,"fair": (self.distance as NSString).floatValue * 1.2]) { (err) in

            if err != nil{

                print((err?.localizedDescription)!)
                return
            }

            // Generate QR code for booking
            let filter = CIFilter(name: "CIQRCodeGenerator")
            filter?.setValue(self.doc.data(using: .ascii), forKey: "inputMessage")

            let image = UIImage(ciImage: (filter?.outputImage?.transformed(by: CGAffineTransform(scaleX: 5, y: 5)))!)

            self.data = image.pngData()!

            // Show booking confirmation
            self.loading.toggle()
            self.book.toggle()

        }
    }
}
struct HomeView_Previews: PreviewProvider {
    static var previews: some View {
        Home()
    }
}
- The Home struct is a SwiftUI view that represents the main screen of the app.
- It contains various @State properties to manage the app’s state, such as map (an instance of MKMapView), manager (an instance of CLLocationManager), alert, source, destination, name, distance, time, show, loading, book, doc, and data.
- The body property defines the UI layout of the view using a ZStack and several other SwiftUI components like VStack, HStack, and Button.
- The MapView is a custom SwiftUI view that represents the map view and is embedded within the Home view.
- The Book function is responsible for booking a ride and saving the booking details to the Firestore database.
Step 8: Connect Views in ContentView
a. Open the “ContentView.swift” file.
b. Replace the default implementation of the ContentView struct with a new implementation that returns an instance of the Home view.
import SwiftUI
struct ContentView: View {
    var body: some View {

        // The Home view is displayed
        Home()
    }
}
struct ContentView_Previews: PreviewProvider {
    static var previews: some View {

        // The ContentView is displayed in the preview
        ContentView()
    }
}
Output
Firebase Firestore stores the Fare details like distance, cost, and customer name.

Summary
Congratulations! You have successfully created a Cab Booking app using SwiftUI and Firebase Firestore. In this project, we learned how to integrate MapKit for location and map services, use Firebase Firestore to store booking details and display a QR code with the booking information. You can now further enhance the app by adding additional features based on your requirements.
Did we exceed your expectations?
If Yes, share your valuable feedback on Google


