PyTorch Image Classifier Use Case
Machine Learning courses with 100+ Real-time projects Start Now!!
The availability of data has opened new fronts of research, and owing to the progress in Artificial Intelligence, we have moved way ahead in utilising these data for the purpose of security, marketing, business and even for fun. Images form a major portion of all data available online, which we can use to build Artificial Intelligence models like computer vision, facial recognition, image classification, etc. Recently, these applications have been embedded into our lives through face recognition in mobile phones, security surveillance in sensitive areas, garbage segregation and many more mediums we might not even acknowledge.
What is Image Classification?
In image classification projects, we train our models to differentiate between several different categories. For instance, we can train our model to identify digits from handwritten images, identify the type of clothing such as shirt, coat, skirt etc., and differentiate between cats and dogs and malignant and benign tumours. We can do anything you can think of and gather data for the same.
Where Can it be Used?
Image recognition has a broad set of futuristic applications.
- We can use image classification for facial recognition for security purposes.
- We can train a model to understand our handwriting by feeding it our handwritten samples along with their
- typed counterparts. It may seem tedious, but if accomplished, we can copy-paste the answers to our online exams from the internet and make them appear handwritten.
- Cameras at departmental stores and shopping malls can identify our faces and track our shopping every time we visit, which will help them give us a personalised shopping experience.
- It can also help doctors detect cancer at early stages from a CT scan of the patient, which is normally done manually by expert doctors. Though this application is still in the research stage, remarkable results have been obtained in recent experiments giving a ray of hope for the future.
- Numerous other tasks can be achieved by image classification. Every task which needs to differentiate between some categories and we have enough data available can be accomplished using it.
How is it Done?
To build an image classifier, we must train our model using many labelled samples. You may think it is as simple as that. But not really. It is just a bird’s eye view.
There is a lot of technical stuff that is happening behind the scenes. The kind of model we need to build for this task is called Convolution Neural Network (CNN). These networks’ hidden layers are convolutions layers that can detect patterns such as brightness, edges, curvature, etc. It may appear very tedious and challenging to code.
This is where frameworks like PyTorch come to our rescue. PyTorch’s nn module has convolution layers of one, two and three dimensions and can be readily used to build models without worrying about internal operations and processes.
Building an Image Classifier Using PyTorch
PyTorch has all the libraries and functions required to build an image classifier, so we don’t have to reinvent the wheel. We must import the required libraries, neural layers, activation functions, optimiser, etc., and pass the appropriate parameters to them in the right order. To demonstrate this, we will use the CIFAR-10 dataset.
a. The CIFAR-10 dataset:
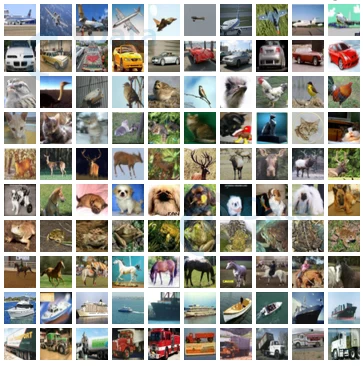
The CIFAR-10 dataset contains images of ‘airplane’, ‘automobile’, ‘bird’, ‘cat’, ‘deer’, ‘dog’, ‘frog’, ‘horse’, ‘ship’, ‘truck’, making a total of 10 categories.
b. Building an image classifier:
I. Importing the required libraries:
First, we will import all the libraries which we may need for our model.
import torch
import torchvision
import torch.nn as nn
import torch.optim as optim
from torchvision import transforms,datasets
import torch.nn.functional as F
import matplotlib
import matplotlib.pyplot as plt
II. Loading the data:
train=datasets.CIFAR10('./data', train=True,download=True,transform=transforms.Compose([transforms.ToTensor(),transforms.Normalize((0.5,0.5,0.5),(0.5,0.5,0.5))]))
test=datasets.CIFAR10('./data', train=False,download=True,transform=transforms.Compose([transforms.ToTensor(),transforms.Normalize((0.5,0.5,0.5),(0.5,0.5,0.5))]))

trainset=torch.utils.data.DataLoader(train,batch_size=2,shuffle=True,num_workers=2)
testset=torch.utils.data.DataLoader(test,batch_size=2,shuffle=True,num_workers=2)
III. Playing around with the loaded data:
for i in range(5):
    print(train[10+i][1])
Output-

Here we have printed some random labels of the CIFAR-10 dataset. We can also print the tensors representing these labels.
print(train[23][0])
Output–

IV. Building the Convolutional Model:
Now that we have our data, we can build our convolutional model. We will create a forward function which will implement the convolution layers followed by activation and pooling layers and, finally, the linear layers.
We will also create a function to validate our predictions and print the accuracy later.
class ConvNet(nn.Module):
    def __init__(self):
        super().__init__()
        super().__init__()
        self.conv1 = nn.Conv2d(3, 6, 5)
        self.pool = nn.MaxPool2d(2, 2)
        self.conv2 = nn.Conv2d(6, 16, 5)
        self.fc1 = nn.Linear(16 * 5 * 5, 120)
        self.fc2 = nn.Linear(120, 84)
        self.fc3 = nn.Linear(84, 10)
    def forward(self,x):
        x = self.pool(F.relu(self.conv1(x)))
        x = self.pool(F.relu(self.conv2(x)))
        x = torch.flatten(x, 1) # flatten all dimensions except batch
        x = F.relu(self.fc1(x))
        x = F.relu(self.fc2(x))
        x = self.fc3(x)
        return x


    def validate(self,model,data):
        total=0
        correct=0
        for i,(images,labels) in enumerate(data):
            x=model(images)
            value,pred=torch.max(x,1)
            total+=x.size(0)
            correct+=torch.sum(pred==labels)


        return correct/total
V. Training the model:
Before training our model, we have to specify the device and the number of epochs we want to use. Also, to use our model, we have to create an instance of it.
device=torch.device("cpu")
epoch=50
cnn_model=ConvNet()


Finally we will train our model.
cnn=cnn_model.forward().to(device)
cel=nn.CrossEntropyLoss()
optimizer=optim.Adam(cnn.parameters(),lr=0.00003)

for epoch in range(epoch):
    for i,(images,labels) in enumerate(trainset):
    	    images=images.to(device)
    	    labels=labels.to(device)
    	    optimizer.zero_grad()
    	    pred=cnn(images)
    	    loss=cel(pred,labels)
    	    loss.backward()
    	    optimizer.step()

    accuracy=cnn_model.validate(cnn,testset)
    print(epoch,accuracy)
It will take a while (more than an hour on CPU) to train the model. Alternatively, if you have less time to spare, you can decrease the number of epochs to 20 or 30 and increase the learning rate by a factor of 100 or even 1000. Reducing the number of epochs might prevent the model from reaching the optimal solution, and decreasing the learning rate might miss the minima and start increasing again. If the accuracy is not good enough for a given learning rate, try increasing the number of epochs. If the accuracy for given epoch increases, but after a certain point, it starts decreasing, then reducing the learning rate might help.
Output–

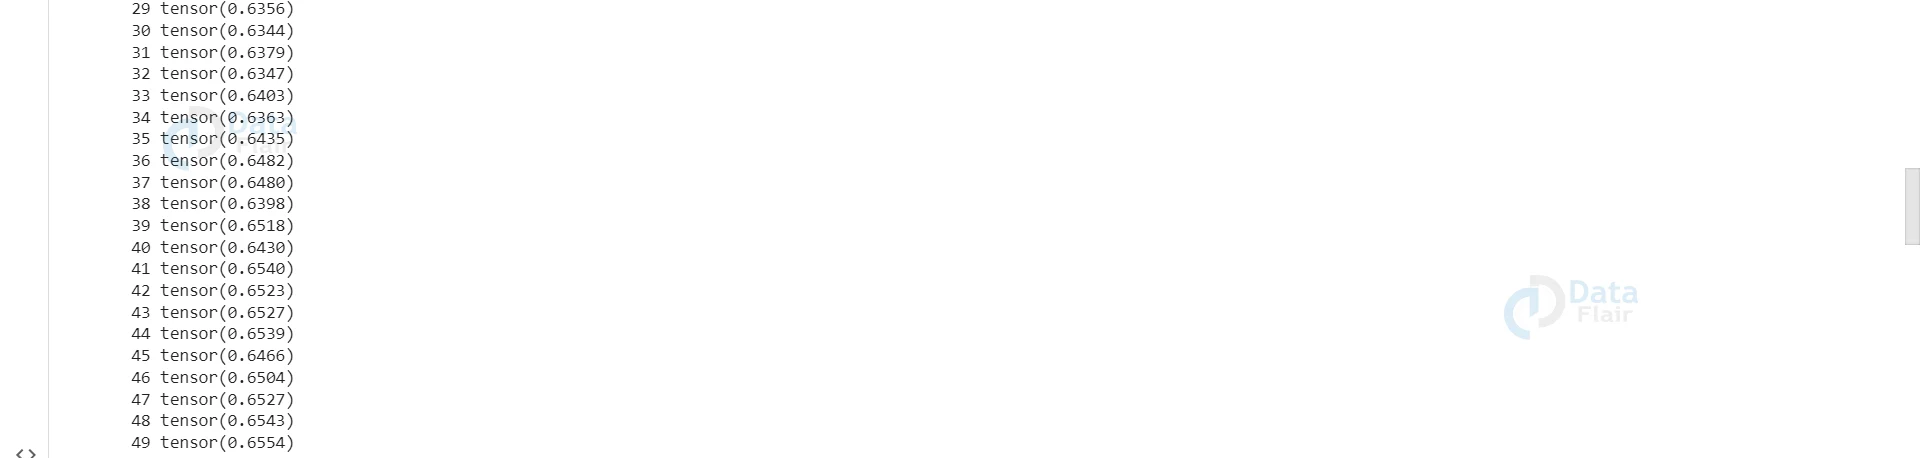
We have successfully implemented a CNN model and achieved remarkable accuracy. The accuracy we got is not exemplary but acceptable. If we want to improve accuracy, we can try increasing the number of epochs, but that would require even more time to train.
Summary
In this article, we built an image classifier for the CIFAR-10 dataset and tested its working by measuring its accuracy on the test set. The process of training neural networks on other datasets will not differ much. Only the parameters must be altered according to the task we need to accomplish.
Did we exceed your expectations?
If Yes, share your valuable feedback on Google


