PyTorch Autograd
Free Machine Learning courses with 130+ real-time projects Start Now!!
Autograd is used to compute gradients involving complex functions in a neural network. In building a model, we need to compute the loss, which is the deviation of the predicted output from the given label and adjust the weights of all the neurons to bring the loss closer to zero. We can do this using the gradient descent algorithm. Then, we have to calculate the derivative of the loss for all the inputs and increase or decrease the weights accordingly.
The neural networks have numerous layers and nodes, which makes tracking the path of the output for computing the gradient tedious and time-consuming. It is where autograd comes to the rescue. Autograd traces the path of the computation at runtime, making the process dynamic and easing the calculation of partial derivatives with respect to all the parameters.
What is Backpropagation?
Let’s consider a long chain of neurons with only one neuron in each layer for simplicity. Let x be the input and y be the output.
This simple network works as follows. First, the input is multiplied by w1, which equals z1. Z1 is the input of the next neuron. The output of the second neuron is f_1(z). Here, f_1 is the activation function of the second neuron. All the layers go through this process. The last layer’s output is the network’s output. Now, this output is compared to the given label for the input. For argument’s sake, let us consider the squared loss.
Loss=(½)* (y-fl)2
Now we will adjust the weights to minimise this loss. We can accomplish this by taking the derivative of the loss for the weights we have to adjust.
მLoss/მw1=მf1/მw1 * მLoss/მf1

Also;

მLoss/მf1=მf2/მf1*მLoss/მf2

Using the chain rule;

მLoss/მf1=მf2/მf1 *მf3/მf2*მf4/მf3*...............მfL/მfL-1
First, the penultimate layer adjusts its weight depending on the loss. Then the layer before that is adjusted, and the process goes on. This process of computing the output using the present weights and then propagating backwards to adjust these weights layer by layer is called backpropagation.
The same process we described above can be used for layers with multiple neurons.
PyTorch “backward()” function
We can calculate the gradient of a tensor with respect to some other tensor in a neural network only after the “backward()” function is called. It initiates the backpropagation process, and the pointer moves from the tensor in consideration of its gradient function, followed by the calculation of the gradient after reaching the reference tensor.
Jacobian
Technology is evolving rapidly!
Stay updated with DataFlair on WhatsApp!!
Jacobian is a matrix which contains all the possible derivatives of a function concerning one or more independent variables.
Autograd, while computing the gradient using backpropagation, is actually calculating the Jacobian product of the loss vector. However, we need not pay much attention to it as it all happens in the background.
How does autograd work?
The autograd stores the gradients in a Directed Acyclic Graph (DAG). A tensor has parameters – data, grad, grad_fn, is_leaf and requires_grad.
| data | Stores the data in the tensor, a number or a single or multidimensional array. |
| grad | Stores the gradient of the tensor. |
| grad_fn | A pointer that points to a node in the backward graph. |
| is_leaf | Either true or false. Indicates if the tensor is a leaf of the graph. |
| requires_grad | Indicates if it required to calculate the gradient or not. |
Any tensor that is created by some operation of tensors where at least one of the operand’s requires_grad parameter is True, then the resultant tensor’s requires_grad will also be true. It means the new tensor will also store the gradient values and a pointer to the backward graph when we call the .backward() method.
Computation Graph
As stated earlier, tensors are stored in a dynamic graph connecting nodes to a backward path required to calculate the gradients of nodes depending on the neighbouring nodes.
This is what a node in a computation graph looks like. It contains the parameters data, grad, grad_fn, is_leaf and requires_grad.
| data=tensor(2,0) |
| grad=None |
| grad_fn=Addbackward |
| is_leaf=None |
| requires_grad=False |
Graphs hold no significance for standalone nodes. They come into play when some operations are performed between two or more nodes, and at least one of these nodes has its require_grad parameter set to “True” to produce a new node.
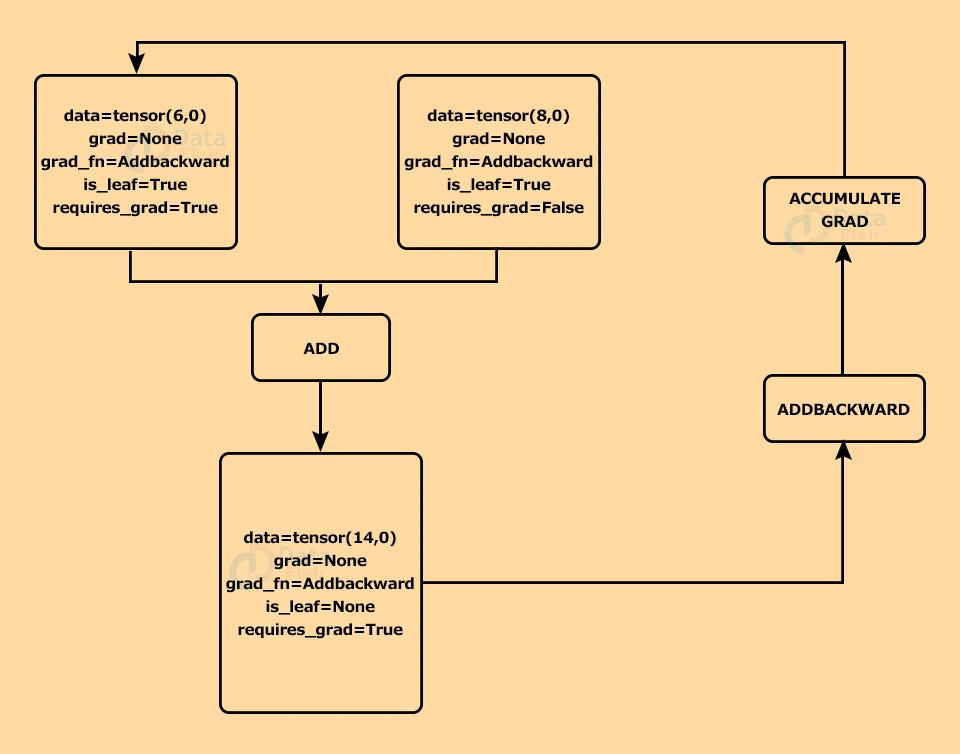
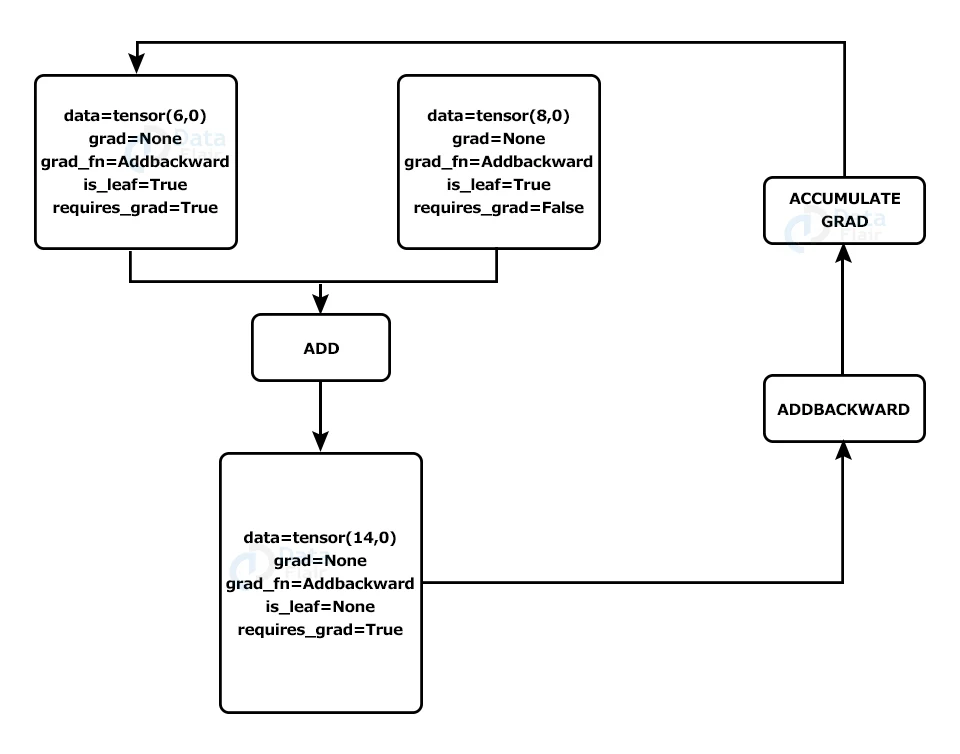
Suppose we have two tensors(nodes), as shown below, and we perform the addition operation on them.
In the diagram above, there are two tensors, and we get a new tensor by adding them. Since the requires_grad in the first tensor is set to ‘True’, the resultant tensor’s requires_grad will also be true.
Initially, the value of grad is ‘None’. When we call the backward() function, it extracts the location of the corresponding backward function (here ADDBACKWARD) from the ‘grad_fn’ parameter of the tensor. It finds the gradient of the output for the inputs whose ‘requires_grad==True’.
In the above example, the gradient of the resultant tensor will be calculated with respect to the first tensor (as requires_grad=True), and the value of the gradient will be stored in the tensor, as we can see in the diagram below.
Example:
a. Importing the torch library
import torch
b. Initialising tensors and checking the value of “requires_grad” parameter
a=torch.tensor([1,4])
b=torch.tensor([5,2])

print(a.grad,a.requires_grad)
Output:
print(b.grad,b.requires_grad)
Output:
a=torch.tensor([1.,4.],requires_grad=True)

b=torch.tensor([5.,2.],requires_grad=True)

print(a.grad,a.requires_grad)

print(b.grad,b.requires_grad)
Output:
c=2*a**6-b**9

print(a.grad)
Output:
c. Calculating gradient in PyTorch
c.backward(gradient=torch.tensor([1.,1.]))

print(a.grad)
Output:
Summary
Autograd proves to be very useful in all the deep learning models we build and is the biggest convenience provided by PyTorch. Finding the partial derivative is an integral step in training our models on the given dataset, and Autograd makes our lives easier by calculating and storing the gradients dynamically
Did you know we work 24x7 to provide you best tutorials
Please encourage us - write a review on Google


