Macros in Excel
Expert-led Online Courses: Elevate Your Skills, Get ready for Future - Enroll Now!
Macros helps in automating the tasks that you wanted to do repeatedly by recording a macro. While recording a macro, each and every mouse clicks and keystrokes will be recorded. It can be edited or minor changes can be done as per the convenience. Macros is one of the programming codes that runs in an excel environment and it is widely helpful when the tasks are repetitive.
What is the use of Macros in Excel?
Macros help you to complete your everyday routine tasks on a single button click. Macros records the routine steps and a single click on the button can replay it again and again.
For example: You are an assistant manager and you wanted to design a call sheet template everyday. This task may seem boring if you are doing it everyday. In these types of situations, you can switch to using macros. Macros automates the routine tasks. You can use the macro to record the format of the layout of the call sheet template.
Let’s now look at how macros are being formed and how they are useful to the user of MS-Excel.
How to Enable Macro Recording
Method 1: From Developer Tab
To enable macro recordings, follow the steps:
1: Right click on the ribbon.
2: Choose customize the ribbon option.

3: Check the developer box.
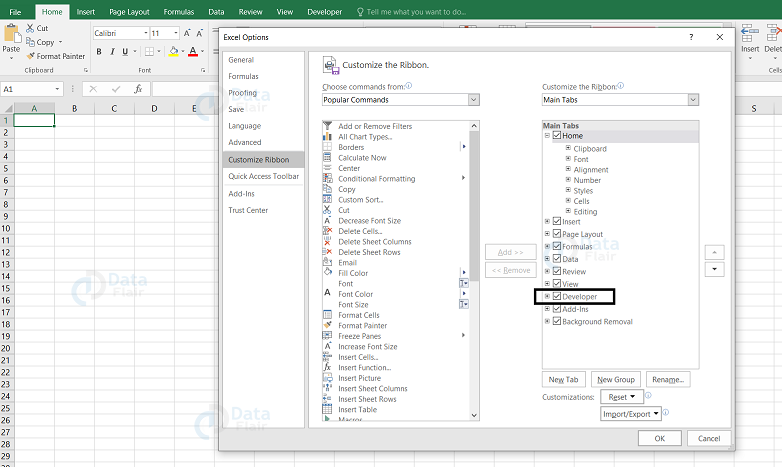
4: Click ok.
After following the steps, the developer tab appears on the excel sheet.

After activating, we could also find the macro symbol below the excel sheet name.
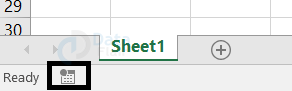
This represents that the macro recorder is on.
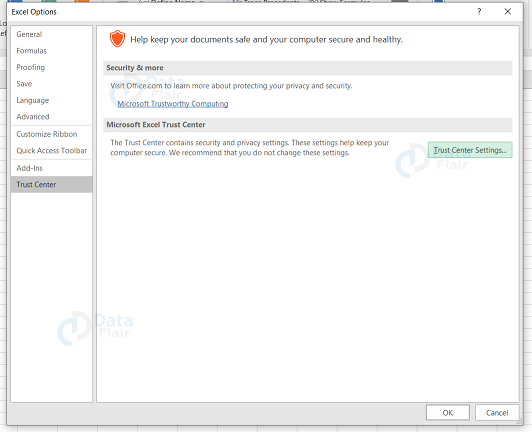
Method 2: From Trust Center Settings
1: Go to the file tab and click on the options from the left side of the pane.
2: Click on the trust center option from the left side of the dialog box.
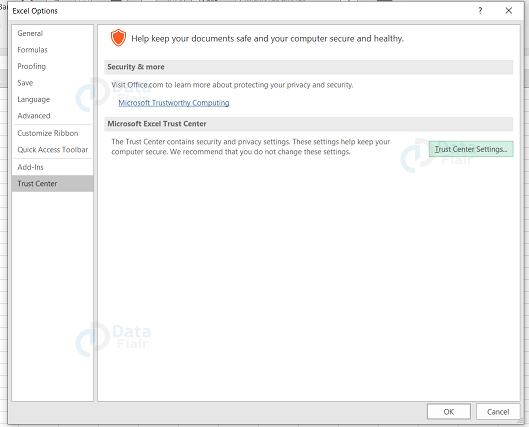
3: Click on the trust center settings and a dialog box appears.
4: Choose the macro settings from the left side of the window and click on the radio button beside ‘Enable all macros (not recommended; potentially dangerous code can run) radio button.’
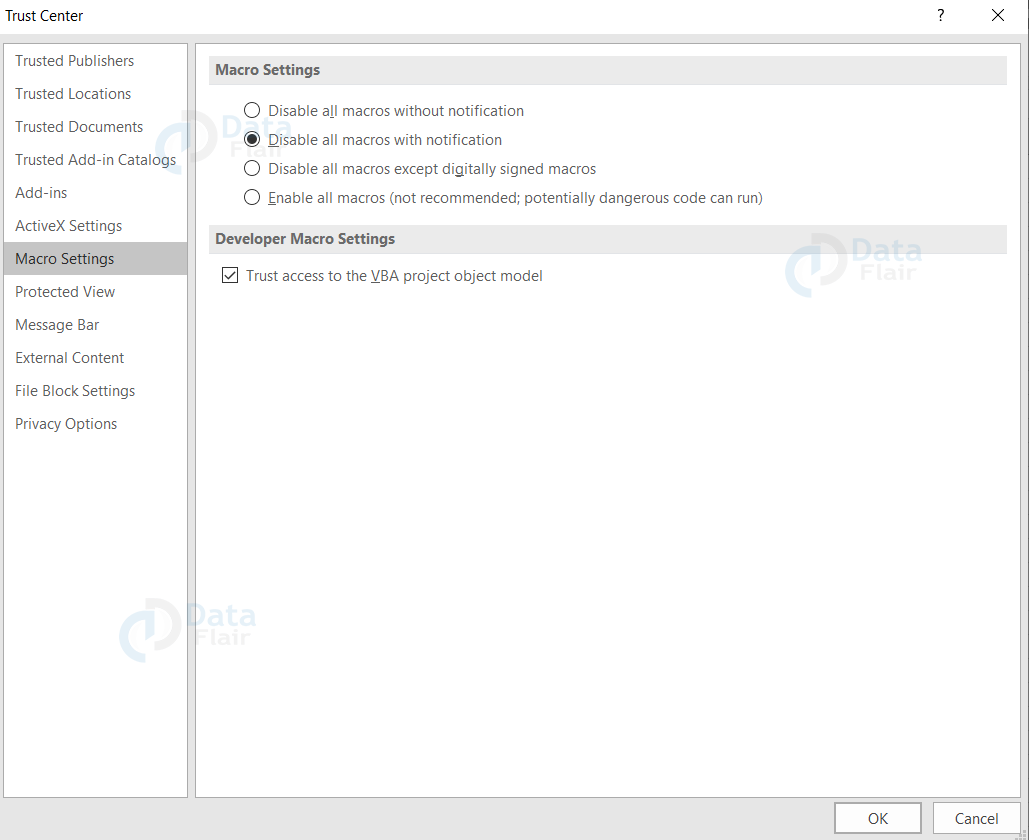
5: Finally, press ok.
After following these steps, the macros will run on all excel worksheets without any warning messages.
Recording macro in Excel
Now, let’s see how to record a macro. To record a macro, follow the steps:
1: Click on the macro record icon.

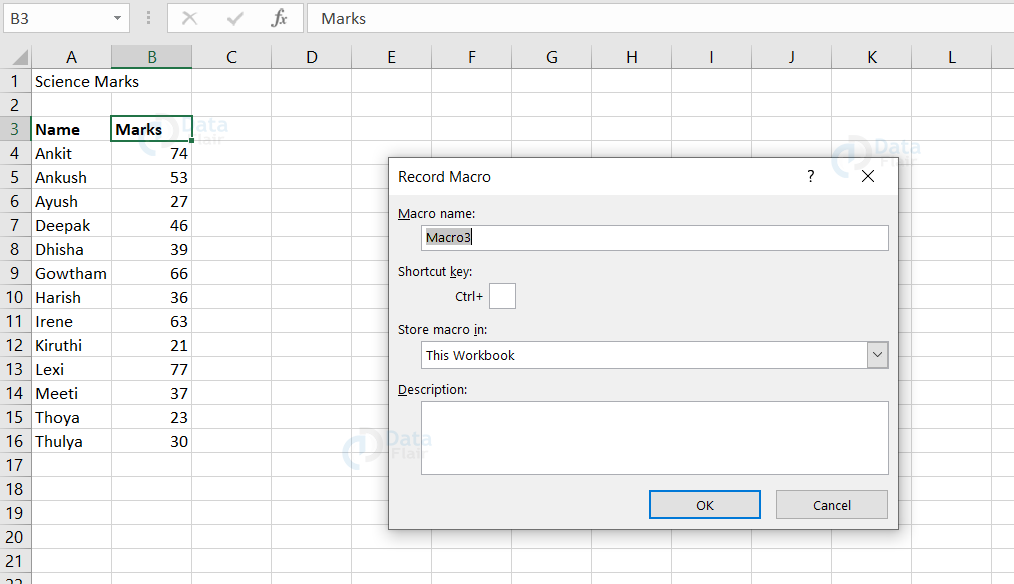
2: A box appears like this. Fill it out as you require and click on the “ok” button.
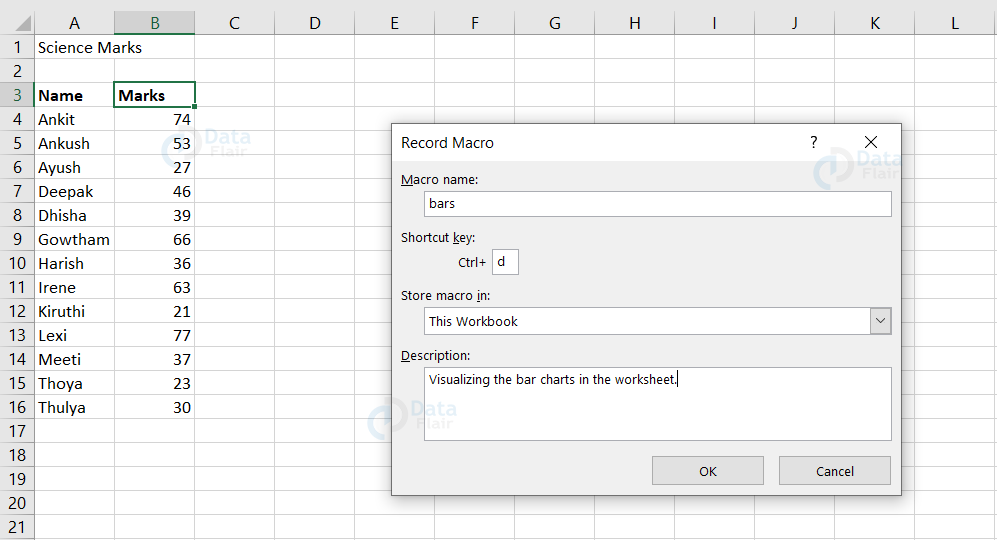
Note: You can fill the box if required or otherwise you could leave it as such. Once you click on the ok button, the macro recording starts.

This symbol denotes that the recording has started. After the appearance of this symbol, each and every move will be recorded.
Let’s look at what does the macro do with an example:

In this, we have students and their marks in three different sheets. Here, we have to calculate the percentage of each student and average in each subject.
So, in this, we are going to repeat the steps. Hence, to save time and reduce the work, we are going to use macros.
How to start a macro?
1: Click on the developer tab.
2: Choose the record macro option.
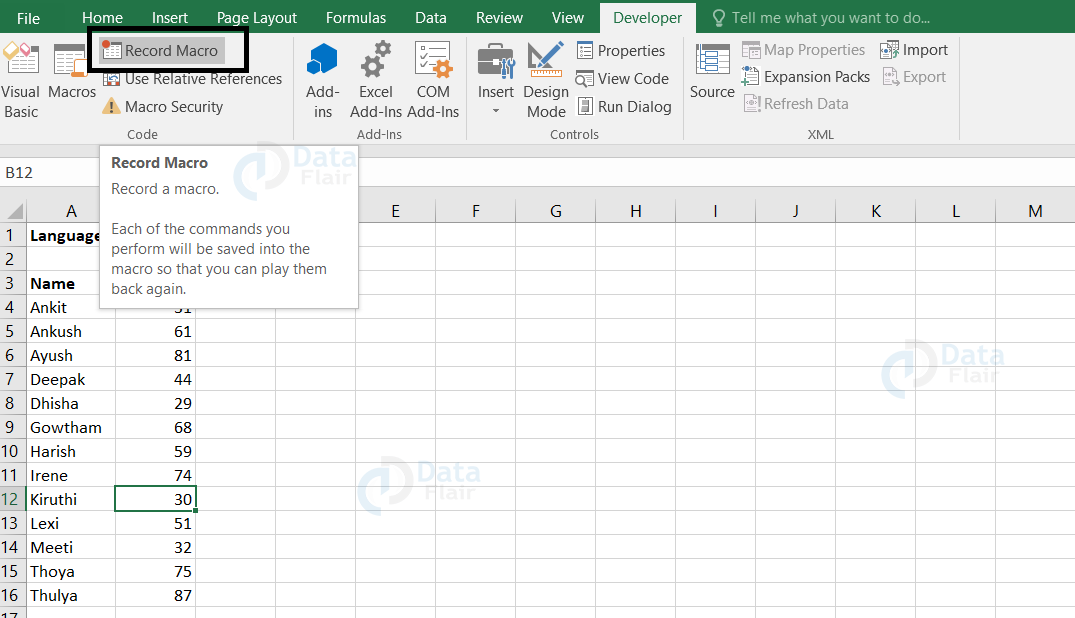
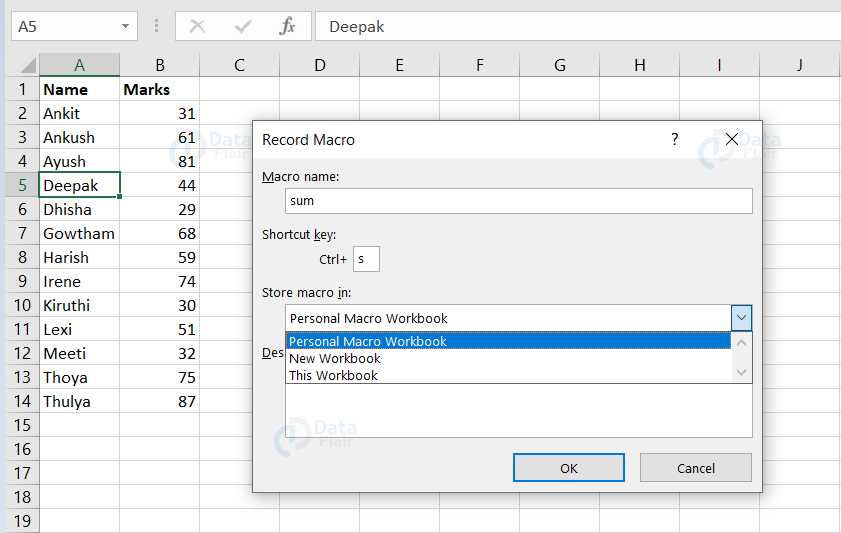
Note: A box appears when you click on the record macro.
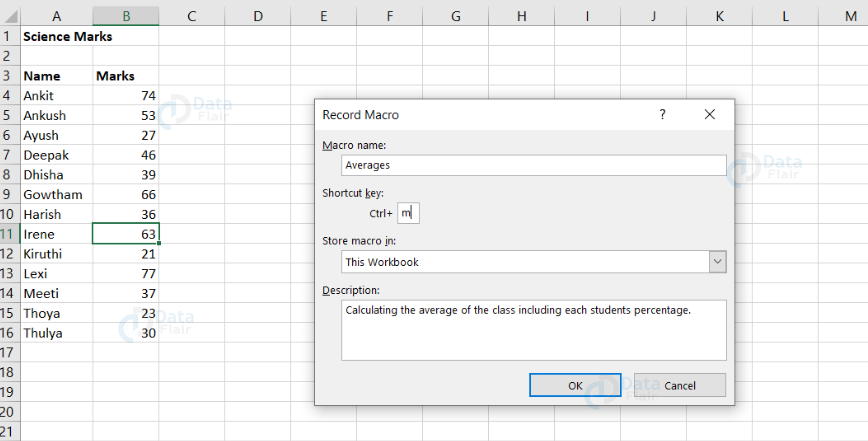
3: Fill the box and as we are finding averages, we are naming it averages here.
Note: The shortcut key, description are optional. You can fill it if you want or else you could leave it as blank. In the store macro in label, choose on this workbook option.
4: After filling the box, press ok.
This is how we have to start a macro. Once you press ok, the macro recording gets started.
From then, each and every move will be recorded. Once, every step is being recorded for a sheet in the spreadsheet, then it can be easy to access in other sheets.

In our dataset, we have found the average score in each subject and percentage of each student.
How to run a Macro?
Now, we know how to record a macro and save it. Hence, now we will learn how to run a macro. In order to try the same thing to happen in the Language mark sheet using a macro, follow the steps:
1: Click on the Developer tab.
2: Choose the Macros option.
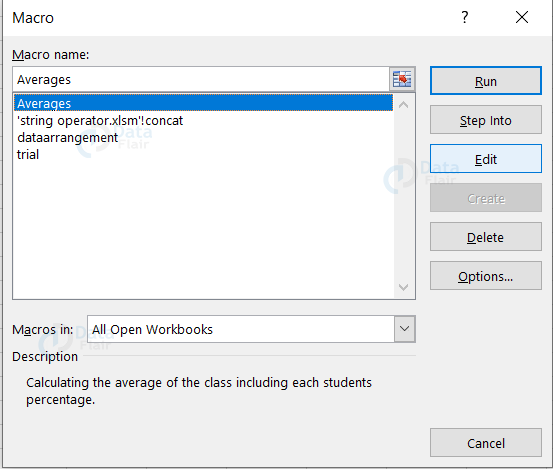
Note: A box appears with the macros we have already recorded.
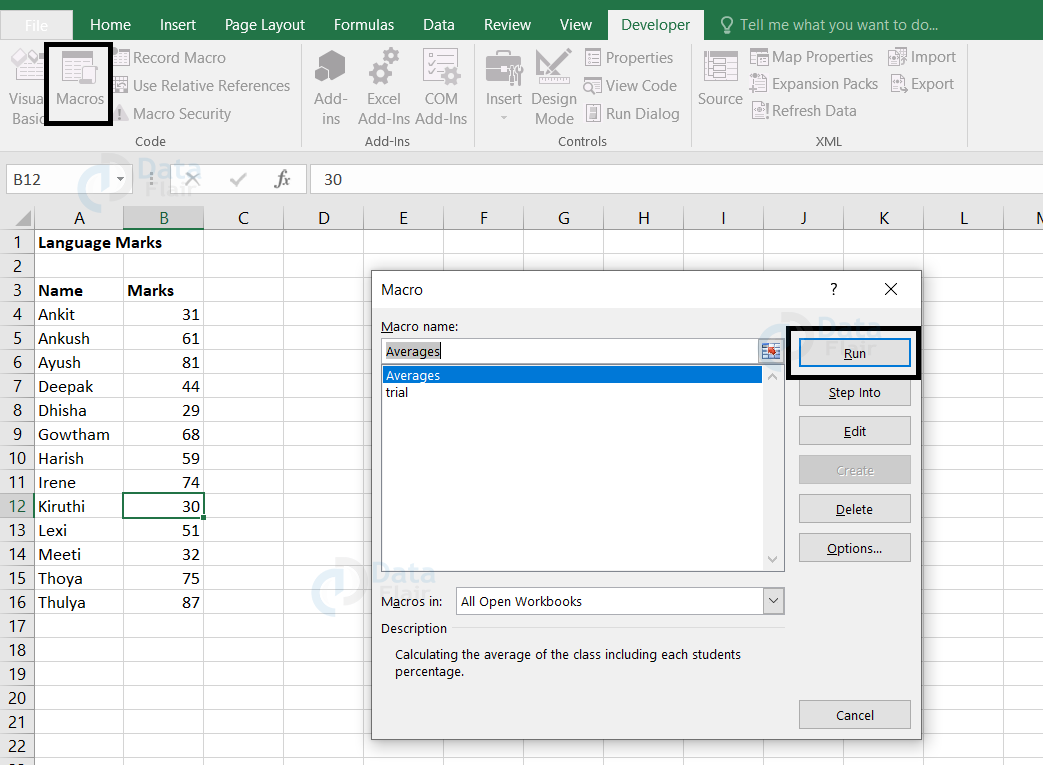
3: Click on the macro you wanted to apply.
4: Click on the run button.
Note: We could either follow the steps or press on the shortcut key we have assigned to that particular macro.
Once we apply this to our dataset, then the average and percentage of the subject appears with no time.
Let’s look at it.

Thus, this is how a macro works.
Debugging a Macro Code
Sometimes, there are chances of users to commit mistakes in the code and this results in error. So to overcome the error in the code, we can debug the code just as we do to any other code to know about the error and eventually we can correct them.
Let’s see how to look at the macro recorded code lines. In order to look at it, follow the steps:
1: Click on the Developer tab.
2: Choose the macros option.
3: Choose the “ Step Into ” option from the box.
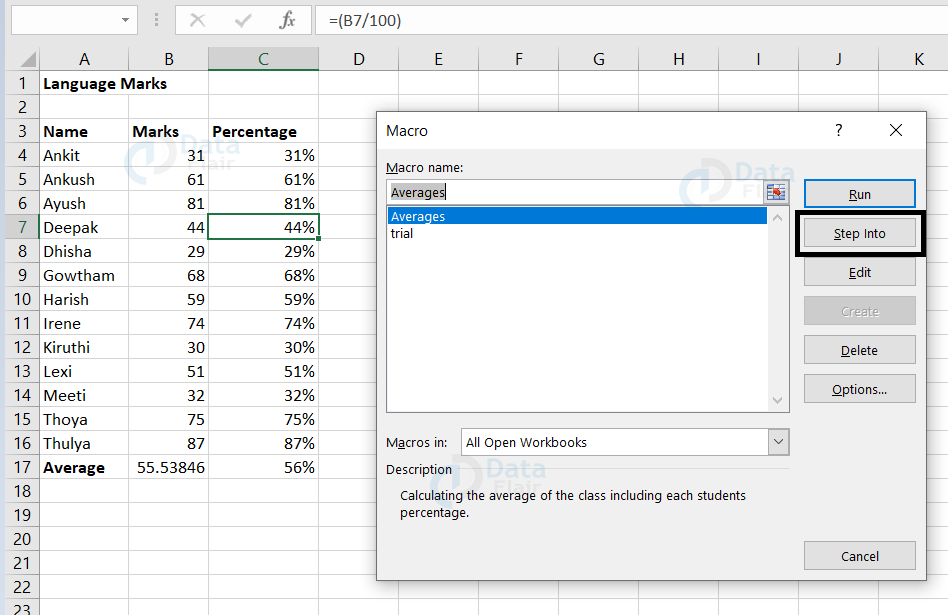
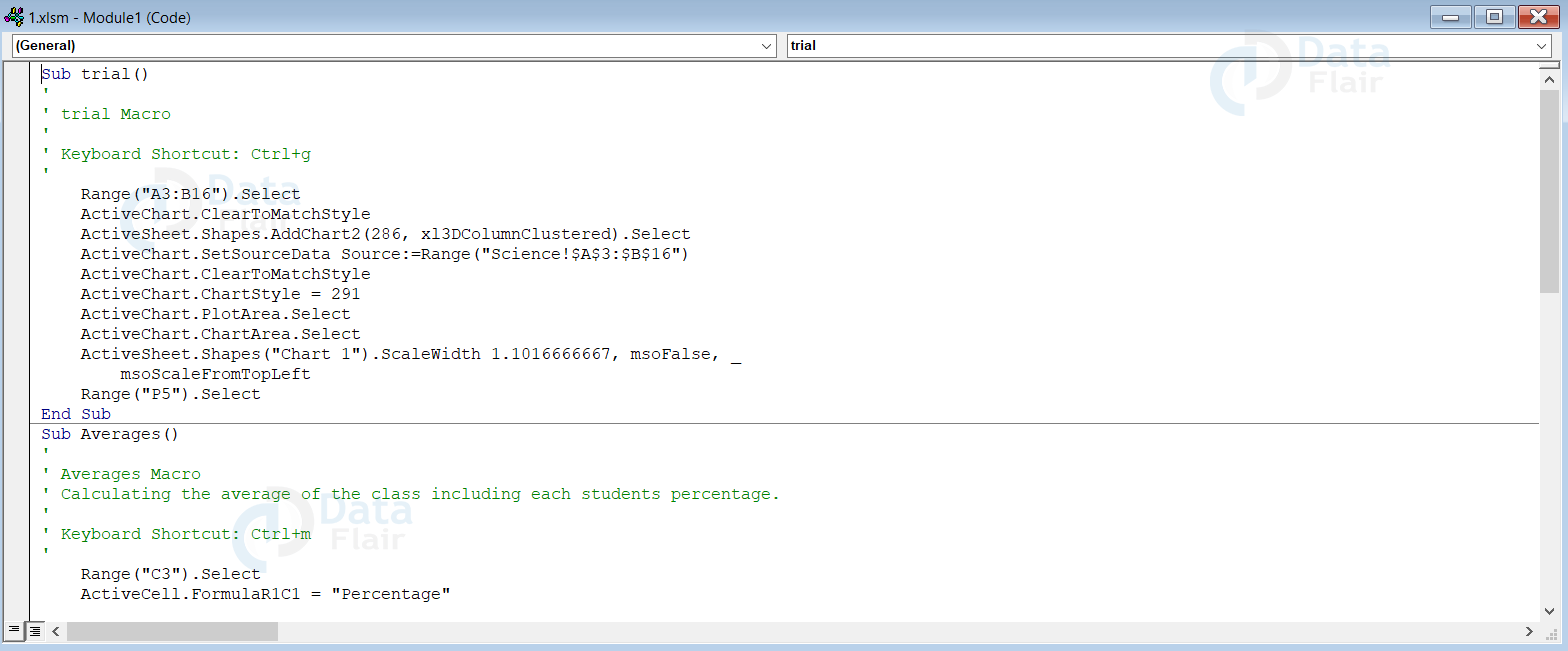
After following the steps, the code automatically opens up in Microsoft Visual Basics for Applications.
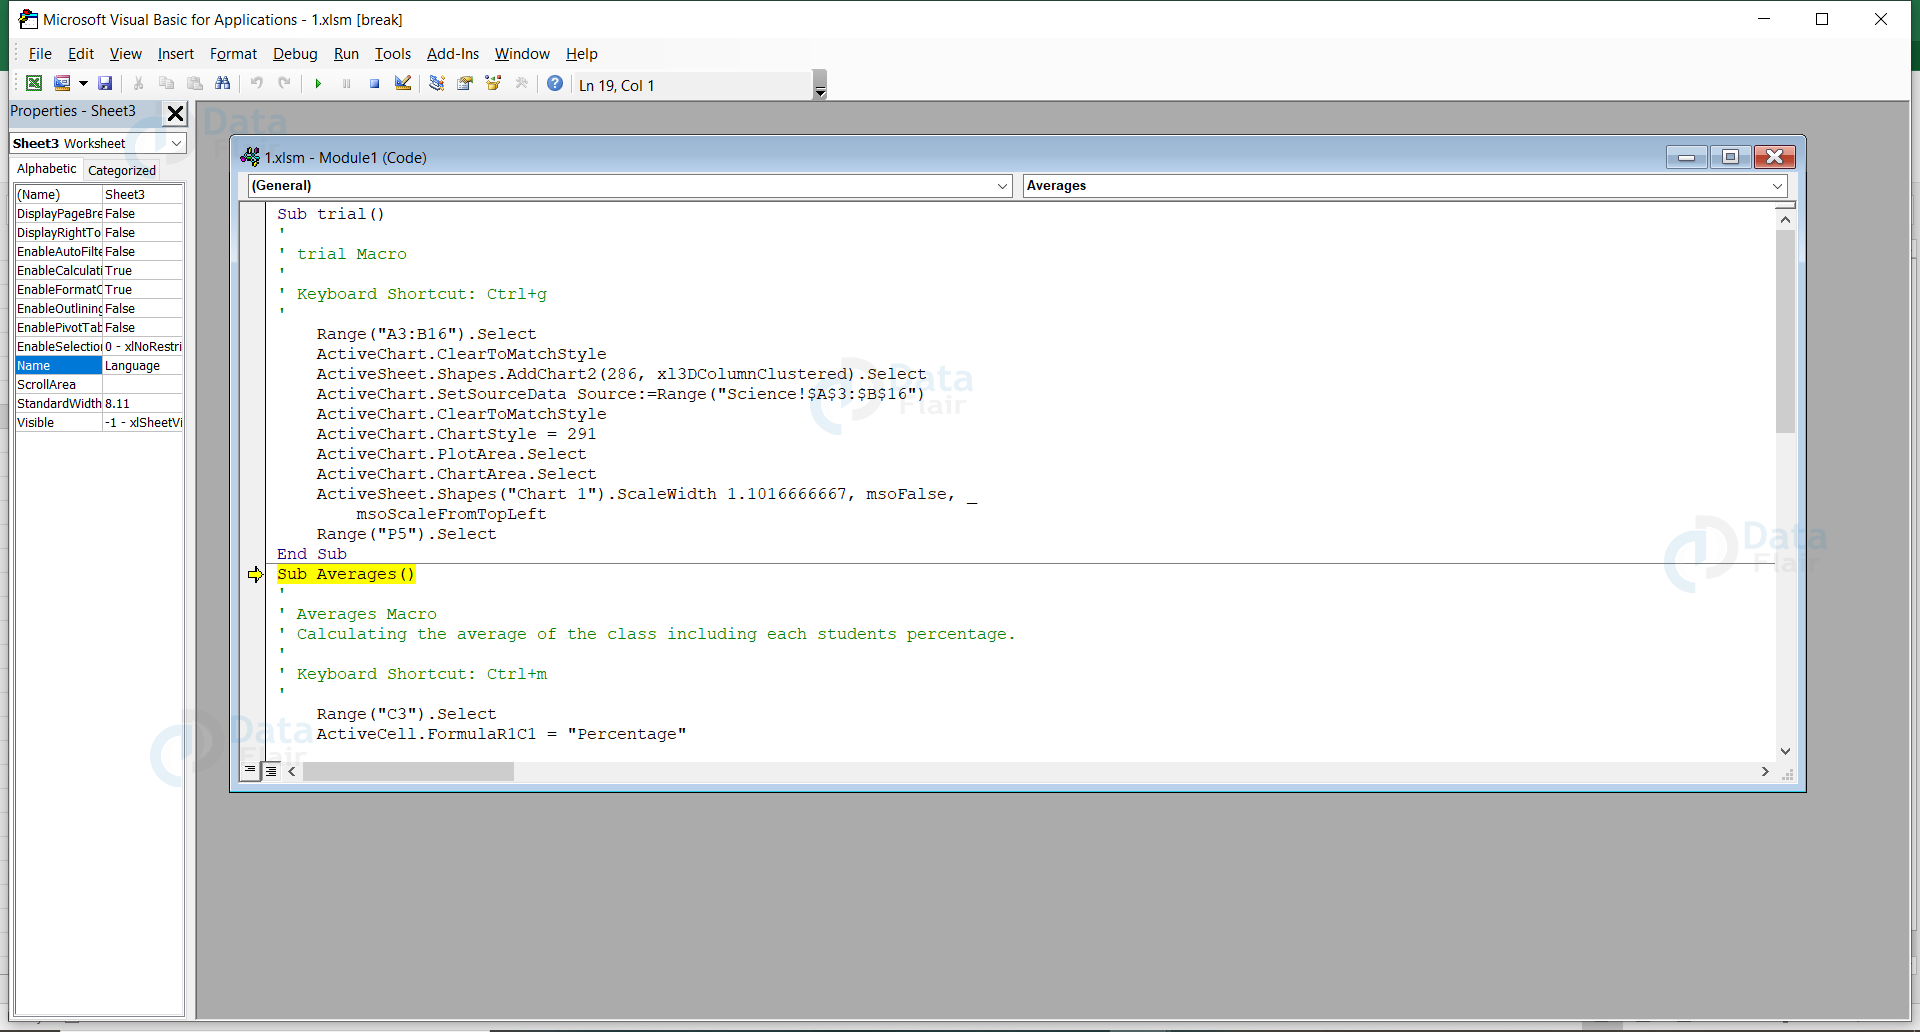
The steps lead to opening of the code. If you want to edit on the code directly, then click on the edit option in the box. It gives you access to edit the code in the code console itself.
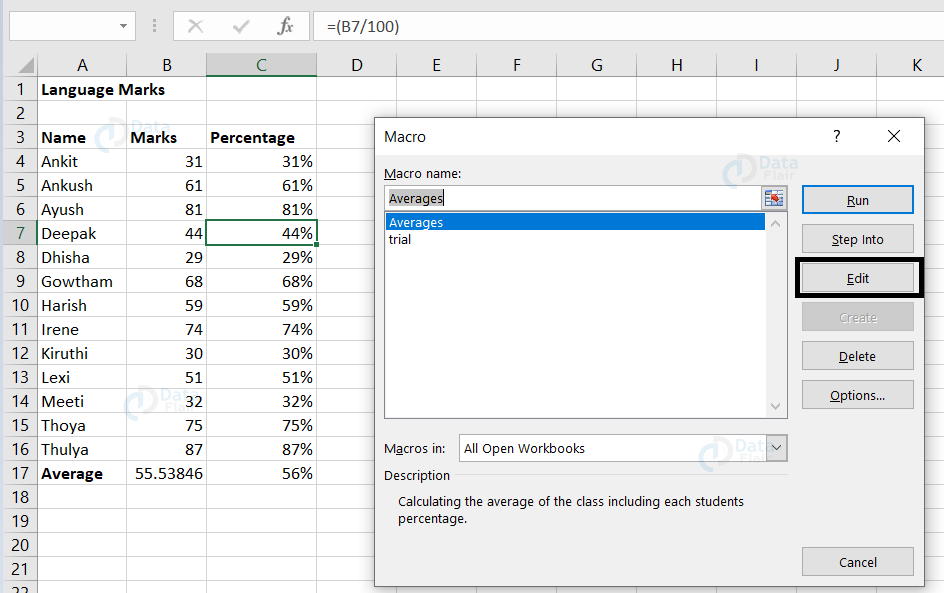
Once you click on it, the code console opens up and you can start editing in the code itself.
1. How to open a macro
To open a macro, follow the steps:
1: Go to the view tab and click on the macros icon.
2: Click on the view macro to view it.

2. View Macro
When the user clicks on the view macro, a dialog box appears with the existing macros along with run, edit or delete macro options.
3. Record Macro
When the user clicks on the record macro, a dialog box appears asking for the macros details and the user can record the macros after filling it.
4. Absolute References
An absolute reference macro would perform the exact steps that have been recorded. Usually, the macros are being recorded in absolute references type. While recording an absolute reference macro, ensure that all the steps are being recorded from the start to end.
5. Relative References
Relative reference is a type of function in macros. It is being used widely when there is a lot of data to be arranged in a specific format.
To enable the relative reference macro, click on the view tab, go to macros and choose “Use Relative References”, then you start the macro recording. A macro recorded using relative references can perform the tasks at different parts on the worksheet.

6. Deleting a Macro
We can also delete a macro. In order to do that, follow the steps:
1: Click on the Developer tab.
2: Choose the macros option.
3: Choose the “ Delete ” option from the box.
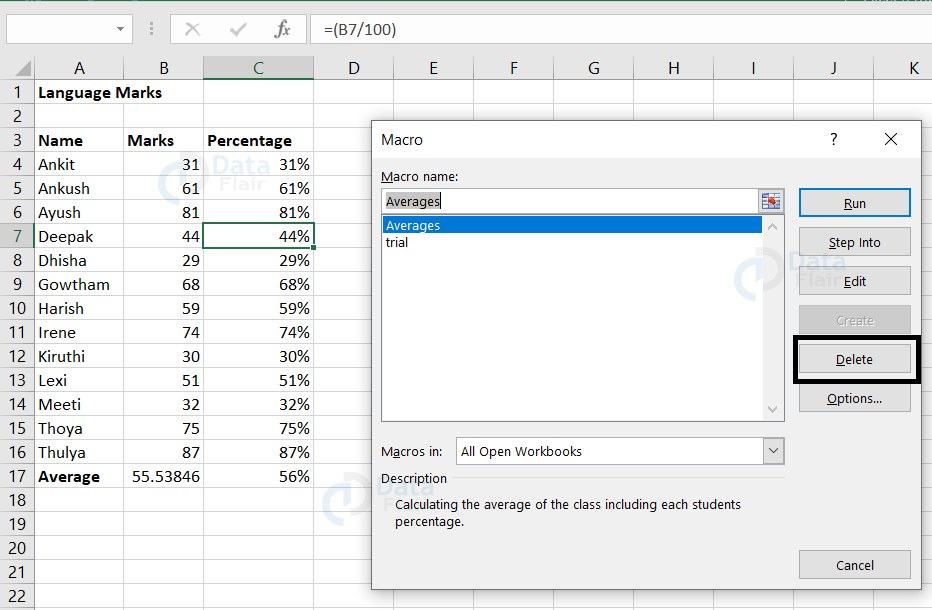
Once it’s clicked, the macro gets deleted.
7. Options label
In case, if you change your mind to change the shortcut key and description of that particular macro, then click on the option label from the box. Then, again a box appears with the edit options.
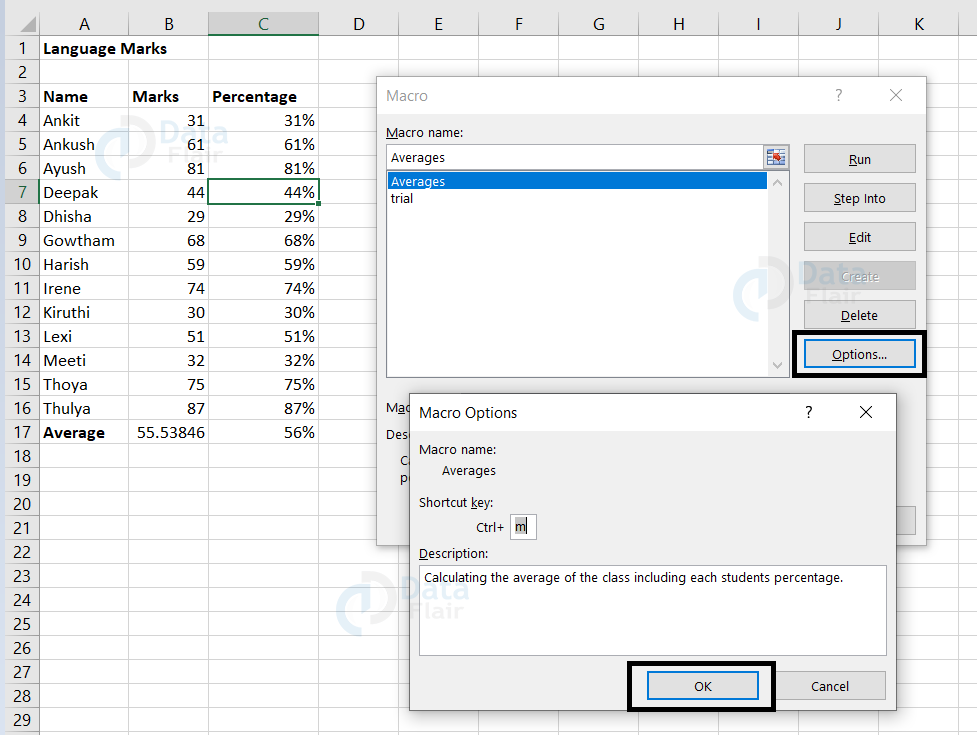
After editing, click on the ok button.
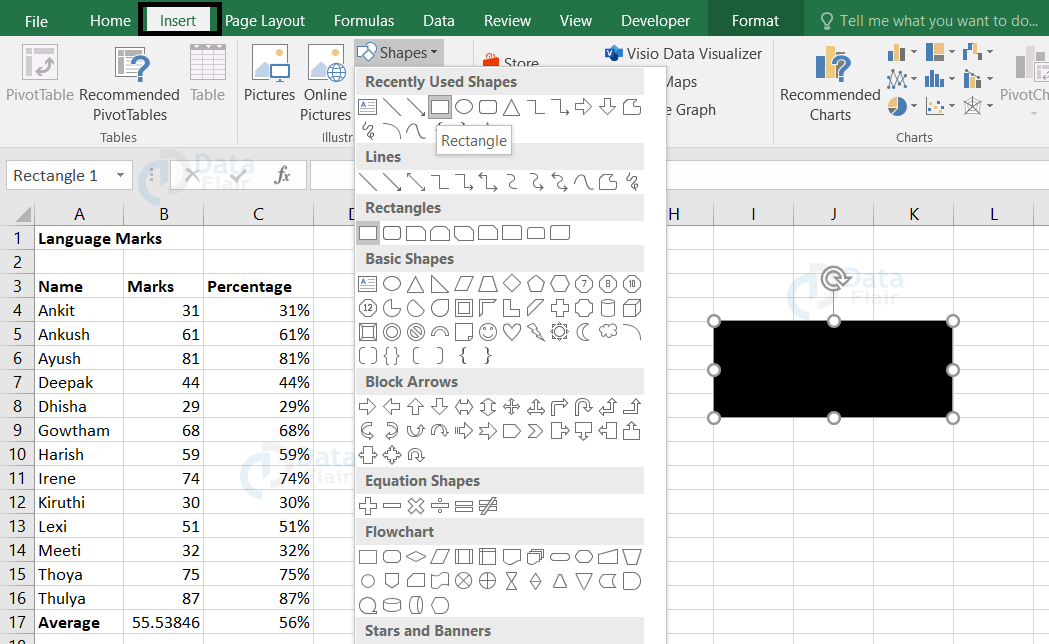
8. Assigning a macro to a shape
Let’s look at how to assign a macro to a shape. In order to do that, follow the steps:
1: Click on the Insert tab.
2: Choose the shapes.
3: Click on the shape you want.
Note: We are choosing a rectangle here. Have a look at the sample below.
4: Right click on the shape in the worksheet.
5: Choose to “Assign macro”.
6: Click on the macro you wanted to apply.
7: Click ok button.
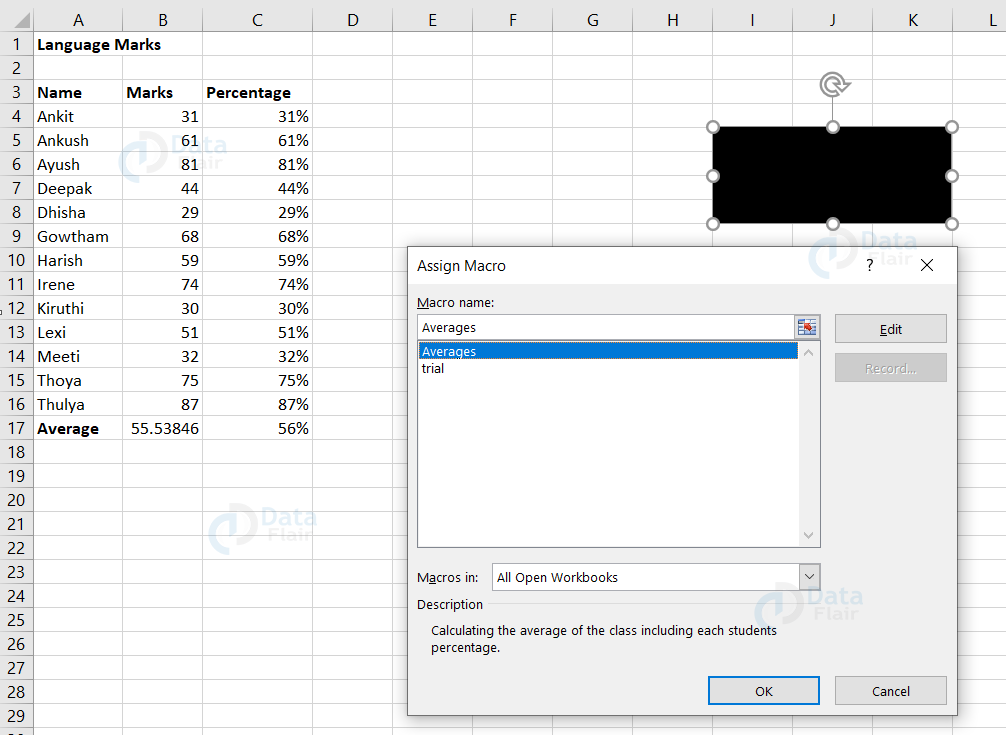
After the steps are being followed, the macro will be assigned to the shape. Now, whenever you click on the shape, the recorded macro will work on your spreadsheet.
Let’s look at how to add the macro to the quick access toolbar. In order to do that, follow the steps:
1: Click on the File tab
2: Choose options.
3: A box appears and choose the Quick Access Toolbar.
4: Click on the view macros and click on the add button.

5: Then, press ok.
![]()
After following the steps, the macro icon is also viewed at the top of the excel worksheet. Once, you click on the icon then you can view all the recorded macro of the worksheet.
9. How to save a macro-enabled file?
To keep the macro enabled in the worksheet, save the excel worksheet type as Excel Macro-Enabled Workbook.
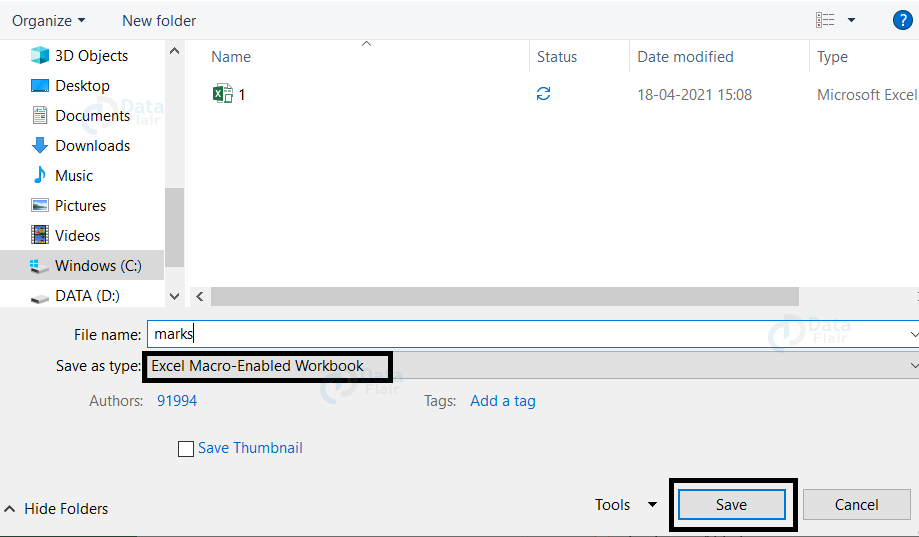
This is how we have to save a macro enabled worksheet.
10. Saving Macros in a Personal Workbook
Create a macro and save them in a personal macro workbook.
By creating a macro and storing them in a personal macro workbook would help you hide the information that the worksheet is macro enabled. It saves the spreadsheet as a normal excel workbook rather than saving it as a macro enabled worksheet.
11. Hiding / Unhiding a personal Macro workbook:
If you want to make changes in the macros which are being stored in a personal macro workbook, then click on the view tab and choose to unhide from the ribbon.
Following the above instruction, you can unhide your personal workbook since they will be hidden by default. After unhiding, you can run your macro or edit it as per your convenience.
How to view macros in VBA
Macros are being stored in excel as VBA code. After recording a macro, we can view, modify, copy the code that is generated. We can also write code in the VBA code editor. There are three ways to view excel macro code. They are as follows:
1. Developer Tab on the Ribbon
Go to the Developer tab, click on the view code from the ribbon.

This leads to the VBA code editor window screen.
VBA code editor contains the code of already recorded macros.
2. Visual Basic Icon
Go to the developer tab and click on the visual basic icon. This automatically leads us to the VBA code editor window screen.
![]()

3. Macro Dialog box
You can also open the code editor by clicking on the macros on the view tab. Choose view macros and choose the respective macro and click on the edit button. This leads you to the VBA code editor.
The code editor also holds following few components and they are:
- Projects Explorer
- Properties window
- Module window with code
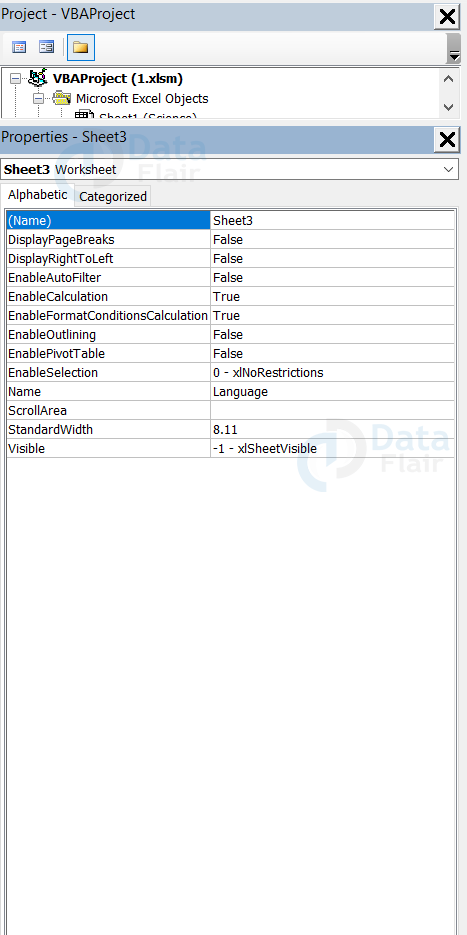
1. Projects Explorer
VBA project names appear under the title of project explorer. in . Under each project, the sheet names and module names are available. When you click on a module name, the corresponding code appears on the code window.
2. Properties Window
VBA object parameters are the properties. The properties appear in the properties window. If the user chooses the object such as a command button then those properties appear in the window.
3. Module window with code
In VBA, the macro codes are stored in modules. When the user selects a macro and clicks edit, then the code automatically appears in the code window.
How to recover a macro in Excel?
When the user loses or deletes the macro unknowingly then rather than creating a new macro, the user can recover the macro itself.
Software to recover macros or corrupted Excel files
There are professional software tools available to recover the corrupted excel sheets. Using these softwares, the user can easily restore the excel sheets, charts and other important data. One of the popular software tools is MS Excel repair tool.
What is the MS Excel repair tool?
MS Excel repair tool is one of the tools used to recover the lost macros.
Using this tool, the user can easily fix the errors in the excel sheets and it can also help the user to access the damaged Excel files as well. This repair tool is compatible with windows as well as mac operating systems.
The advantage of this tool is it supports all versions of Excel and the demo is free.
Steps to use MS Excel repair tool
1: Download the MS Excel repair tool on your system.
2: Install this software tool in your device, click next and check the box agreeing to all terms and conditions.
3: Press on the ok button and keep moving forward.
4: Choose the browse button if you know the path of the corrupted excel file and click on the corrupted excel file.
5: If you are not sure about the file path, click on the search button and select the file.
Note: The excel files will be listed and the tool will find and repair the corrupted file from the chosen folder.
6: Click on the repair button after choosing the corrupted file.
Note: You can see that the corrupted files are in progress.
7: Once the scan is done, the user can preview the corrupted file that has been repaired now from the right panel.
8: Choose a location to save the file.
Steps to recover personal Macro workbook
To recover the personal macro workbook, follow the steps below:
1: Go to the File tab and choose options from the left panel.
2: Click on the Add-ins on the left panel of the dialog box.
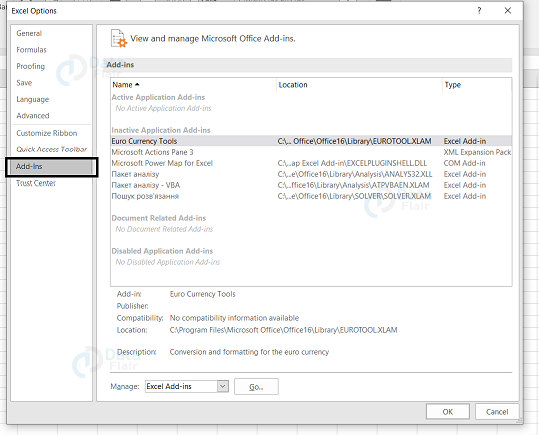
3: Go to Manage dropdown list, choose disabled Items (last item of the list).
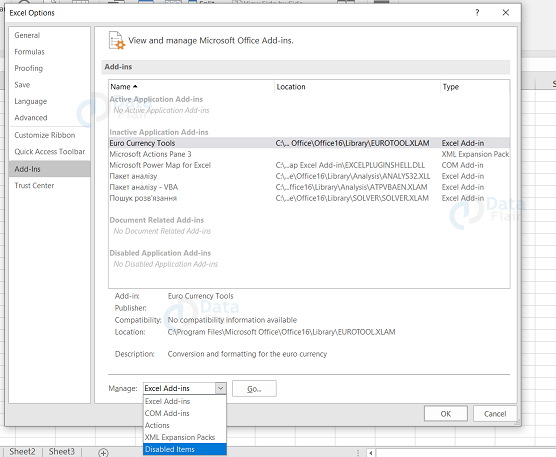
4: Click on the OK button and restart the MS Excel.
Macro Recovery Method
Sometimes the user may lose the macro along with the corrupted file. In order to recover those macros, the user has to recover the corrupted workbook.
Method 1: Set the Calculation option to Manual
To recover the macros using this method, follow the steps:
1: Open the MS Excel and not the corrupted excel workbook.
2: Go to the formula tab and click on the calculation options.
3: Choose manual from the drop down menu.

Setting up the security high
To set up the macro security maximum, follow the steps:
1: Go to the file tab and click on the options.
2: Choose formulas from the left side of the pane.
3: Under the calculation options setting, set the maximum change and click on the ok button.

4: Now, open the corrupted workbook and if the workbook runs successfully, the user will receive a message that the macros were disabled.
Hope the user recovers the lost macro successfully after setting up the setting as described above.
Method 2: Change the Macro Security Option
To change the macro security options, follow the steps:
1: Open the MS Excel and not the corrupted excel sheet.
2: Go to the files tab and choose options.
3: Click on the trust center from the left side panel of the window and choose trust center settings..
Note: A new dialog box appears.
4: Go to macro settings from the left side panel.
5: Enable Disable All Macros with notification.

6: Finally, press the ok button.
7: Now, open the corrupted workbook and if the workbook runs successfully, the user will receive a message that the macros were disabled or if excel does not open, then it means that the method did not work.
Hope the user recovers the lost macro successfully, after setting up the setting as described above.
Macro Security
Macros are executed using VBA code in Excel. There are chances of some other malicious code to be executed when you open a macro enabled workbook. This is considered to be a threat to your system. Hence, Microsoft provides a macro security facility that helps in protecting your system.
What are Macro Viruses?
Macros can also contain viruses. Excel VBA in which the macros are written has access to most of the Windows system calls and sometimes the macros are automatically executed when the user opens the spreadsheet.
There is a potential threat of the existence of a virus written as a macro and it’s hidden within Excel. These types of macros have a lot of chances to get executed when we open a workbook. Therefore, Excel macros can be very dangerous and it might attack your system.
Though, there are measures taken but still we should be cautious while using macros in Excel. Microsoft has also developed macro security in which you can identify which macros you can trust and which you cannot trust.
1. Disabling the Macros
Excel usually disables the macros and if the user wants to run a macro then, they have to enable it manually. Now, let’s see how to disable the macros manually. In order to disable, follow the steps:
1: Go to the home tab, choose options from the left side menu.
2: Select trust center from the left side of the dialog box and click on the trust center settings…
3: In the left menu, go to Macro settings and click on the disable all macro settings without notification.

4: Press OK.
Summary
1. Macro is a series of instructions that can be recorded and it starts by providing a name to it.
2. Macro helps in automating repetitive tasks.
3. The macros are written in Visual Basic for Applications programming language.
4. It saves a lot of time by not repeating the routine tasks in a worksheet.
5. The other advantage of recording a macro is that we can run a macro as many times as we want.
Your opinion matters
Please write your valuable feedback about DataFlair on Google


