Forms in React
Job-ready Online Courses: Dive into Knowledge. Learn More!
Forms are a critical component of many web applications. React provides several tools to make building forms easy and efficient. React forms can be simple or complex and contain text inputs, checkboxes, radios, select elements, and more. In this article, we will explore the various techniques and components used to build forms in React, including controlled and uncontrolled components, form validation, and handling form submissions.
Controlled Components in React:
One of the key concepts in React forms is the idea of a “controlled component.” A controlled component is a form element whose value is controlled by React, rather than by the user. This means that React is responsible for setting the value of the form element. To create a controlled component in React, you need to pass a value prop to the form element and a callback function.
<input
  type="text"
  value={this.state.username}
  onChange={this.handleChange}
/>
In this example, the value of the input element is set to the username state property, and the handleChange function is called whenever the user changes the value of the input element.
Uncontrolled Components in React:
An alternative to controlled components are “uncontrolled components.” An uncontrolled component is a form element whose value is managed directly by the DOM, rather than by React. Uncontrolled components are simpler to create and can be more efficient in certain cases. To create an uncontrolled component in React, you simply need to omit the value prop from the form element.
<input type="text" ref={this.usernameInput} />
In this example, the input element is an uncontrolled component, and its value can be accessed directly using the usernameInput ref.
Form Validation in React:
Form validation is an important part of building reliable and user-friendly forms. React provides several tools and techniques for form validation, including manual validation, built-in validation components, and third-party libraries. To implement form validation in React, you need to define the validation rules, check the form values when the form is submitted
class NameForm extends React.Component {
  constructor(props) {
    super(props);
    this.state = {value: ''};

    this.handleChange = this.handleChange.bind(this);
    this.handleSubmit = this.handleSubmit.bind(this);
  }

  handleChange(event) {
    this.setState({value: event.target.value});
  }

  handleSubmit(event) {
    alert('A name was submitted: ' + this.state.value);
    event.preventDefault();
  }

  render() {
    return (
      <form onSubmit={this.handleSubmit}>
        <label>
          DataFlair's Student Name:
          <input type="text" value={this.state.value} onChange={this.handleChange} />
        </label>
        <input type="submit" value="Submit" />
      </form>
    );
  }
}

const root = ReactDOM.createRoot(document.getElementById('root'));
root.render(<NameForm />);
Output:

Alert output:

This is a code snippet for a NameForm component that extends the React.Component class. It has a constructor that initializes the state with an empty value property.
The component has two methods: handleChange and handleSubmit. handleChange is used to update the value state property every time the input field is changed. handleSubmit is triggered when the form is submitted and alerts the user with the submitted value. It also prevents the default form submission action with event.preventDefault().
The render method is used to create the form with a label and an input field. The input field’s value is set to the current value state property, and its onChange event is set to call the handleChange method. When the form is submitted, the handleSubmit method is called.
Finally, the NameForm component is rendered to the DOM using ReactDOM.createRoot and root.render().
Handling Form Submission in React:
Handling form submissions is an important part of building forms in React. To handle form submissions, you need to define an onSubmit handler for the form.
Here’s an example of how you can handle form submission in React:
class FormExample extends React.Component {
  constructor(props) {
    super(props);
    this.state = {
      name: "",
      email: "",
    };
  }

  handleChange = (event) => {
    this.setState({ [event.target.name]: event.target.value });
  };

  handleSubmit = (event) => {
    event.preventDefault();
    console.log(`Name: ${this.state.name}`);
    console.log(`Email: ${this.state.email}`);
  };

  render() {
    return (
      <form onSubmit={this.handleSubmit}>
        <label>
          Name:
          <input
            type="text"
            name="name"
            value={this.state.name}
            onChange={this.handleChange}
          />
        </label>
        <br />
        <label>
          Email:
          <input
            type="email"
            name="email"
            value={this.state.email}
            onChange={this.handleChange}
          />
        </label>
        <br />
        <button type="submit">Submit</button>
      </form>
    );
  }
}
In this example, we create a FormExample component that renders a form with two input fields for name and email. The handleChange function is called every time the value of an input field changes, and it updates the corresponding state property. The handleSubmit function is called when the form is submitted, and it logs the values of the name and email fields to the console.
By using the onSubmit event, we prevent the default behavior of the form submission, which is to refresh the page. By calling event.preventDefault(), we can handle the form submission ourselves and do what we want with the form data, such as sending it to a server or saving it to local storage.
React Select Tag
In React, a select tag is used in forms to allow the user to select one or multiple options from a list of pre-defined options. The select tag can be used in conjunction with the option tag to define each selectable option.
class FlavorForm extends React.Component {
  constructor(props) {
    super(props);
    this.state = {value: 'react'};

    this.handleChange = this.handleChange.bind(this);
    this.handleSubmit = this.handleSubmit.bind(this);
  }

  handleChange(event) {
    this.setState({value: event.target.value});
  }

  handleSubmit(event) {
    alert('Your favorite DataFlair Tutorial is: ' + this.state.value);
    event.preventDefault();
  }

  render() {
    return (
      <form onSubmit={this.handleSubmit}>
        <label>
          Pick your favorite DataFlair's Tutorial:
          <select value={this.state.value} onChange={this.handleChange}>
            <option value="react">React</option>
            <option value="python">Python</option>
            <option value="mongodb">MongoDB</option>
          </select>
        </label>
        <input type="submit" value="Submit" />
      </form>
    );
  }
}

ReactDOM.render(
  <FlavorForm />,
  document.getElementById('root')
);
Output:

Alert after selecting React as the option, output of the alert:
This is a React component that defines a form with a select input. The select input allows the user to choose their favorite DataFlair tutorial from a list of options.
When the user selects an option, the handleChange method is called, which updates the component’s state to reflect the new value of the select input. When the form is submitted, the handleSubmit method is called, which displays an alert message with the user’s selected tutorial.
The select input is defined using the HTML <select> element, with the value attribute set to the current value of the component’s state, and the onChange attribute set to the handleChange method. The <option> elements within the <select> element represent the available options, with the value attribute set to the value that will be stored in the component’s state when the user selects that option.
The form is rendered using the ReactDOM.render() method, which takes the FlavorForm component and a reference to the DOM element where the component will be mounted.
React TextArea Tag
The <textarea> tag in React is used to create a multi-line input field. It is commonly used for allowing users to enter larger amounts of text, such as in forms or comments sections.
function ContactForm() {
  const [name, setName] = React.useState("");
  const [message, setMessage] = React.useState("");

  const handleSubmit = (event) => {
    event.preventDefault();
    alert(`Name: ${name}\nMessage: ${message}`);
  };

  return (
    <form onSubmit={handleSubmit}>
      <label>
        Name:
        <input
          type="text"
          value={name}
          onChange={(event) => setName(event.target.value)}
        />
      </label>
      <br />
      <label>
        Message:
        <textarea
          value={message}
          onChange={(event) => setMessage(event.target.value)}
        />
      </label>
      <br />
      <button type="submit">Submit</button>
    </form>
  );
}

ReactDOM.render(<ContactForm />, document.getElementById("root"));
Output:

In this example, the <textarea> tag is used to create the input field for the message. The value attribute is set to the message state variable, and the onChange event is used to update the message state whenever the user types something in the field. The handleSubmit function is called when the form is submitted, and it displays an alert with the entered name and message.
Input Tag in React
The <input> tag in React is used to create various types of input fields. It is a fundamental component in building forms and is used to accept user input such as text, numbers, email addresses, dates, and more.
import React, { useState } from "react";

function UserForm() {
  const [name, setName] = useState("");
  const [email, setEmail] = useState("");
  const [age, setAge] = useState("");

  const handleSubmit = (event) => {
    event.preventDefault();
    alert(`Name: ${name}\nEmail: ${email}\nAge: ${age}`);
  };

  return (
    <form onSubmit={handleSubmit}>
      <label>
        Name:
        <input
          type="text"
          value={name}
          onChange={(event) => setName(event.target.value)}
        />
      </label>
      <br />
      <label>
        Email:
        <input
          type="email"
          value={email}
          onChange={(event) => setEmail(event.target.value)}
        />
      </label>
      <br />
      <label>
        Age:
        <input
          type="number"
          value={age}
          onChange={(event) => setAge(event.target.value)}
        />
      </label>
      <br />
      <button type="submit">Submit</button>
    </form>
  );
}

export default UserForm;
Output:
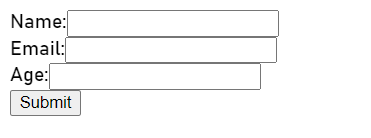
In this example, the <input> tag is used to create different types of input fields for name, email, and age. The value attribute is set to the corresponding state variable, and the onChange event is used to update the state whenever the user types something in the field. The handleSubmit function is called when the form is submitted, and it displays an alert with the entered name, email, and age.
Conclusion:
Handling forms in React is a crucial aspect of building web applications. React provides a wide range of tools to make the process of creating and submitting forms easy and efficient. Understanding form handling such as controlled components, form validation, and submission, can greatly enhance the user experience.
Whether you are creating a simple contact form or a complex survey, using React to handle forms is a must-have skill.
Your 15 seconds will encourage us to work even harder
Please share your happy experience on Google


