

We offer you a brighter future with industry-ready online courses - Start Now!!
1. Objective
In our last tutorial, we studied Power BI Gateway. In this Power BI Treemap tutorial, we will learn about when to use a treemap in Power BI, and how to create a basic Power BI treemap. Atlast, we will cover the highlighting and cross-filtering.
So, let’s start Power BI Treemap tutorial.
How to Create Power BI Treemap – 8 Simple & Easy Steps
2. Power BI Treemap
Microsoft Power BI Treemaps show various levelled information as an arrangement of settled square shapes. Each level of the pecking order is spoken to by a shaded square shape (regularly called a “branch”) containing different square shapes (“takes off”). The space inside every square shape is distributed in light of the quantitative esteem being estimated, with the square shapes orchestrated in a measure from upper left (biggest) to base right (littlest).
For instance, in case I’m investigating my business, I may have top-level square shapes (branches) for the attire classifications: Urban, Rural, Youth, and Mix. My classification square shapes would contain littler square shapes (leaves) for the apparel makers inside that class, and these little square shapes would be measured and shaded in light of the number sold. In the Urban branch above, heaps of Maximus attire was sold, less Natura and Fama, and next to no Leo.
Do you know How to Create ArcGIS Maps For Power BI with ESRI
Along these lines, the Urban branch of my Treemap would have the biggest square shape for Maximus (in the upper left corner), somewhat littler square shapes for Natura and Fama, heaps of different square shapes speaking to the various garments sold, and a small square shape for Leo. What’s more, I could look at the number of things sold over the other garments classifications by contrasting the size and shading of each leaf hub; the bigger the square shape and the darker the shading, the higher the esteem.
3. When to Utilize Power BI Treemap
Power BI Treemaps are an incredible decision:
- To show a lot of various levelled information.
- At the point when a bar outline can’t successfully deal with the substantial number of qualities.
- To demonstrate the extents between each part and the entirety.
- To demonstrate the example of the conveyance of the measure over each level of classifications in the chain of importance.
- Demonstrate properties utilizing size and shading coding.
- To spot designs, anomalies, most-imperative patrons, and special cases.
a. Requirements for Power BI Treemaps
- Power BI administration or Power BI Desktop.
- Retail Analysis test.
4. Steps to Make Treemap in Power BI
These guidelines utilize the Retail Analysis Sample. To take after a long, sign in to Power BI benefit (not Desktop) and select Get Data > Samples > Retail Analysis Sample > Connect > Go to dashboard. Making representations in a report requires to alter authorizations to the dataset and report. Fortunately, the Power BI tests are editable. Be that as it may, in the event that somebody imparts an answer to you, you won’t have the capacity to include new perceptions.
- Select the “Aggregate stores” tile to open the Retail Analysis test report.
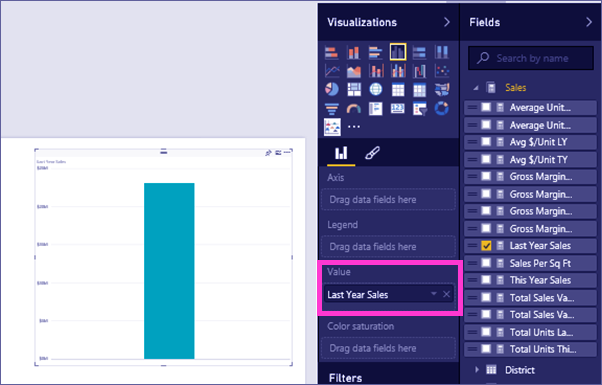
- Open Editing View and select the Sales > Last Years Sales measure.
Step 2 – To Create Power BI Treemap
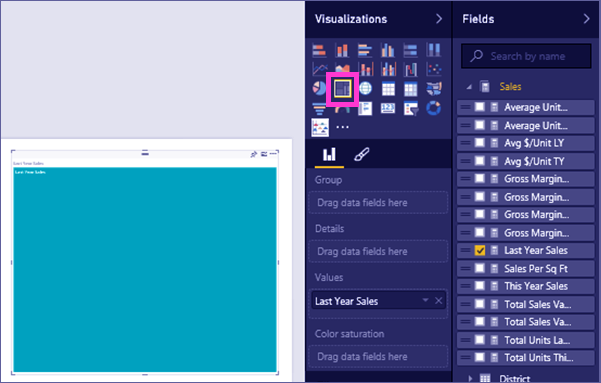
- Change over the graph to a treemap.
Let’s discuss How to Share Power BI Dashboard – Outside Organization/Clients
Step 3 – To Create Power BI Treemap
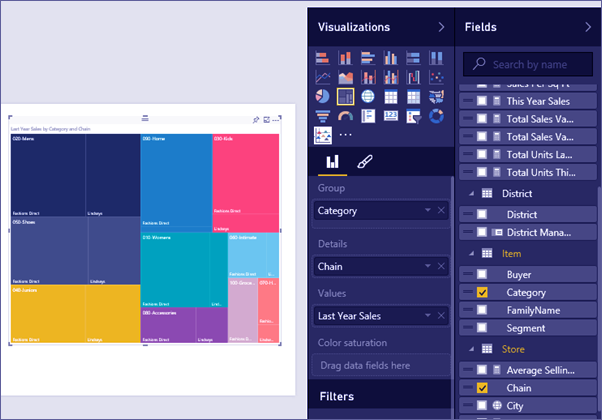
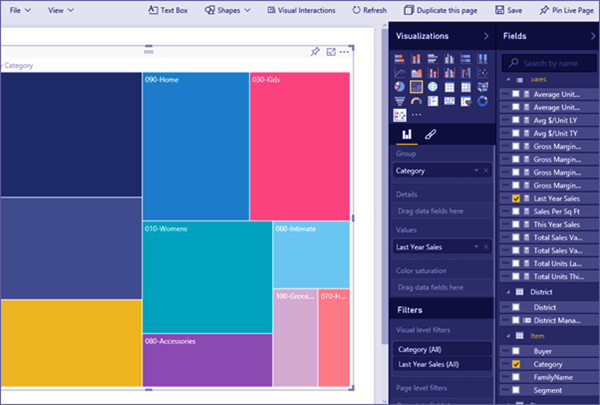
- Drag Item > Category to the Group well. Power BI makes a treemap where the measure of the square shapes reflects add up to deals and the shading speaks to the class. Generally, you’ve made a progressive system that outwardly portrays the relative size of aggregate deals by class. The men’s class has the most noteworthy deals and the Hosiery classification has the least.
Step 4 – To Create Power BI Treemap
- Drag Store > Chain to the Details well to finish your Power BI treemap. You would now be able to think about a year ago are deals by class and chain.
Step 5 – To Create Power BI Treemap
Note – Shading Saturation and Details can’t be utilized in the meantime.
- Float over a Chain territory to uncover the tooltip for that part of the Category. For instance, floating over Lindsey in the 040-Juniors square shape uncovers the tooltip for Lindsey’s part of the Juniors classification.
Step 6 – To Create Power BI Treemap
- Include the treemap as a dashboard tile (stick the visual).
- Spare the report.
Follow this link to know about Power Bi and Excel Integration
5. Featuring and Cross-Sifting
For data about utilizing the Filters sheet, see Add a channel to a report.
Featuring a Category or Details in a Power BI treemap cross-features and cross-channels alternate perceptions on the report page also, the other way around. To take after a long, either add some visuals to a similar page or duplicate/glue the treemap to a report page that as of now has different visuals.
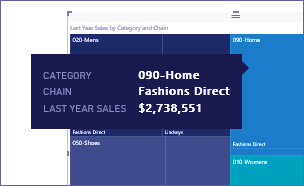
- On the treemap, select either a Category or a Chain inside a Category. This cross-features alternate perception on the page. Choosing 050-Shoes, for instance, demonstrates to me that last year’s deals for shoes were $3,640,471 with $2,174,185 of that originating from Fashions Direct.

Power BI Treemap – Featuring and Cross-Sifting
- In the Last Year Sales by Chain pie outline, choosing the Fashions Direct cut, cross-channels the treemap.
- To oversee how outlines cross-feature and cross-channel each other, see Visualization collaborations in a Power BI report.
Read about Power BI Report Server Tutorial (Latest 2018)
So, this was all about Power BI Treemap. Hope you like our explanation.
6. Conclusion
Hence, In this Microsoft Power BI tutorial, we learned about when to use a Power BI treemap. In addition, we studied how to create a basic treemap, and Highlighting and cross-filtering in Power BI. Still, you have a query, feel free to share with us!
Related Topic- Connect to Data in Power BI Desktop
For reference