


FREE Online Courses: Your Passport to Excellence - Start Now
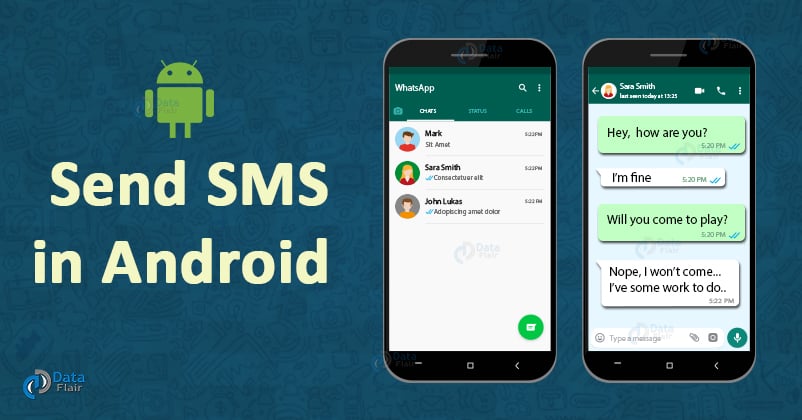
Hey Everyone, welcome back to our Android article. There are three very important features of Android that are SMS, Email and the Call. So in this article, we will see one of these three features and implement it at the same time. We will begin with how to send SMS in Android in this article, then move further to the call and the email in the coming articles.
Send SMS in Android
So beginning with SMS, that is, Short Message Service. It is a messaging service in Android. It lets us send messages to a particular contact number. This is provided to us by Android in two ways –
- Using the SMSManager API.
- Using the Built-In application for sending messages.
So let me first show you the example of both of these:
1. This one is using SMSManager:
SmsManager smsmanage = SmsManager.getDefault();
smsmanage.sendTextMessage(“Phone Number”, null, “The message to be sent”, null, null);
For this, we would need to set permission to send SMS in the Manifest file.
<uses-permission android:name="android.permission.SEND_SMS"/>
2. This one is with the help of Built-in application Intent for SMS:
Intent smsIntent = new Intent(Intent.ACTION_VIEW);
smsIntent.putExtra("...Message...", "...default content...");
smsIntentt.setType("vnd.android-dir/mms-sms");
startActivity(sendIntent);
For this too, we would need to set permission to send SMS in the Manifest file.
<uses-permission android:name="android.permission.SEND_SMS"/>
There are a few more methods that are available in the SmsManager class. We are mentioning them below:
1. ArrayList<String> divideMessage(String text)
This method can divide a message into sub-parts, within the limit of a default message size.
2. void sendDataMessage(String destinationAddress, String scAddress, short destinationPort, byte[] data, PendingIntent sentIntent, PendingIntent deliveryIntent)
Technology is evolving rapidly!
Stay updated with DataFlair on WhatsApp!!
It sends a data-based message to a particular application port.
3. static SmsManager getDefault()
This method gets a default instance of an SmsManager.
4. void sendTextMessage(String destinationAddress, String scAddress, String text, PendingIntent sentIntent, PendingIntent deliveryIntent)
It sends a Text-based message.
How to Send SMS in Android?
Now we will implement SMS in our application and see how it works:
Step 1: First of all as always, we will create a new project and we will name it. After that we will create the layout in Activity_main.xml as follows:
<?xml version="1.0" encoding="utf-8"?>
<androidx.constraintlayout.widget.ConstraintLayout xmlns:android="http://schemas.android.com/apk/res/android"
   xmlns:tools="http://schemas.android.com/tools"
   android:layout_width="match_parent"
   android:layout_height="match_parent"
   tools:context=".MainActivity">

   <RelativeLayout
       android:layout_width="match_parent"
       android:layout_height="match_parent"
       tools:context=".MainActivity">

       <TextView
           android:id="@+id/textView2"
           android:layout_width="wrap_content"
           android:layout_height="wrap_content"
           android:layout_centerHorizontal="true"
           android:layout_marginLeft="100dp"
           android:layout_marginTop="100dp"
           android:fontFamily="@font/arbutus"
           android:text="DataFlair "
           android:textColor="@color/colorPrimaryDark"
           android:textSize="50dp" />

       <TextView
           android:id="@+id/textView1"
           android:layout_width="wrap_content"
           android:layout_height="wrap_content"
           android:layout_alignParentTop="true"
           android:layout_marginLeft="110dp"
           android:layout_marginTop="184dp"
           android:fontFamily="@font/arbutus"
           android:text="SMS Service"
           android:textColor="#EE47ADDD"
           android:textSize="30dp" />

       <EditText
           android:id="@+id/editText"
           android:layout_width="wrap_content"
           android:layout_height="wrap_content"
           android:layout_marginLeft="100dp"
           android:layout_marginTop="270dp"
           android:hint=" Please Enter Phone Number"
           android:textColorHint="#9FAEE9" />

       <EditText
           android:id="@+id/editText2"
           android:layout_width="wrap_content"
           android:layout_height="wrap_content"
           android:layout_below="@+id/editText"
           android:layout_marginStart="100dp"
           android:layout_marginLeft="100dp"
           android:layout_marginTop="45dp"
           android:hint="Please write the message "
           android:textColorHint="#CE9C9C" />

       <Button
           android:id="@+id/btnSendSMS"
           android:layout_width="wrap_content"
           android:layout_height="wrap_content"
           android:layout_below="@+id/editText2"
           android:layout_centerHorizontal="true"
           android:layout_marginTop="48dp"
           android:text="Send Sms" />

   </RelativeLayout>


</androidx.constraintlayout.widget.ConstraintLayout>
Step 2: Now we will write the code for MainActivity.java file as follows:
package com.DataFlair.smssample;

import android.Manifest;
import android.app.Activity;
import android.content.pm.PackageManager;
import android.os.Bundle;
import android.telephony.SmsManager;
import android.view.View;
import android.widget.Button;
import android.widget.EditText;
import android.widget.Toast;
import androidx.core.app.ActivityCompat;
import androidx.core.content.ContextCompat;

public class MainActivity extends Activity {
   private static final int PERMISSION_RQST_SEND = 0;
   Button button1;
   EditText phoneNo;
   EditText myMessage;
   String phoneNo;
   String message;

   @Override
   protected void onCreate(Bundle savedInstanceState) {
       super.onCreate(savedInstanceState);
       setContentView(R.layout.activity_main);
//We’ll create objects
       button1 = (Button) findViewById(R.id.btnSendSMS);
       phoneNo = (EditText) findViewById(R.id.editText);
       myMessage = (EditText) findViewById(R.id.editText2);

       button1.setOnClickListener(new View.OnClickListener() {
           public void onClick(View view) {
               sendSMSMessage();
           }
       });
   }

   protected void sendSMSMessage() {
       phoneNo = phoneNo.getText().toString(); //we’ll get the phone number from the user
       message = myMessage.getText().toString();//we’ll get the Message from the user
//We’ll check the permission is granted or not . If not we’ll change
       if (ContextCompat.checkSelfPermission(this,Manifest.permission.SEND_SMS) != PackageManager.PERMISSION_GRANTED) {
           if (ActivityCompat.shouldShowRequestPermissionRationale(this,Manifest.permission.SEND_SMS)) {
           }
        else { ActivityCompat.requestPermissions(this, new String[]{Manifest.permission.SEND_SMS}, PERMISSION_RQST_SEND);
           }
       }
   }
//Now once the permission is there or not would be checked
   @Override
   public void onRequestPermissionsResult(int requestCode, String permissions[], int[] grantResults) {
       switch (requestCode) {
           case PERMISSION_RQST_SEND: {
               if (grantResults.length > 0 && grantResults[0] == PackageManager.PERMISSION_GRANTED) {
                   SmsManager smsManager = SmsManager.getDefault();
                   smsManager.sendTextMessage(phoneNo, null, message, null, null);
                   Toast.makeText(getApplicationContext(), "SMS sent.",Toast.LENGTH_LONG).show();
               } else {Toast.makeText(getApplicationContext(), "SMS failed, you may try again later.", Toast.LENGTH_LONG).show();
                   return;
               }
           }
       }

   }
}
Step 3: Now we will update the manifest.xml file as follows:
<?xml version="1.0" encoding="utf-8"?>
<manifest xmlns:android="http://schemas.android.com/apk/res/android"
   package="com.DataFlair.smssample">

   <uses-permission android:name="android.permission.SEND_SMS" />

   <application
       android:allowBackup="true"
       android:icon="@mipmap/ic_launcher"
       android:label="@string/app_name"
       android:roundIcon="@mipmap/ic_launcher_round"
       android:supportsRtl="true"
       android:theme="@style/AppTheme">
       <activity
           android:name="com.DataFlair.smssample.MainActivity"
           android:label="@string/app_name">
           <intent-filter>
               <action android:name="android.intent.action.MAIN" />

               <category android:name="android.intent.category.LAUNCHER" />
           </intent-filter>
       </activity>
       <meta-data
           android:name="preloaded_fonts"
           android:resource="@array/preloaded_fonts" />
   </application>

</manifest>
Step 4: After this, we will now implement our application as follows:
i) Our application would look like this.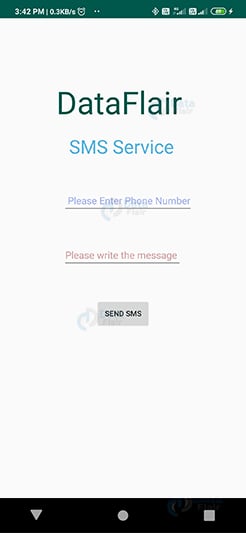
ii) Now, we will enter the number and the message.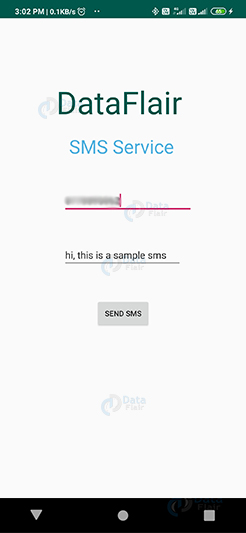
iii) After entering the number and message, we will grant permission to access our messages.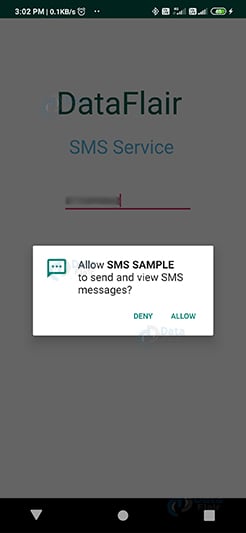
iv) After that, you will see that the message has been sent.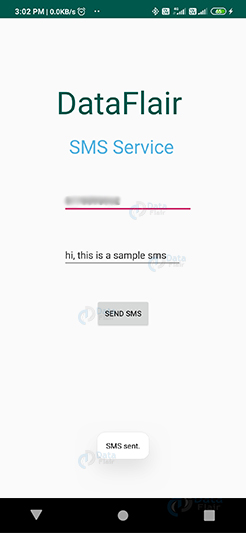
v) Now, the message is delivered and received.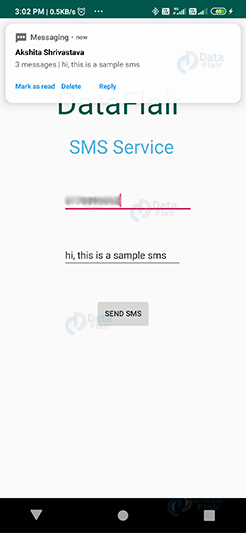
Summary
In this DataFlair’s Send SMS in Android article, we have seen how we can use messaging in our application. We also implemented it in our own Application. I hope you find it easy to implement SMS features in applications. Just give it a try. Now we will meet in the next article on Call services in Android.
If you have any doubts in DataFlair’s Send SMS in Android article, mention them in the comment section. we will be happy to help you.
Happy Learning😃