


Machine Learning courses with 110+ Real-time projects Start Now!!
In the era of video calling, sometimes we don’t want to broadcast our background space for some reason. That’s why video calling applications include a feature that hides the background and places another image in the background. So in this project, we’re going to make our own image background removal application using OpenCV and MediaPipe framework.
OpenCV is an image processing library for python. It is the most popular library for image processing and computer vision tasks because it is open source and very fast. OpenCV contains more than 2500 image processing algorithms. Approx 70% of the industry uses OpenCV for their image processing application.
Popular background removal techniques
- Edge-based background removal- This technique detects edges in the image and then finds a continuous edge path. All the elements that are outside the path are considered as background.
- Foreground detection- Foreground detection is a technique that detects changes in the image sequence. The background subtraction method is used here to separate the foreground from an image.
- Machine-Learning Based Approach- In this technique various machine learning algorithms are used to separate the foreground from the background.
What is MediaPipe?
MediaPipe is a machine learning solution framework developed by Google. MediaPipe has various pre-trained models inbuilt. Recently MediaPipe has released a background removal model, they call it selfieSegmentation. We’ll use this model to build our application.
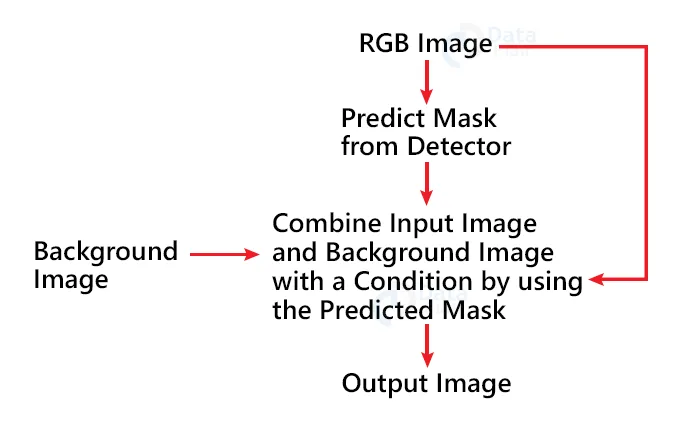
So how does it work?
Background removal or selfie segmentation basically returns a segmented mask of the foreground from the image. Foreground means the subject, in this case, humans are the foreground in the image, and the rest of the things are the background.
What is segmentation?
Segmentation is an image processing technique that returns a binary black and white image mask of a targeted image. It is a process of labeling pixels that shares certain characteristics.
What is selfie-segmentation?
Mediapipe’s selfie segmentation API separates humans from the background within a scene. It creates a binary mask of the scene and focuses only on humans. The value of the background pixels is 0 and the value of the interested area contains greater than 0 but the maximum is 1 depending on certain criteria like lighting, the complexity of the scene, etc.
Prerequisites for the project:
1. Python 3.x (we used 3.8.8) for the project.
2. OpenCV 4.4.0
3. Numpy 1.19
4. MediaPipe 0.8.5
Install all the packages using pip package manager (pip install “package-name”)
Create a folder ‘images’ in the same project directory and store some images that you want to use in the background image.
Download Image Background Removal Project Code
Please download the source code of image background removal with opencv: Image Background Removal Project Code
Steps to solve the project:
Below are the steps to develop remove image background project in python
1. Import necessary packages.
2. Initialize selfie-segmentation object.
3. Read frames from a webcam.
4. Create the segmented mask.
5. Replace the background with an image.
Step 1 – Import necessary packages:
First, we need to import all the necessary packages for the Python project to remove image background.
    # DataFlair background removal
# import necessary packages
import os
import cv2
import numpy as np
import mediapipe as mp

# store background images in a list
image_path = 'images'
images = os.listdir(image_path)

image_index= 0
bg_image = cv2.imread(image_path+'/'+images[image_index])
- os.listdir() returns a list of all files and directories in a specified directory.
- Using cv2.imread() function read an image and store it in the bg_image variable. This will be the default image when the program starts every time.
Step 2 – Initialize selfie-segmentation object:
# initialize mediapipe
mp_selfie_segmentation = mp.solutions.selfie_segmentation
selfie_segmentation = mp_selfie_segmentation.SelfieSegmentation(model_selection=1)
In these two lines of code, we initialized the selfie segmentation object from the media pipe framework.
Step 3 – Read frames from a webcam:
# create videocapture object to access the webcam
cap = cv2.VideoCapture(0)
while cap.isOpened():
  _, frame = cap.read()
  # flip the frame to horizontal direction
  frame = cv2.flip(frame, 1)
  height , width, channel = frame.shape
- Using cv2.VideoCapture(0) we create the capture object that reads frames from the webcam.
- cap.isOpened() checks if the capture object is available or not.
- cap.read() reads each frame from the webcam.
- cv2.flip(frame, 1) flips the frame in horizontal direction. Argument 1 means horizontal direction and 0 means vertical direction.
Step 4 – Create the segmented mask:
RGB = cv2.cvtColor(frame, cv2.COLOR_BGR2RGB)

  # get the result
  results = selfie_segmentation.process(RGB)

  # extract segmented mask
  mask = results.segmentation_mask
  # show outputs
  cv2.imshow("mask", mask)
  cv2.imshow("Frame", frame)

  key = cv2.waitKey(1)
  if key == ord('q'):
    		break
- MediaPipe works with RGB images but OpenCV reads images in BGR format, so using cv2.cvtColor() we convert the BGR image to RGB.
- selfie_segmentation.process(RGB) returns a result class.
- results.segmentation_mask extracts the mask from the result class.
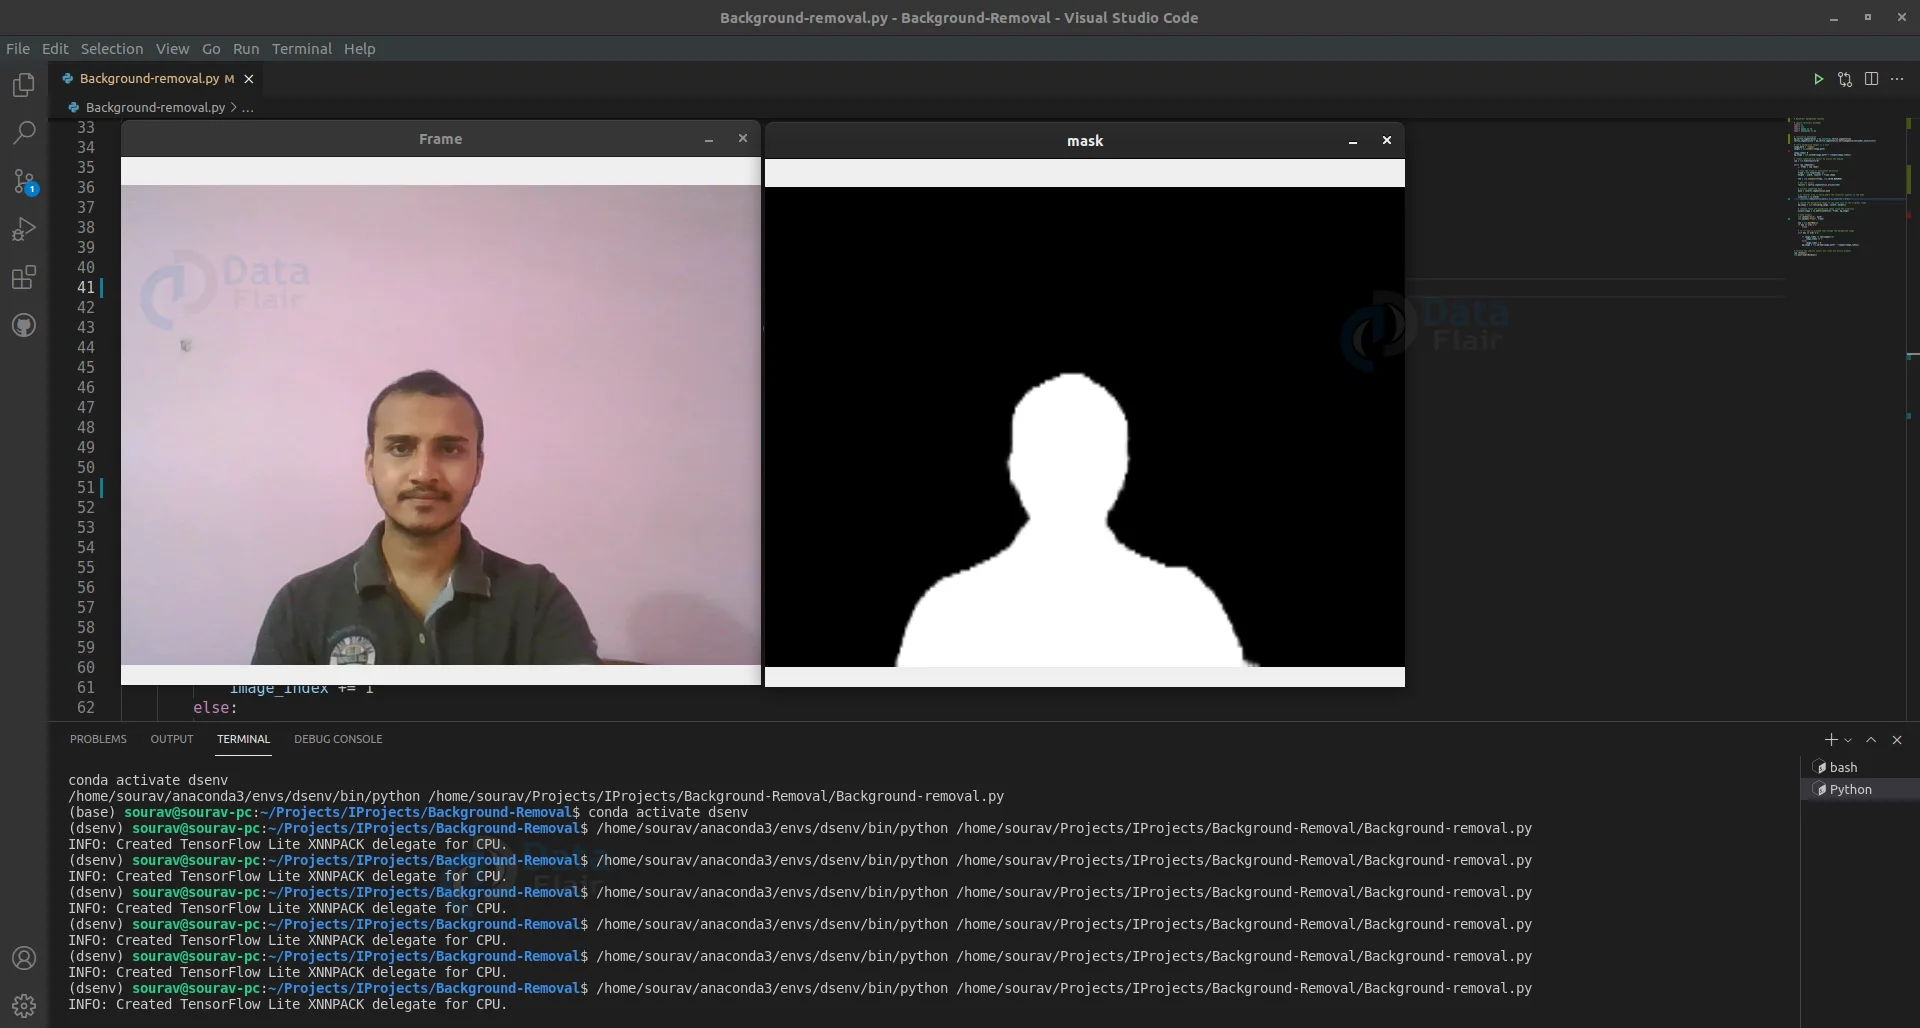
- Finally show the output using cv2.imshow() function. It shows frames in a new opencv window.
Output:
Step 5 – Replace the background with an image:
Now we have the mask, but we want to place the background image in the black region and the foreground image in the white region.
# it returns true or false where the condition applies in the mask
  condition = np.stack(
  	(results.segmentation_mask,) * 3, axis=-1) > 0.5

  # resize the background image to the same size of the original frame
  bg_image = cv2.resize(bg_image, (width, height))

  # combine frame and background image using the condition
  output_image = np.where(condition, frame, bg_image)
cv2.imshow("Output", output_image)
cv2.imshow("Frame", frame)
  key = cv2.waitKey(1)
  if key == ord('q'):
    		break
  # if 'd' key is pressed then change the background image
  elif key == ord('d'):
    		if image_index != len(images)-1:
        			image_index += 1
    		else:
        			image_index = 0
    		bg_image = cv2.imread(image_path+'/'+images[image_index])
- Here, np.stack returns a matrix of shape as the mask. It contains true where the pixel value is more than 0.5 and returns false where the pixel value is less than 0.5.
- Resize the bg_image using cv2.resize() as the same size as the frame. Otherwise, we can’t add a background image with the frame.
- Np.where combines two images, where the condition is satisfied.
- After that, we check if the key ‘d’ is pressed then change the background image. In this way, we can have multiple background images and can change them at runtime.
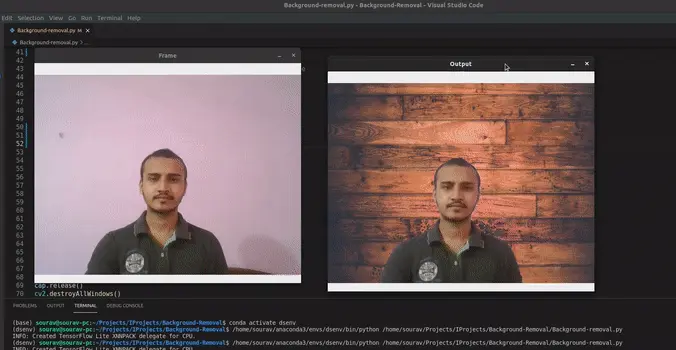
Python Remove Image Background Output
Summary
In this project, we created a background removal application using OpenCV – python. We’ve used the MediaPipe framework to perform the task. Through this project, we’ve learned about segmentation, image combination, and some basic image processing techniques.
This project is useful for real-world image editing tasks and helps learners understand how image segmentation works. It introduces key ideas like masking, contours, color spaces, and OpenCV filters. You’ll also get to practice file handling, image conversion, and GUI creation if you want to turn it into a mini photo-editing app.