


Machine Learning courses with 110+ Real-time projects Start Now!!
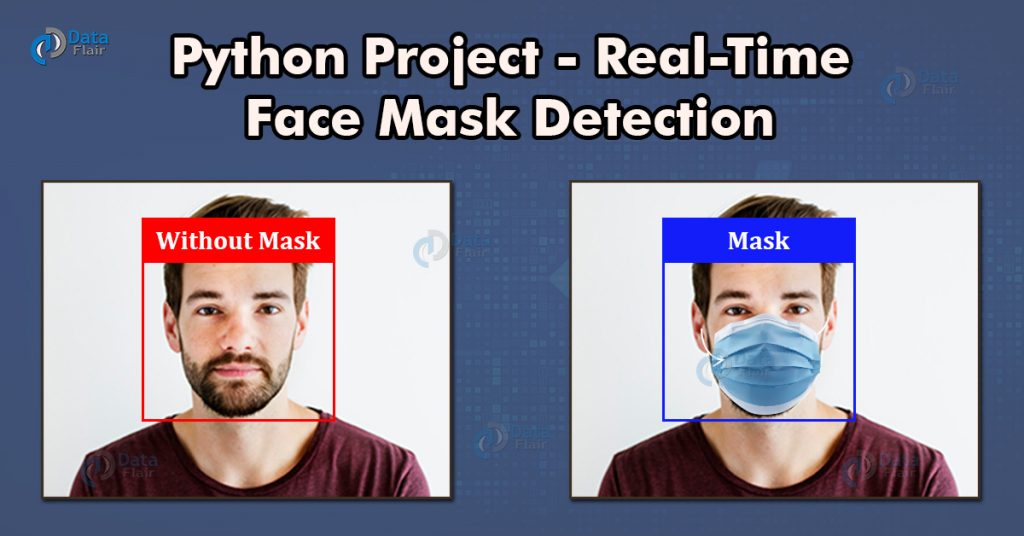
During pandemic COVID-19, WHO has made wearing masks compulsory to protect against this deadly virus. In this tutorial we will develop a machine learning project – Real-time Face Mask Detector with Python.
Real-Time Face Mask Detector with Python
We will build a real-time system to detect whether the person on the webcam is wearing a mask or not. We will train the face mask detector model using Keras and OpenCV.
Download the Dataset
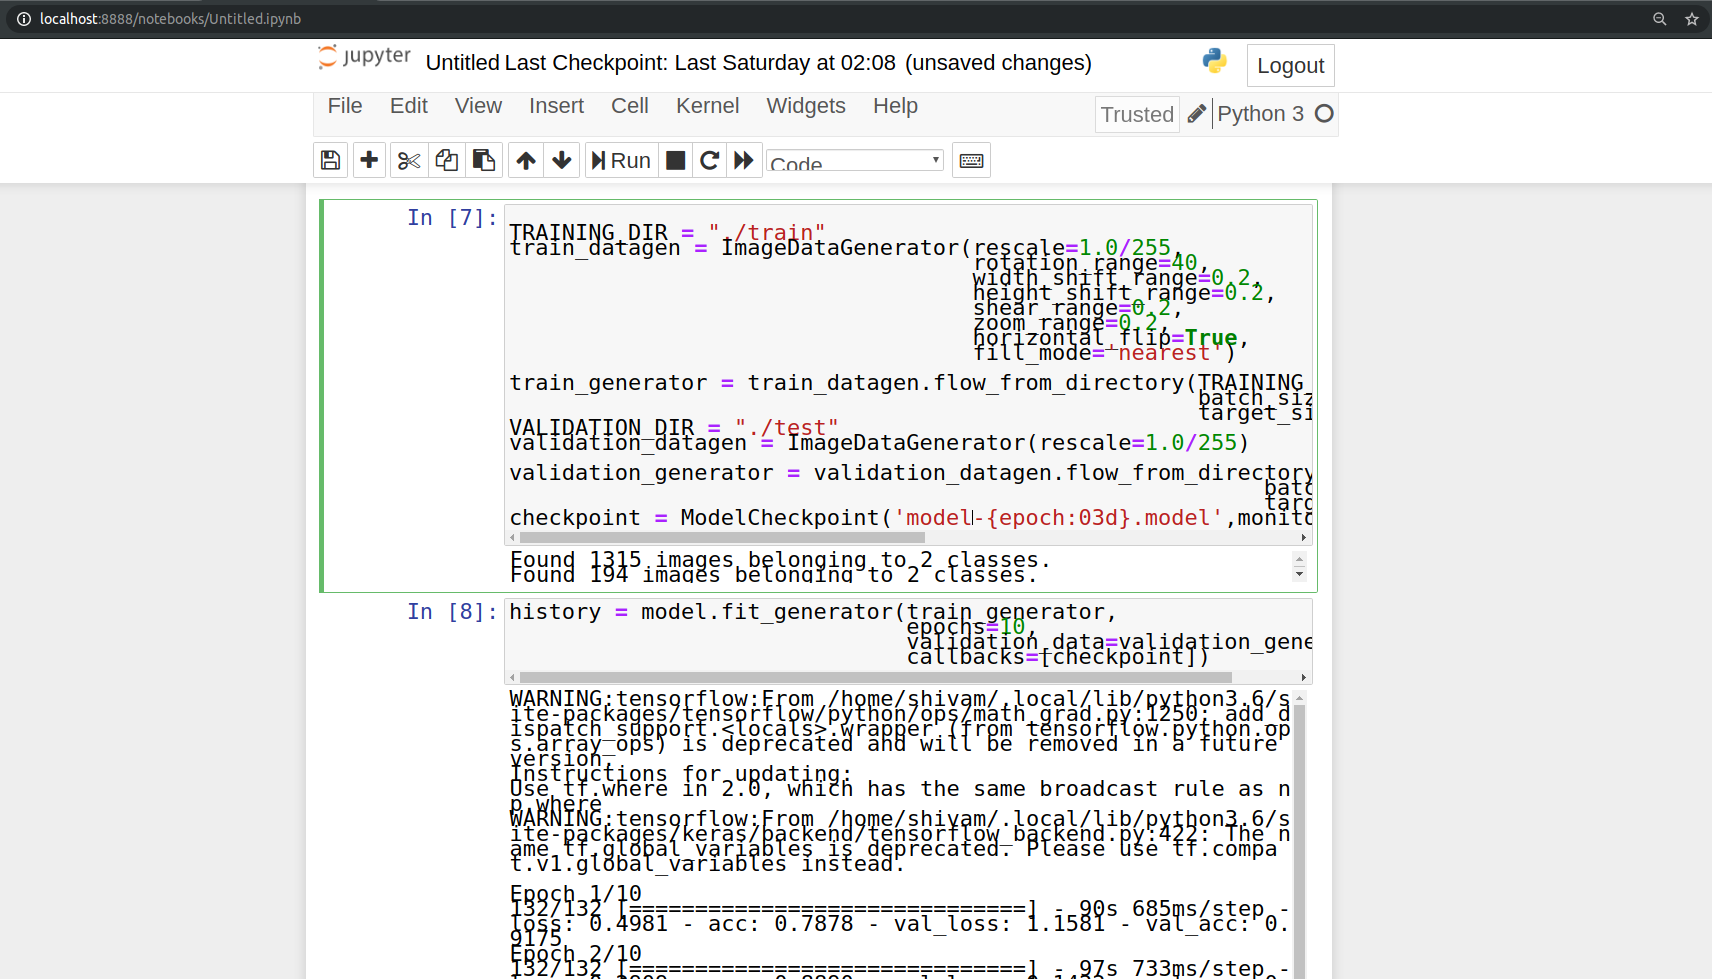
The dataset we are working on consists of 1376 images with 690 images containing images of people wearing masks and 686 images with people without masks.
Download the dataset: Face Mask Dataset
Download the Project Code
Before proceeding ahead, please download the project source code: Face Mask Detector Project
Install Jupyter Notebook
In this machine learning project for beginners, we will use Jupyter Notebook for the development. Let’s see steps for the installation and configuration of Jupyter Notebook.
Using pip python package manager you can install Jupyter notebook:
pip3 install notebook
And that’s it, you have installed jupyter notebook
After installing Jupyter notebook you can run the notebook server. To run the notebook, open terminal and type:
jupyter notebook
It will start the notebook server at http://localhost:8888
To create a new project click on the “new” tab on the right panel, it will generate a new .ipynb file.
Create a new file and write the code which you have downloaded
Let’s dive into the code for face mask detector project:
We are going to build this project in two parts. In the first part, we will write a python script using Keras to train face mask detector model. In the second part, we test the results in a real-time webcam using OpenCV.
Make a python file train.py to write the code for training the neural network on our dataset. Follow the steps:
1. Imports:
Import all the libraries and modules required.
from keras.optimizers import RMSprop
from keras.preprocessing.image import ImageDataGenerator
import cv2
from keras.models import Sequential
from keras.layers import Conv2D, Input, ZeroPadding2D, BatchNormalization, Activation, MaxPooling2D, Flatten, Dense,Dropout
from keras.models import Model, load_model
from keras.callbacks import TensorBoard, ModelCheckpoint
from sklearn.model_selection import train_test_split
from sklearn.metrics import f1_score
from sklearn.utils import shuffle
import imutils
import numpy as np
2. Build the neural network:
This convolution network consists of two pairs of Conv and MaxPool layers to extract features from the dataset. Which is then followed by a Flatten and Dropout layer to convert the data in 1D and ensure overfitting.
And then two Dense layers for classification.
model = Sequential([
    Conv2D(100, (3,3), activation='relu', input_shape=(150, 150, 3)),
    MaxPooling2D(2,2),

    Conv2D(100, (3,3), activation='relu'),
    MaxPooling2D(2,2),

    Flatten(),
    Dropout(0.5),
    Dense(50, activation='relu'),
    Dense(2, activation='softmax')
])
model.compile(optimizer='adam', loss='binary_crossentropy', metrics=['acc'])
3. Image Data Generation/Augmentation:
TRAINING_DIR = "./train"
train_datagen = ImageDataGenerator(rescale=1.0/255,
                                   rotation_range=40,
                                   width_shift_range=0.2,
                                   height_shift_range=0.2,
                                   shear_range=0.2,
                                   zoom_range=0.2,
                                   horizontal_flip=True,
                                   fill_mode='nearest')

train_generator = train_datagen.flow_from_directory(TRAINING_DIR,
                                                    batch_size=10,
                                                    target_size=(150, 150))
VALIDATION_DIR = "./test"
validation_datagen = ImageDataGenerator(rescale=1.0/255)

validation_generator = validation_datagen.flow_from_directory(VALIDATION_DIR,
                                                         batch_size=10,
                                                         target_size=(150, 150))
4. Initialize a callback checkpoint to keep saving best model after each epoch while training:
checkpoint = ModelCheckpoint('model2-{epoch:03d}.model',monitor='val_loss',verbose=0,save_best_only=True,mode='auto')
5. Train the model:
history = model.fit_generator(train_generator,
                              epochs=10,
                              validation_data=validation_generator,
                              callbacks=[checkpoint])
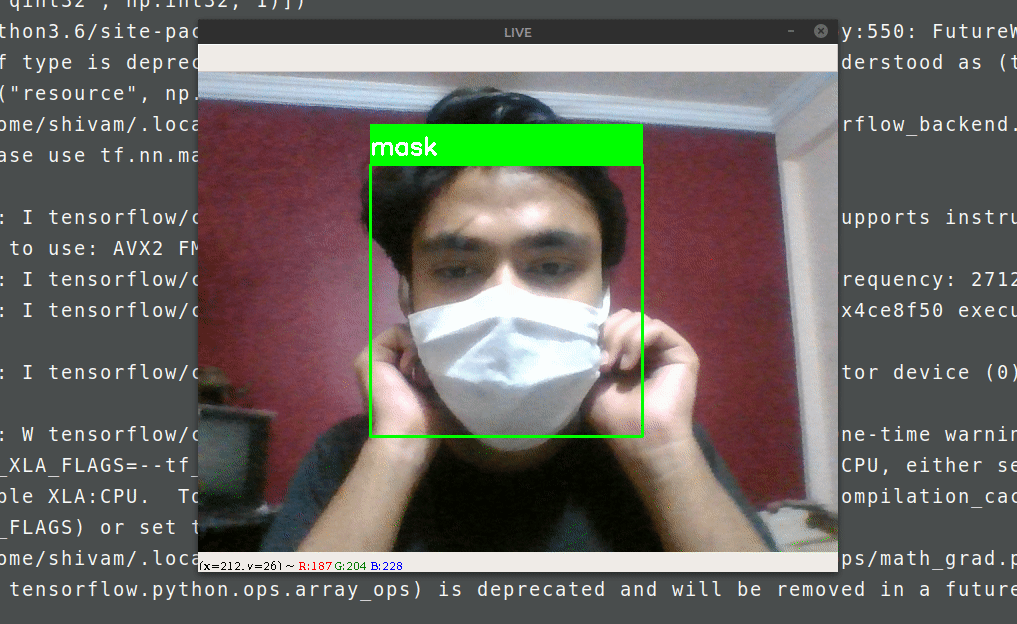
Now we will test the results of face mask detector model using OpenCV.
Make a python file “test.py” and paste the below script.
import cv2
import numpy as np
from keras.models import load_model
model=load_model("./model-010.h5")

results={0:'without mask',1:'mask'}
GR_dict={0:(0,0,255),1:(0,255,0)}

rect_size = 4
cap = cv2.VideoCapture(0)


haarcascade = cv2.CascadeClassifier('/home/user_name/.local/lib/python3.6/site-packages/cv2/data/haarcascade_frontalface_default.xml')

while True:
    (rval, im) = cap.read()
    im=cv2.flip(im,1,1)


    rerect_size = cv2.resize(im, (im.shape[1] // rect_size, im.shape[0] // rect_size))
    faces = haarcascade.detectMultiScale(rerect_size)
    for f in faces:
        (x, y, w, h) = [v * rect_size for v in f]

        face_img = im[y:y+h, x:x+w]
        rerect_sized=cv2.resize(face_img,(150,150))
        normalized=rerect_sized/255.0
        reshaped=np.reshape(normalized,(1,150,150,3))
        reshaped = np.vstack([reshaped])
        result=model.predict(reshaped)


        label=np.argmax(result,axis=1)[0]

        cv2.rectangle(im,(x,y),(x+w,y+h),GR_dict[label],2)
        cv2.rectangle(im,(x,y-40),(x+w,y),GR_dict[label],-1)
        cv2.putText(im, results[label], (x, y-10),cv2.FONT_HERSHEY_SIMPLEX,0.8,(255,255,255),2)

    cv2.imshow('LIVE',   im)
    key = cv2.waitKey(10)

    if key == 27:
        break

cap.release()

cv2.destroyAllWindows()
Run the project and observe the model performance.
python3 test.py
Summary
After the COVID-19 pandemic, wearing a face mask became important. This project uses machine learning to detect if a person is wearing a mask or not in real-time. Using OpenCV, Keras, and a webcam, we can alert people if they are without a mask. This project is great for public safety systems.
In this project, we have developed a deep learning model for face mask detection using Python, Keras, and OpenCV. We developed the face mask detector model for detecting whether person is wearing a mask or not. We have trained the model using Keras with network architecture. Training the model is the first part of this project and testing using webcam using OpenCV is the second part.
This is a nice project for beginners to implement their learnings and gain expertise.