


Machine Learning courses with 110+ Real-time projects Start Now!!
Object tracking is defined as a problem of locating a moving object over time in a video or in a real-time camera feed. Nowadays object tracking technology is used in various fields such as surveillance, medical, industrial robotics, etc. Implementation of an Object tracking algorithm is very complex, but in this project, we’ll create a basic object tracker with a very simple approach.
We’ll use OpenCV’s inbuilt “Camshift” algorithm to build the project. OpenCV is an open-source library for Computer Vision and Image processing library which comes with more than 500 inbuilt algorithms.
What is Camshift?
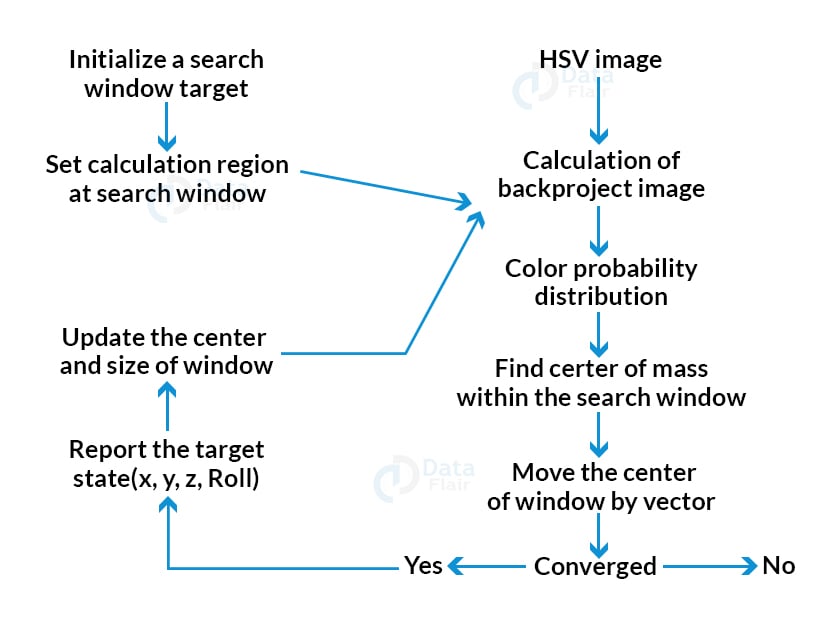
Camshift or Continuously Adaptive Mean Shift is a color-based object tracking algorithm. It uses Histogram Backprojection of the window of the target object’s color distribution and finds the same color distribution in each frame. Then it finds the center of mass within the search window. After that, it relocates and resizes the window size according to the probability distribution of the colors and sets the current window as the target window.
The Intuition behind CamShift
Camshift is an advanced version of the mean shift algorithm. To use MeanShift an initial location window needs to be established. First, it finds the histogram and then backproject the target in each frame to calculate the mean shift.
The problem with meanshift is, whether the object is too close or too far, the window size remains the same and that’s where camshift comes into play.
CamShift first applies meanshift to track the window position and then it updates the size as well as rotation of the targeted window.
Advantage:
- Easy to implement.
- Very light-weight.
- Gives decent results.
Disadvantage:
- It cannot track any object in a complex situation.
- If the lighting of the environment is changed then it cannot track any targeted object because color distribution changes according to
- environment lighting.
We’ll use a webcam to track an object in real-time. So let’s build the tracker.
Prerequisites:
1. Python – 3.x (We used 3.8.8 for this project)
2. OpenCV – 4.4
- Run “pip install opencv-python opencv_contrib-python” to install opencv.
3. Numpy – 1.20.3
Download Object Tracking Project Code
Please download the source code of object tracking with opencv: Camshift Object Tracking Project Code
Steps to solve the project:
- Getting access to the webcam.
- Setup mouse event.
- Initialize the tracker.
- Track an object in real-time.
Step 1 – Getting access to the webcam:
First, we need to import the necessary packages for the project.
# DataFlair Object Tracker
# import necessary packages
  import cv2
import numpy as np
Next, we will initialize the camera and get some input from the camera.
# Naming the Output window
windowname = 'Result'
cv2.namedWindow(windowname)

cap = cv2.VideoCapture(0)

While True:
    ret, frame = cap.read()
    # Show the output
    output = frame
    cv2.imshow(windowname,output)
    if cv2.waitKey(1) == ord('q'):
        break

cap.release()
cv2.destroyAllWindows()
- Using cv2.namedWindow we set a name for our output window. We’ll use it when we’ll work with mouse events.
- Next, we initialize the capture object using cv2.VideoCapture method.
- cap.read() reads each frame from the webcam.
- cv2.imshow() shows frames in a new OpenCV window.
- cv2.waitKey(1) waits 1 millisecond between each frame and continues to show frames until ‘q’ is pressed.
- Finally release the capture object using cap.release() and then close all active windows using the cv2.destroyAllWindows() function.
Step 2 – Setup mouse event:
What is mouse-event?
OpenCV provides a feature to handle mouse activity on an active OpenCV window. For example – Mouse click, scroll, mouse movement. Whenever any activity is detected on that window, OpenCV calls an event. These events are known as mouse-event.
So why are we using mouse events in this project?
Here, we don’t want our tracker to track only one specific object at each program run. But we want to select in real-time to track an object and can also change the track focus to another object without closing the program.
x, y, w, h = 0, 0, 0, 0
first_point_saved = False
second_point_saved = False
track_window = (x, y, w, h)
can_track = False

def click_event(event, px, py, flags, param):
    global x, y, w, h, first_point_saved, track_window, can_track, output

    # Left mouse button release event
    if event == cv2.EVENT_LBUTTONUP:
        if first_point_saved:
            w = px-x
            h = py-y
            track_window = (x, y, w, h)
            print(x, y, w, h)
            first_point_saved = False
            second_point_saved = True

        else:
            x = px
            y = py
            first_point_saved = True
            can_track = False
There are various types of events present in OpenCV. But we’ll need just two types of events for this project. Left mouse button release and right mouse button press.
- First, we create a function named click_event to handle all the events. And it returns the coordinate points of the OpenCV window, where the event happens.
- cv2.EVENT_LBUTTONUP detects left mouse button up/release event.
- We need two points to initialize the object window for tracking. So first we check if first_point_saved is true or not. If it is true means the first point is saved then we calculate the tracker window height and width, otherwise assign the coordinate points to the x and y variable.
 # Right mouse button press event
    if event == cv2.EVENT_RBUTTONDOWN:
        can_track = False
cv2.setMouseCallback(windowname, click_event)  # Start the mouse event
- cv2.EVENT_RBUTTONDOWN detects right mouse button down/press event.
- If the event happens then we set can_track = False. That means the tracker will stop tracking. Later we’ll see how it works.
- Finally start the Mouse event using the cv2.setMouseCallback() method. It takes two arguments as input. The first one is the window name and the second one is the event handler function that we’ve created.
Step 3 – Initialize the tracker:
# initialize tracker
def initialize(frame, track_window):
    x, y, w, h = track_window
    # set up the ROI for tracking
    roi = frame[y:y+h, x:x+w]
    hsv_roi =  cv2.cvtColor(roi, cv2.COLOR_BGR2HSV)
    roi_hist = cv2.calcHist([hsv_roi],[0],None ,[180],[0,180])
    roi_hist  = cv2.normalize(roi_hist,roi_hist,0,255,cv2.NORM_MINMAX)
    return roi_hist, roi


# Setup the termination criteria
term_crit = (cv2.TERM_CRITERIA_EPS | cv2.TERM_CRITERIA_COUNT, 10, 1 )
- As we know that the Camshift algorithm is a color-based tracker, so we first set up the ROI (Region of interest) from the main window. ROI is basically a cropped image of the selected object’s window. And then we convert the ROI to HSV color space.
- HSV is an alternative representation of the RGB color model but it provides more control over colors. HSV stands for Hue, Saturation, and Value. Where Hue represents the color information, Saturation represents the intensity of color and Value represents the brightness of the color.
- cv2.calcHist function calculates the histogram of the colors.
- Cv2.normalize() filters some noises in the histogram.
- After that set up the term criteria for the tracker. The value for the criteria 10 and 1 means the tracker updates either every 10 iterations or moves by at least 1 point.
Now we have set up everything. So let’s track an object in real-time.
Step 4 – Track an object in real-time:
hsv = cv2.cvtColor(frame, cv2.COLOR_BGR2HSV)

 # Check if 2nd point is also saved then initialize the tracker
 if second_point_saved:
     roi_hist, roi = initialize(frame, track_window)
     second_point_saved = False
     can_track = True

 # Start tracking
 if can_track == True:
     dst = cv2.calcBackProject([hsv],[0],roi_hist,[0,180],1)
     # apply camshift to get the new location
     ret, track_window = cv2.CamShift(dst, track_window, term_crit)
     # Draw it on image
     pts = cv2.boxPoints(ret)
     pts = np.int0(pts)
     print(ret)
     cv2.imshow('roi', roi)
     output = cv2.polylines(frame,[pts],True, 255,2)

 else:
     output = frame
     if first_point_saved:
         cv2.circle(output, (x, y), 5, (0, 0, 255), -1)
         cv2.destroyWindow('roi')


 cv2.imshow(windowname,output)
- If the second point is also saved then we call the initialize function to initialize the tracker according to the selected object.
- If can_track is false but first_point is saved then it draws a circle wherever the mouse release event happens.
- cv2.calcBackProject() finds the same color distribution of the ROI’s histogram in the current frame.
- After that call the cv2.CamShift() method to track the selected object. The method takes the Back projected histogram, track window (selected object’s window), and the term criteria as argument and returns the objects box information and updated track window.
Output:
((197.0, 290.0), (192.5224151611328, 304.6971740722656),12.093690872192383)
The output contains the object’s location and rotation.
- Next we calculate the box point using cv2.boxPoints() function and draw the box on the window using cv2.polylines() function.
Camshift Object Tracking using OpenCV Output
![]()
Summary:
In this project, we’ve built a basic object tracker using OpenCV and python. We used OpenCV’s CamShift algorithm to build this. Through this project, we’ve learned about Mouse event handling, Histogram, and other image processing techniques.