


Machine Learning courses with 110+ Real-time projects Start Now!!
Hey there! If you’re fascinated by the incredible world of computer vision and image processing, then working with images in OpenCV is going to be right up your alley. Images are the heart and soul of so many captivating applications, from identifying objects to analyzing videos. Lucky for us, OpenCV, a fantastic open-source computer vision library, is here to help us make magic happen with those images.
In this article, we’ll embark on a journey together, exploring the ins and outs of working with images in OpenCV. Whether you’re just starting out or a seasoned developer, this guide will be your trusty companion, unleashing the full potential of OpenCV for all your image-related tasks.
Image file types where deployment of OpenCV is possible :
- OpenCV supports a wide range of image file types, making it a versatile library for image-processing tasks.
- Common image file formats supported by OpenCV include JPEG (JPG), PNG (Portable Network Graphics), BMP (Bitmap), GIF (Graphics Interchange Format), TIFF (Tagged Image File Format), and PBM/PGM/PPM (Portable Bitmap/Graymap/Pixmap).
- Additionally, OpenCV can handle various raw image formats and camera-specific formats, making it highly adaptable to different data sources.
- The extensive file format support of OpenCV enables seamless image loading, processing, and saving, catering to diverse image processing applications with ease and efficiency.
To read an image from a file using OpenCV, you need to have the following prerequisites:
1. Python and OpenCV Installed: Ensure you have Python installed on your system. Additionally, you must have OpenCV installed. You can install OpenCV using pip by running the following command:
pip install opencv-python
2. Image File: You should have the image file (e.g., JPEG, PNG, etc.) you want to read using OpenCV. Make sure you know the file’s path or place it in the same directory as your Python script.
3. Working IDE or Code Editor: You need a working integrated development environment (IDE) or a code editor where you can write and execute your Python code. Popular choices include Anaconda, Jupyter Notebook, PyCharm, Visual Studio Code, or any other Python-supported IDE.
Once you have Python, OpenCV installed, and an image file available, you are ready to read the image using OpenCV. Use the cv2.imread() function, passing the path to your image file as an argument. This will return the image data as a NumPy array, which you can further process or display as needed.
How to read an image from a file using OpenCV?
Ah, reading an image from a file is one of the fundamental steps in working with images in OpenCV. Let’s explore how you can do that!
To read an image from a file using OpenCV, you’ll need to follow these steps:
1. Import the necessary OpenCV library:
Before diving into reading images, make sure you have OpenCV installed and imported into your project.
You can typically import it with the following line of code:
Import cv2
2. Provide the path to the image file:
You’ll need to specify the path to the image file you want to read. It could be a relative or absolute path, depending on where the image is located on your system. Make sure to include the file extension (e.g., .jpg, .png, etc.). Think of it as giving OpenCV the directions to find the image in your computer’s vast storage.
3. Read the image using OpenCV’s `imread()` function:
OpenCV provides the `imread()` function, which allows you to read the image file. It outputs a NumPy array that represents the image after receiving the file location as input. It’s like opening a treasure chest filled with pixel values and colours.
Here’s an example of how to use it:
We are going to read an image of a Tiger from a file,
image = cv2.imread(r"C:\Users\sanji\Desktop\DataFlair\Working With Images in OpenCV\wildlife-tiger.jpg")
4. Check if the image was successfully read:
It’s essential to verify if the image was successfully read from the file. You can check if the `image` variable is `None` or has a valid value. If it’s `None`, it means there was an error while reading the image. It’s like checking if your friend successfully picked up the image without any mishaps.
import cv2
image = cv2.imread(r"C:\Users\sanji\Desktop\DataFlair\Working With Images in OpenCV\wildlife-tiger.jpg")

cv2.imshow('DataFlair @satchit', image)


cv2.waitKey(0)
cv2.destroyAllWindows()

Various forms of cv2.imread()
1. Reading an image as a color image: Using cv2.IMREAD_COLOUR
import cv2

color_image = cv2.imread(r"C:\Users\sanji\Desktop\DataFlair\Working With Images in OpenCV\wildlife-tiger.jpg", cv2.IMREAD_COLOR)
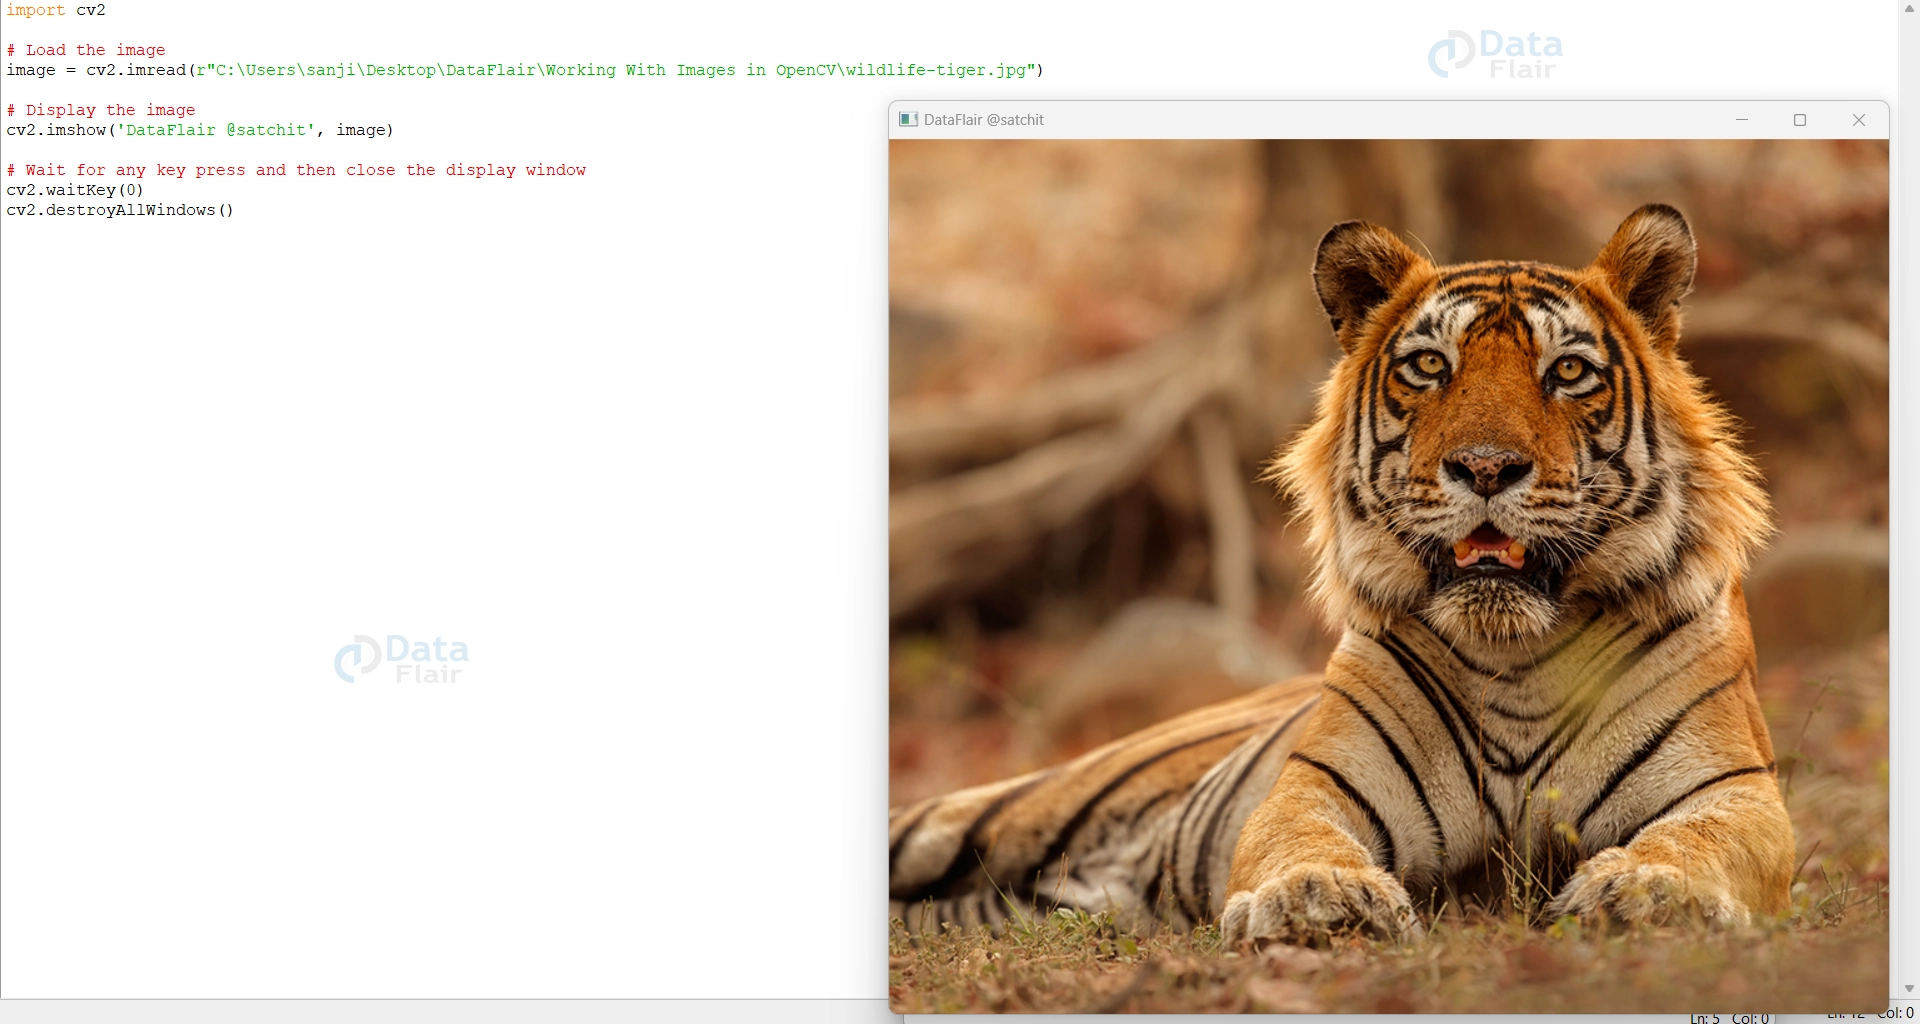
This method reads the image in the BGR color format (default) and preserves the color information. Each pixel is represented by three color channels: Blue, Green, and Red.
2. Reading an image as a grayscale image: Using cv2.IMREAD_GRAYSCALE
import cv2
image = cv2.imread(r"C:\Users\sanji\Desktop\DataFlair\Working With Images in OpenCV\wildlife-tiger.jpg",cv2.IMREAD_GRAYSCALE)
cv2.imshow('DataFlair @satchit', image)
cv2.waitKey(0)
cv2.destroyAllWindows()

In this case, the image is read in grayscale mode, where each pixel value represents the intensity of the grey colour. This is useful when color information is not necessary for your image-processing tasks.
3. Reading an image as-is with alpha channel (including transparency): Using cv2.IMREAD_UNCHANGED
import cv2
image = cv2.imread(r"C:\Users\sanji\Desktop\DataFlair\Working With Images in OpenCV\wildlife-tiger.jpg",cv2.IMREAD_UNCHANGED)
cv2.imshow('DataFlair @satchit', image)
cv2.waitKey(0)
cv2.destroyAllWindows()
This method allows you to read images that have an alpha channel, which represents transparency. It retains all color channels and additional alpha channel information
Let’s use cv2.imshow() to unveil a piece of art to the world!
- Displaying an image in OpenCV using `cv2.imshow()` brings visuals to life with just one line of code.
- It allows you to unveil your favorite memories or creative masterpieces on the screen effortlessly.
- With a personalized title, you can add your own touch to the displayed image.
- The `cv2.imshow()` function immerses you in the beauty of your images, whether it’s a breathtaking landscape or a cute pet portrait.
import cv2
image = cv2.imread(r"C:\Users\sanji\Desktop\DataFlair\Working With Images in OpenCV\wildlife-tiger.jpg")
cv2.imshow('DataFlair @satchit', image)
cv2.waitKey(0)
cv2.destroyAllWindows()
- OpenCV’s enchanting display capabilities let your image-processing skills shine through as you showcase your cherished memories and artistic brilliance to the world.
Let’s modify the pixel values of an image. Shall we?
Modifying pixel values in an image is a fundamental technique in image processing, allowing us to enhance, manipulate, or apply various effects to an image. With OpenCV, a popular computer vision library in Python, this process becomes seamless and efficient.
- Modifying pixel values in an image is a fundamental technique in image processing, enabling enhancements, filters, and artistic effects.
- OpenCV, a Python library, simplifies pixel manipulation with an intuitive interface.
- Accessing individual pixel coordinates and adjusting their RGB values achieves stunning visual transformations.
- OpenCV’s versatility allows for color changes, filters, contrast adjustments, and more.
- The code example below demonstrates inverting image colors using OpenCV:
import cv2
image = cv2.imread(r"C:\Users\sanji\Desktop\DataFlair\Working With Images in OpenCV\wildlife-tiger.jpg")
if image is not None:
    inverted_image = 255 - image
     cv2.imshow('DataFlair OG @satchit', image)
    cv2.imshow('DataFlair INT @satchit', inverted_image)
     cv2.waitKey(0)
    cv2.destroyAllWindows()
else:
    print("Failed to load the image.")
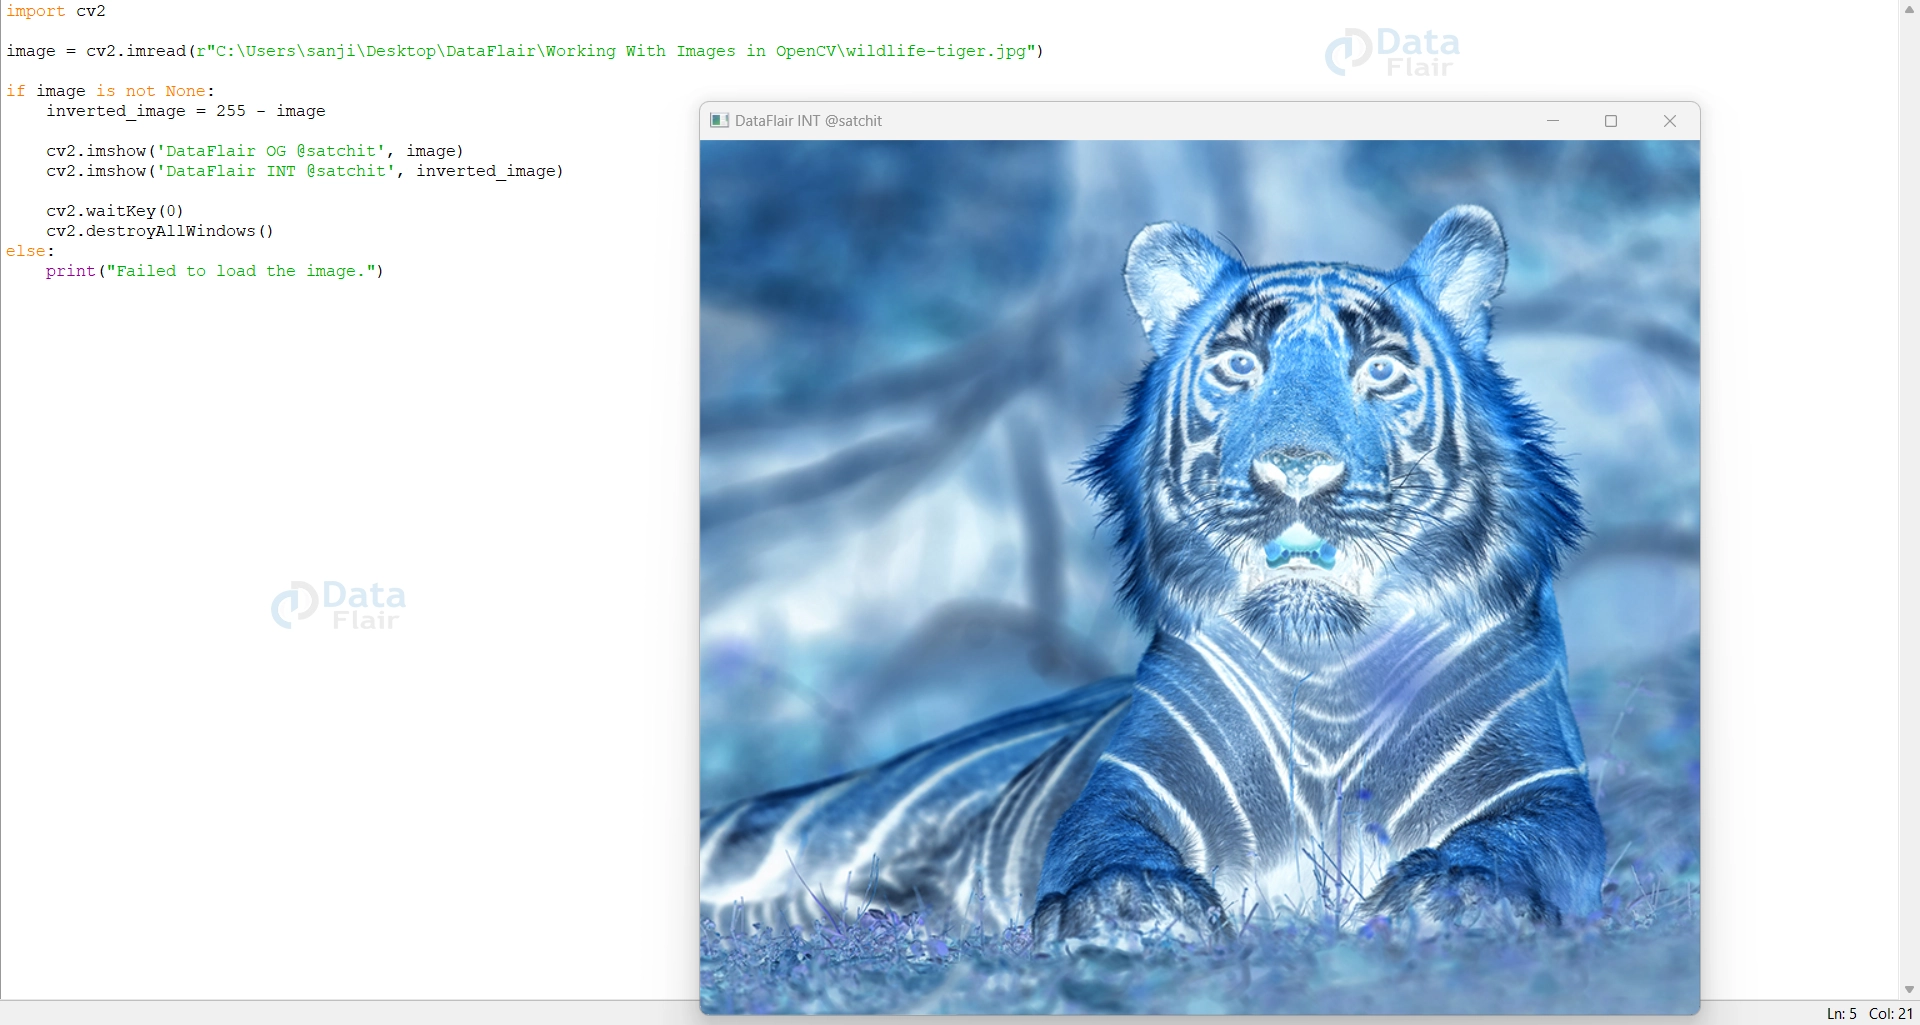
- In this example, we load an image using cv2.imread() and then create an inverted version of it by subtracting the RGB values from 255.
- The result is displayed alongside the original image using cv2.imshow().
- Running this code will show the original and inverted images side by side, demonstrating a basic image modification using OpenCV.
Here’s an easy code to know about the dimensions of the image!
- Determining image dimensions is a crucial first step in image processing, providing valuable insights for further manipulations.
- OpenCV’s simple Python code allows us to uncover the width and height of an image effortlessly.
- By using cv2.imread() to load the image and `image.shape`, we can access its dimensions.
- The first element of the shape represents the height, while the second element indicates the width.
- Understanding image dimensions empowers us to optimize memory usage, perform accurate resizing, and ensure compatibility with computer vision tasks.
import cv2
image = cv2.imread(r"C:\Users\sanji\Desktop\DataFlair\Working With Images in OpenCV\wildlife-tiger.jpg")
if image is not None:
     height, width, channels = image.shape
  print(f"Image Dimensions: {width}x{height}")
else:
    print("Failed to load the image.")

Do you want to add a border or your own sketch to the image? Let’s start!
- Editing images with different borders or self-made drawings using OpenCV provides endless artistic possibilities.
- With a variety of tools and functions, you can add personalized touches to visuals and create captivating artwork.
- OpenCV allows you to frame images with colorful borders or sketch intricate drawings, turning ordinary visuals into extraordinary pieces.
- Utilizing geometric shapes, lines, and colors, you can craft unique overlays and artistic flair.
- Customizations, filters, and border additions can be easily applied to images to showcase your creative vision.
- The code example below demonstrates adding a colored border to an image using OpenCV:
import cv2
image = cv2.imread(r"C:\Users\sanji\Desktop\DataFlair\Working With Images in OpenCV\wildlife-tiger.jpg")
if image is not None:
     border_color = (0, 255, 0)  # Green color
     border_width = 20
bordered_image = cv2.copyMakeBorder(image, border_width, border_width, border_width, border_width, cv2.BORDER_CONSTANT, value=border_color)
cv2.imshow('Original Image', image)
    cv2.imshow('Bordered Image', bordered_image)
 cv2.waitKey(0)
    cv2.destroyAllWindows()
else:
    print("Failed to load the image.")
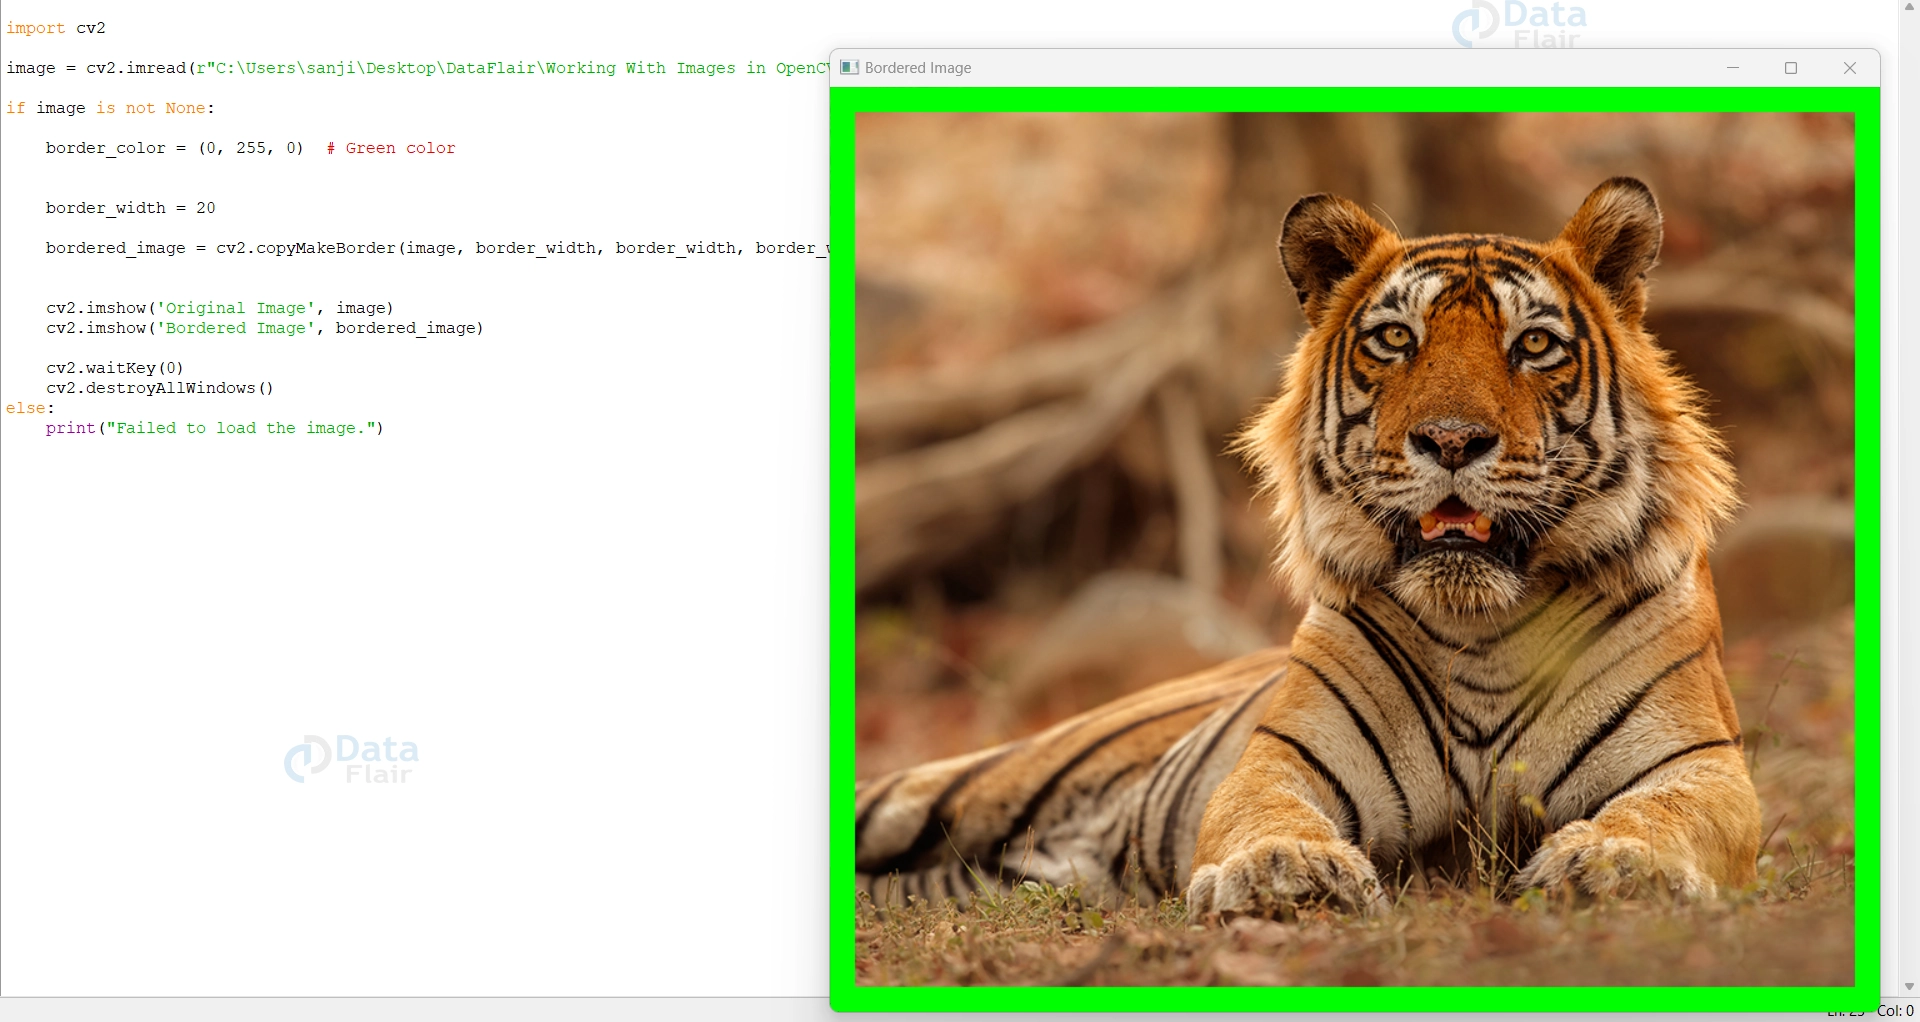
- OpenCV becomes your canvas as you unleash your creativity and experiment with various edits, transforming images into captivating masterpieces. Let your imagination run wild and explore the boundless possibilities of image editing with OpenCV!
How to write and store an image from one file to another using OpenCV?
The cv2.imwrite() function in OpenCV is used to write/save an image to disk in a specified file format. It allows you to store the results of your image processing or analysis or simply save an image for later use or sharing.
Here are the key details you should know about cv2.imwrite():
1. Output filename: Specify the path and filename where you want to save the image. Make sure to include the appropriate file extension (e.g., `.jpg`, `.png`) to indicate the desired file format.
2. Image data: Pass the image you want to save to the function. It should be in the expected format for the chosen file format. For example, if you’re saving a color image, ensure the color channels are in the correct order (BGR).
Here’s an example of how to use cv2.imwrite() :
import cv2


image = cv2.imread(r"C:\Users\sanji\Desktop\DataFlair\Working With Images in OpenCV\wildlife-tiger.jpg")


import cv2


output_path = r"C:\Users\sanji\Desktop\DataFlair/wildlife-tiger.jpg"


cv2.imwrite(output_path, image)
In this example, we load an image using `cv2.imread()` and store it in the `image` variable. Then, we specify the path and filename for the output image using `cv2.imwrite()`. By calling this function, the image is saved to the specified location with the provided filename.
Make sure to provide the correct output path and filename to ensure the successful saving of the image. One can Perform any desired image processing or analysis between the cv2.imread() and cv2.imwrite() functions.
Summary
In the captivating world of computer vision and image processing, the ability to store images for future use is essential. With OpenCV’s remarkable `cv2.imwrite()` function, preserving your visual treasures has never been easier.
This article serves as your guide, walking you through the process of writing and storing images using OpenCV. From importing the necessary library to specifying output paths and filenames, you’ll learn the art of image preservation with a few lines of code. Unleash your creativity, secure your hard work, and unlock the power of preservation with OpenCV’s image-storing capabilities. Let’s embark on this exciting journey together!