


Machine Learning courses with 110+ Real-time projects Start Now!!
Unlock the hidden potential of images with OpenCV’s template matching! In the world of computer vision, the ability to seamlessly find a needle in a haystack of pixels is a superpower.
Join us as we dive into the captivating realm of template matching, where patterns emerge, objects reveal themselves, and OpenCV becomes the key to unraveling visual mysteries.
Understanding Template Matching: Revealing the Visual Puzzle
Imagine you’re searching for a specific item in a cluttered room. Your brain effortlessly identifies the object by recognizing its shape, color, and features, allowing you to pick it out from the surroundings.
Template matching, a powerful technique in the realm of computer vision, mimics this innate human ability to identify patterns within images. Just as you can spot a familiar face in a crowd, template matching enables machines to locate specific patterns within larger images.
At its core, template matching involves taking a smaller reference image (the template) and searching for instances of that template within a larger target image. This technique finds its applications in a wide array of fields, from object detection and medical imaging to quality control in manufacturing processes. Understanding how template matching works and harnessing its capabilities can lead to breakthroughs in various industries.
The concept is deceptively simple: by sliding the template across the target image and comparing pixel values, we can determine areas where the template’s pattern closely matches the content of the target. However, beneath this simplicity lies a complexity that arises from variations in scale, rotation, lighting, and noise.
This article will peel back the layers, exploring not only the fundamentals of template matching but also how OpenCV, a leading computer vision library, equips us to perform this task efficiently and accurately.
A metric is computed to indicate how “good” or “bad” the match is at each (x, y)-location. To assess how “similar” the pixel intensities of the two patches are, we often utilize the normalized correlation coefficient :

In the following sections, we’ll delve into the mechanisms behind template matching, explore the suite of tools OpenCV offers, and discover how to tackle challenges like scale variation and noise.
By the end of this journey, you’ll be armed with the knowledge to unlock the potential of template matching and add it to your arsenal of computer vision techniques. So, let’s embark on this visual adventure and uncover the secrets of template matching together.
What is Template Matching in OpenCV?
Template matching in OpenCV is a technique used for finding a specific template image within a larger target image. This method is widely employed in computer vision to identify patterns, objects, or specific regions of interest within an image. OpenCV provides a set of functions and methods that allow you to perform template matching efficiently and accurately.
The basic idea behind template matching in OpenCV involves sliding the template image over the target image and calculating a similarity score at each position. This similarity score indicates how closely the template matches the content of the target image at that particular position. The position with the highest similarity score corresponds to the location where the template best matches the target image.
OpenCV’s cv2.matchTemplate() function is the cornerstone of template matching. This function takes the template image and the target image as inputs and returns a result matrix. Each element of this result matrix corresponds to a position in the target image and contains a value that indicates the degree of similarity between the template and the content of the target image at that position.
Different methods can be used to calculate the similarity score, and OpenCV offers several options such as:
1. Normalized Cross-Correlation (`cv2.TM_CCORR_NORMED`): This method computes the cross-correlation between the template and the target image while normalizing the pixel values. The resulting matrix will have peaks at positions where the template best matches the target image.
2. Sum of Squared Differences (`cv2.TM_SQDIFF`): This method calculates the sum of squared differences between the template and the target image. The lower the value, the better the match. This method is often used with the minimum value being the best match.
3. Correlation Coefficient (`cv2.TM_CCOEFF`): This method calculates the correlation coefficient between the template and the target image. A higher value indicates a better match, with 1 being a perfect match.
These methods offer flexibility in choosing the most suitable approach based on the specific application and the nature of the images involved.
Overall, template matching in OpenCV provides a powerful tool for various tasks, including object detection, pattern recognition, and image analysis. However, it’s important to note that template matching might have limitations when dealing with scale variation, rotation, and complex scenes. In such cases, additional techniques or algorithms might be required to enhance the accuracy of the results.
Unlocking the Art of Visual Recognition: Exploring Template Matching with Varied Match Modes
1. cv2.TM_SQDIFF:
The best match is determined using this mode’s sum of squared differences. The match will be better if the score is lower.
import cv2
import numpy as np

# Load the original image, template image, and convert to grayscale
original_image = cv2.imread(r"C:\Users\satchit\Desktop\DataFlair\OpenCv Template Matching\traffic-street-img.jpg",cv2.IMREAD_GRAYSCALE)
template_image = cv2.imread(r"C:\Users\satchit\Desktop\DataFlair\OpenCv Template Matching\Template_image.png",cv2.IMREAD_GRAYSCALE)

# Perform template matching using cv2.TM_SQDIFF
result = cv2.matchTemplate(original_image, template_image, cv2.TM_SQDIFF)
min_val, max_val, min_loc, max_loc = cv2.minMaxLoc(result)
top_left = min_loc
bottom_right = (top_left[0] + template_image.shape[1], top_left[1] + template_image.shape[0])

# Create a copy of the original image for visualization
matched_image = original_image.copy()
cv2.rectangle(matched_image, top_left, bottom_right, (0, 255, 0), 2)
# Display the images
cv2.imshow('Original Image', original_image)
cv2.imshow('Template Image', template_image)
cv2.imshow('Matched Image (TM_SQDIFF)', matched_image)
cv2.waitKey(0)
cv2.destroyAllWindows()
TM_SQDIFF:

2. cv2.TM_CCORR:
This mode calculates the cross-correlation between the template and the target image. The higher the score, the better the match.
Use the same Libraries and path from above code:
# Perform template matching using cv2.TM_CCORR
result = cv2.matchTemplate(original_image, template_image, cv2.TM_CCORR)
min_val, max_val, min_loc, max_loc = cv2.minMaxLoc(result)
top_left = max_loc
bottom_right = (top_left[0] + template_image.shape[1], top_left[1] + template_image.shape[0])

# Create a copy of the original image for visualization
ma
tched_image = original_image.copy()
cv2.rectangle(matched_image, top_left, bottom_right, (0, 255, 0), 2)

# Display the images
cv2.imshow('Original Image', original_image)
cv2.imshow('Template Image', template_image)
cv2.imshow('Matched Image (TM_CCORR)', matched_image)
cv2.waitKey(0)
cv2.destroyAllWindows()
3. cv2.TM_CCOEFF:
This mode calculates the correlation coefficient between the template and the target image. The higher the score, the better the match.
Use the same Libraries and path from above code:
# Perform template matching using cv2.TM_CCOEFF
result = cv2.matchTemplate(original_image, template_image, cv2.TM_CCOEFF)
min_val, max_val, min_loc, max_loc = cv2.minMaxLoc(result)
top_left = max_loc
bottom_right = (top_left[0] + template_image.shape[1], top_left[1] + template_image.shape[0])

# Create a copy of the original image for visualization
matched_image = original_image.copy()
cv2.rectangle(matched_image, top_left, bottom_right, (0, 255, 0), 2)

# Display the images
cv2.imshow('Original Image', original_image)
cv2.imshow('Template Image', template_image)
cv2.imshow('Matched Image (TM_CCOEFF)', matched_image)
cv2.waitKey(0)
cv2.destroyAllWindows()
These examples demonstrate how to perform template matching using different match modes in OpenCV.
Multi-Object Discovery: Unveiling the Power of OpenCV Template Matching with Multiple Targets
Certainly, performing template matching with multiple objects involves iterating over regions of the target image and applying the template matching process to each region.
Here’s an example code that demonstrates how to perform template matching with multiple objects using OpenCV:
import cv2
import numpy as np

# Load the original image, template image, and convert to grayscale
original_image = cv2.imread(r"C:/Users/sanji/Desktop/DataFlair/OpenCv Template Matching/wildlife-leopard.jpg",cv2.IMREAD_GRAYSCALE)
template_image = cv2.imread(r"C:\Users\sanji\Desktop\DataFlair\OpenCv Template Matching\leopard templeate.png",cv2.IMREAD_GRAYSCALE)

# Get the dimensions of the template
template_height, template_width = template_image.shape

# Perform template matching using TM_CCOEFF_NORMED
result = cv2.matchTemplate(original_image, template_image, cv2.TM_CCOEFF_NORMED)

# Define a threshold for considering matches
threshold = 0.7

# Find all locations where the result exceeds the threshold
locations = np.where(result >= threshold)

# Create a copy of the original image for visualization
matched_image = original_image.copy()

# Iterate over matched locations
for loc in zip(*locations[::-1]):
    top_left = loc
    bottom_right = (top_left[0] + template_width, top_left[1] + template_height)
    cv2.rectangle(matched_image, top_left, bottom_right, (0, 255, 0), 2)

# Display the images
cv2.imshow('Original Image', original_image)
cv2.imshow('Template Image', template_image)
cv2.imshow('Matched Image', matched_image)
cv2.waitKey(0)
cv2.destroyAllWindows()
Original Image:

Template Image:
![]()

Matched Image: Here, multiple similar shaped Spots are marked up,
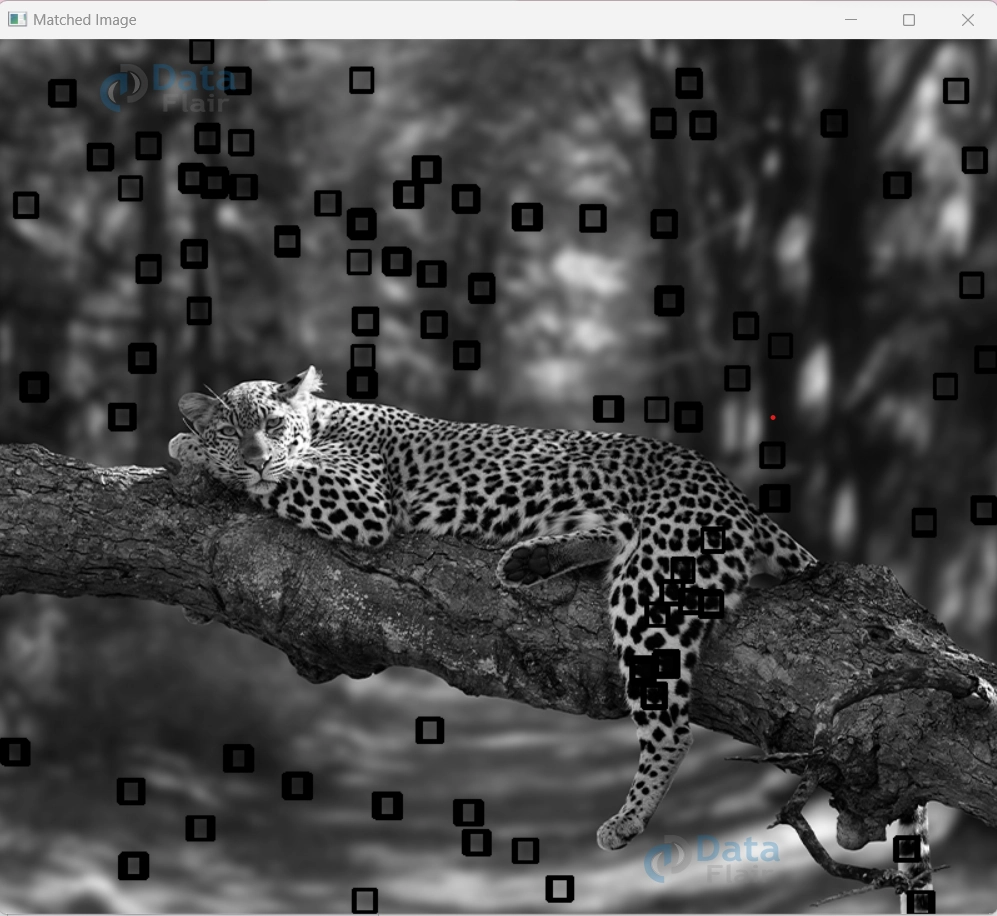
In this code, the cv2.matchTemplate function is used with cv2.TM_CCOEFF_NORMED to perform template matching. The code then finds all locations where the result exceeds a predefined threshold (0.7 in this case) to consider them as matches. It iterates over these matched locations and draws rectangles around each match on the copy of the original image for visualization.
Scaling New Heights: Unveiling the Magic of Multi-Scale Template Matching with OpenCV
Applying template matching with multiple scales involves resizing the template and target image at different scales and performing template matching on each scale.
Here’s an example code that demonstrates how to perform multi-scale template matching using OpenCV:
import cv2
import numpy as np

# Load the original image, template image, and convert to grayscale
original_image = cv2.imread(r"C:\Users\satchit\Desktop\DataFlair\OpenCv Template Matching\walking-dog.jpg",cv2.IMREAD_GRAYSCALE)
template_image = cv2.imread(r"C:\Users\satchit\Desktop\DataFlair\OpenCv Template Matching\walking_dog_template.png",cv2.IMREAD_GRAYSCALE)

# Define a list of scales to consider
scales = [0.5, 1.0, 1.5]

# Create a copy of the original image for visualization
matched_image = original_image.copy()

# Iterate over each scale
for scale in scales:
    # Resize the template image based on the current scale
    scaled_template = cv2.resize(template_image, None, fx=scale, fy=scale)

    # Perform template matching using TM_CCOEFF_NORMED
    result = cv2.matchTemplate(original_image, scaled_template, cv2.TM_CCOEFF_NORMED)

    # Define a threshold for considering matches
    threshold = 0.7

    # Find all locations where the result exceeds the threshold
    locations = np.where(result >= threshold)

    # Iterate over matched locations
    for loc in zip(*locations[::-1]):
        top_left = loc
        bottom_right = (top_left[0] + scaled_template.shape[1], top_left[1] + scaled_template.shape[0])
        cv2.rectangle(matched_image, top_left, bottom_right, (0, 255, 0), 2)

# Display the images
cv2.imshow('Original Image', original_image)
cv2.imshow('Template Image', template_image)
cv2.imshow('Matched Image (Multi-Scale)', matched_image)
cv2.waitKey(0)
cv2.destroyAllWindows()
Template Image:

Matched Image:

In this code, the scales list defines the scales at which the template image will be resized. For each scale, the template image is resized using cv2.resize, and template matching is performed using `cv2.matchTemplate` with cv2.TM_CCOEFF_NORMED. The code then finds matches above a predefined threshold and draws rectangles around the matches on the copy of the original image for visualization.
Unveiling the Boundaries: Exploring the Limitations of Template Matching in OpenCV
1. Scale and Rotation Sensitivity: Template matching struggles with objects that vary in scale or are rotated, leading to inaccurate matches.
2. Background Variations: Significant differences between the template and target image background can result in false positives.
3. Partial Occlusion: Template matching may fail when the template is partially occluded in the target image.
4. Complex Scenes: In cluttered or complex scenes, template matching can yield multiple false positives or struggle to find the correct match.
5. Computational Demands: It can be computationally intensive, particularly for large images or templates, impacting real-time applications.
6. Limited Robustness: Template matching is less robust in handling complex scenes, variations in appearance, and noisy images.
Summary
In the realm of computer vision, OpenCV’s template matching stands as a versatile tool for pattern recognition. This technique holds the power to uncover hidden correlations within images, but it’s crucial to recognize its limitations for optimal results. While sensitive to scale, rotation, and background variations, template matching might encounter challenges in complex scenes, occlusion, and computational efficiency.
This insight guides us to leverage this method judiciously, exploring alternatives when necessary and complementing it with other strategies. Embracing these limitations equips us with a comprehensive understanding, enabling more informed and effective template matching in diverse visual applications.