



In the fast-paced digital age, staying informed has never been more crucial. A news aggregator app is designed to simplify the way you access and consume news. It serves as a centralized hub, collecting headlines and articles from a wide range of reputable sources, eliminating the need to jump between multiple apps or websites.
About Flutter News Aggregator App
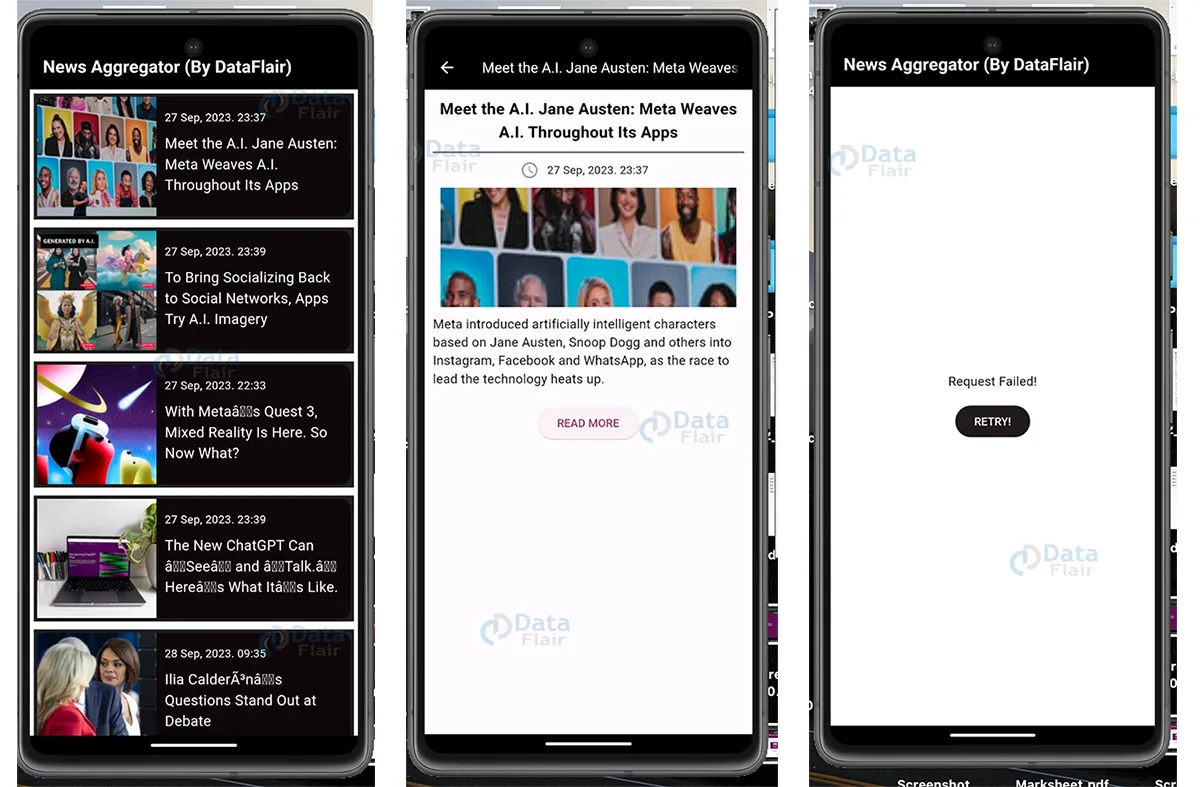
In this project, we will build a News Aggregator app in Flutter. We will use the NY Times developer API to get the latest news on this project. We will build three screens: one to show the various news headlines from which the user can select, the other to show a detailed summary of particular news, and last, to show a screen if the request sent through the API failed.
Prerequisites For Flutter News Aggregator project
In order to build the News Aggregator app on Flutter, we would need the following things:
(i) Flutter – Refer to the link for installing Flutter, depending on your operating system.
(ii) Android Studio – You can download Android Studio. This is necessary as it will run the app in the Android emulator.
(iii) Visual Studio Code – Although this is not necessary, you can also build apps in Android Studio. But in our case, we have used VS code as it is a good code editor.
(iv) NY Times Developer API Key—We will use this to get news from the NY Times. You can get the API key by creating an app on your account on NY Times Developer.
Now that the setup is ready, let’s get started!
Download Flutter News Aggregator Project
Please download the source code of the Flutter News Aggregator Project: Flutter News Aggregator Project Code.
Creating New Flutter News Aggregator Project
First, let’s create a new project in Flutter by doing the following steps:-
1. Go to the directory where you want to save the project using:-
cd $Project-directory-path
2. Then create a new project using the below command:-
flutter create news_aggregator

Changes in pubsec.yaml file
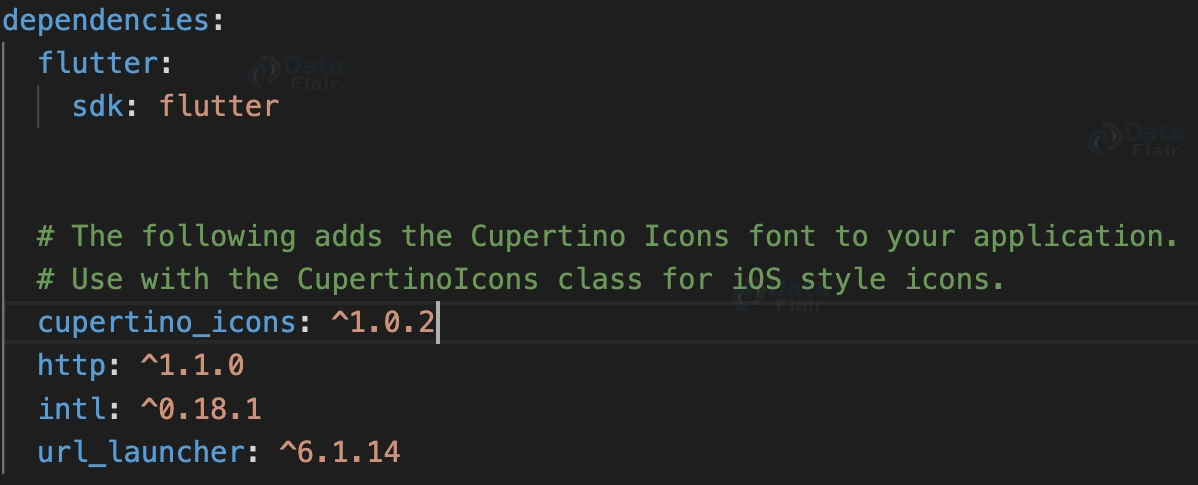
In order to build the application, we would need the following three libraries:-
http – We will use this to send the request to the NY Times developer API to get the news. It can be installed using the below mentioned command:-
flutter pub add http
intl – This library we will be using to format date in the required format, to show when the news was published. The command mentioned below can be used to install the library:-
flutter pub add intl
url_launcher – We will be using this library to open a url. Url_launcher can be installed using the following:-
flutter pub add url_launcher
You can see that the installed libraries would reflect changes in the pubsec.yaml file, as seen in the image below.
Steps to Build News Aggregator App
1. Building Main Layout of the App
Let’s start by building the main layout of the app. We are using ‘MaterialApp’ widget to create the basic structure of the app. Here we are defining the theme to be used for which we have created the color scheme using ‘ColorScheme.fromSeed’. In the ‘home’ argument, we are returning the Scaffold widget to define the basic visual structure. Inside the Scaffold, we defined the backgroundColor and appBar and returned the ‘HomePage’ widget, which we will create later in the ‘body’ argument.
import 'package:flutter/material.dart';

import './home_page.dart';

final ColorScheme kColorSceheme =
    ColorScheme.fromSeed(seedColor: Colors.black87);
void main() {
  return runApp(
    MaterialApp(
      debugShowCheckedModeBanner: false,
      theme: ThemeData(
          useMaterial3: true,
          colorScheme: kColorSceheme,
          primaryColor: Colors.black87,
          appBarTheme: AppBarTheme(
            backgroundColor: Colors.black,
          )),
      home: Scaffold(
        backgroundColor: Colors.white,
        appBar: AppBar(
          title: const Text(
            'News Aggregator (By DataFlair)',
            textAlign: TextAlign.center,
            style: TextStyle(fontWeight: FontWeight.bold, color: Colors.white),
          ),
          shadowColor: Colors.black,
        ),
        body: HomePage(),
      ),
    ),
  );
}
2. Creating Model for Articles2
The below code is used to create class for the news article, where we accept several parameters such as the title of the page, summary of the page, URL for the image, timeStamp and url to the main article of the NY Times.
We also defined a few functions such as:-
(i) getArticleDetailsFrmJasonObj – This function is used to extract the parameters we defined above from the jasonObject which we received through the API call and converts them into the required data type.
(ii) get formattedTime – This is a getter function used to convert the date in the required format using the intl package which we installed in our pubsec file.
import 'package:intl/intl.dart';

class Article {
  String title;
  String summary;
  String imageURL;
  int timeStamp;
  String url;

  Article(
      {required this.title,
      required this.summary,
      required this.imageURL,
      required this.timeStamp,
      required this.url});

  static Article getArticleDetailsFrmJasonObj(dynamic jsonObj) {
    String title = jsonObj['title'];
    String url = jsonObj['url'];
    String summary = jsonObj['abstract'];
    List multiMediaList = jsonObj['multimedia'];

    int length = multiMediaList.length;
    String imageURL = multiMediaList[length - 1]['url'];

    int timeStamp =
        DateTime.parse(jsonObj['created_date']).microsecondsSinceEpoch;

    return Article(
        title: title,
        summary: summary,
        imageURL: imageURL,
        timeStamp: timeStamp,
        url: url);
  }

  @override
  String toString() {
    return "title = $title; summary = $summary; imageURL = $imageURL; "
        "timeStamp = $timeStamp; url = $url";
  }

  String get formattedTime {
    var timeStamp = DateTime.fromMicrosecondsSinceEpoch(this.timeStamp);
    var formatter = DateFormat('dd MMM, yyyy. HH:mm');
    return formatter.format(timeStamp);
  }
}
3. Building Home Page with Necessary Functions
Now, let’s build the home page of the app, which will open when a user opens the app. It is a stateful widget as the content on the page which is the news articles, needs to be updated and may change.
We have imported several packages here such as material.dart for the UI, dart:convert to convert b/w different data representations,http to send API requests and other custom widgets which we will create in the next section.
We have also imported a file called ‘configurations.dart’, where we store the NY Times API key.
import 'package:flutter/material.dart';
import 'dart:convert';
import 'dart:io';

import 'package:http/http.dart' as http;
import 'package:news_aggregator/models/article.dart';
import 'widgets/articleWidget.dart';
import 'widgets/retryRequest.dart';
import 'configurations.dart';

class HomePage extends StatefulWidget {
  const HomePage({super.key});
  @override
  State<HomePage> createState() {
    return _HomePageState();
  }
}
In the code below, we have defined a few variables and functions that we will use to write code for the logic and user interactions.
The variables we have defined are:-
a. _isRequestSent – This is a boolean variable. It is used to check if the request has been successfully sent or not.
b. _isRequestFailed – This boolean variable is used to check if the API request sent has failed or not.
c. articlesList – It is used to store a list of the object of the article which we will show on our page.
The functions we are using are:-
a. sendRequest – It is used to send requests to the API and get the articles. In the url, we have also passed the API key, which you will get through the NY Times developer page. Using http.get, we will get the API call response. If it is successful, we will decode it using json and get the required parameters.
b. requestError – This function sets both the variables, _isRequestSent and _isRequestFailed to true.
c. retryRequest – This function sets both the variables, _isRequestSent and _isRequestFailed to false.
class _HomePageState extends State<HomePage> {
  bool _isRequestSent = false;
  bool _isRequestFailed = false;
  List<Article> articlesList = [];

  void sendRequest() async {
    String url =
        "https://api.nytimes.com/svc/topstories/v2/technology.json?api-key=$API_KEY";
    try {
      http.Response response = await http.get(Uri.parse(url));
      // Checking if the request was success or not
      if (response.statusCode == HttpStatus.ok) {
        //print('Request Success');
        Map decode = json.decode(response.body);
        List results = decode['results'];
        // Parsing the result
        for (var jsonObject in results) {
          var article = Article.getArticleDetailsFrmJasonObj(jsonObject);
          articlesList.add(article);
        }
        setState(() {
          _isRequestSent = true;
        });
      } else {
        print(response.statusCode);
        print("Request not success");
        requestError();
      }
    } catch (e) {
      print(e);
      requestError();
    }
  }

  void requestError() {
    setState(() {
      _isRequestSent = true;
      _isRequestFailed = true;
    });
  }

  void retryRequest() {
    setState(() {
      _isRequestSent = false;
      _isRequestFailed = false;
    });
  }
In the build function, firstly we are checking if the API request has been sent or not and if not, we are sending request. Then we are returning a ‘Container’ widget whose alignment is set to center. In the child argument, depending on the condition we are returning widgets. If _isRequestSent is false, we are returning a CircularProgressIndicator, then is the _isRequestSent is true and _isRequestFailed is true, we return ‘RetryRequest’ widget, which we will create in the helper widgets section.
Finally, if both _isRequestSent is true and _isRequestFailed is false, we are returning the list of articles using ‘ListView.builder’ and in the itemBuilder function returning the ArticleWidget, which is a custom we will create in the helper widgets section for the current article.
 @override
  Widget build(BuildContext context) {
    if (!_isRequestSent) {
      sendRequest();
    }
    return Container(
      alignment: Alignment.center,
      child: !_isRequestSent
          ? const CircularProgressIndicator()
          : _isRequestFailed
              ? RetryRequest(
                  retry: retryRequest,
                )
              : ListView.builder(
                  itemCount: articlesList.length,
                  itemBuilder: (ctx, index) =>
                      ArticleWidget(article: articlesList[index]),
                ),
    );
  }
}
4. Building Current Article Page
This page will open when the user clicks on any article on the home page. This is used to show the main content of the article.
In the below code, we have imported url_launcher package to open a url. CurrentArticlePage is a Stateful widget as the content of the page can be rendered depending upon user interaction. Here we are passing the article which we will show about using the constructor function. We have also defined openURL function, which is used to open the url on your browser once user clicks on the corresponding button.
import 'package:flutter/material.dart';
import 'package:url_launcher/url_launcher.dart';

import './models/article.dart';

class CurrentArticlePage extends StatefulWidget {
  const CurrentArticlePage({required this.article, super.key});
  final Article article;
  @override
  State<CurrentArticlePage> createState() {
    // ignore: no_logic_in_create_state
    return _CurrentArticlePageState(article);
  }
}

class _CurrentArticlePageState extends State<CurrentArticlePage> {
  _CurrentArticlePageState(this.article);
  Article article;

  void openURL() async {
    String url = article.url;
    print(url);
    Uri uri = Uri(scheme: 'https', path: url);
    if (await canLaunchUrl(uri)) {
      await launchUrl(uri);
      //print("Launching");
    } else {
      //print("Not Launching");
      SnackBar(
        content: Text("Cannot Open $url"),
      );
    }
  }
In the build function, we are returning Scaffold to define the basic visual structure for the page and defined an AppBar to show the title of the article. In the body argument, we are returning the Container widget where we set the margin and in the child, we are using a Column widget to show different part of the page. Inside the Column widget, we are returning title of the page inside a Text widget, Divider widget which has SizedBox above and below it to give some gap b/w widgets, Row widget which is used to show the formatted time with icon of clock horizontally to each other, image of the article using Image.network, a summary of the article using Text widget and an ElevatedButton which is used to open the url of the article on your browser.
@override
  Widget build(BuildContext context) {
    return Scaffold(
      appBar: AppBar(
        foregroundColor: Colors.white,
        title: Text(
          article.title,
          style: const TextStyle(fontSize: 18, overflow: TextOverflow.fade),
        ),
      ),
      body: Container(
        margin: EdgeInsets.all(10),
        child: Column(
          children: [
            Text(
              article.title,
              textAlign: TextAlign.center,
              style: const TextStyle(
                  color: Colors.black,
                  fontSize: 20,
                  fontWeight: FontWeight.bold),
            ),
            const SizedBox(
              height: 10,
            ),
            const Divider(
              height: 1,
              color: Colors.black,
            ),
            const SizedBox(
              height: 10,
            ),
            Row(
              mainAxisAlignment: MainAxisAlignment.center,
              children: [
                const Icon(
                  Icons.access_time,
                  color: Colors.grey,
                ),
                Padding(
                  padding: const EdgeInsets.symmetric(horizontal: 10),
                  child: Text(article.formattedTime),
                )
              ],
            ),
            Container(
              width: double.infinity,
              height: 150,
              margin: const EdgeInsets.all(10),
              child: Image.network(
                article.imageURL,
                fit: BoxFit.cover,
              ),
            ),
            Text(
              article.summary,
              style: const TextStyle(fontSize: 16),
            ),
            Container(
              margin: const EdgeInsets.all(20),
              child: ElevatedButton(
                onPressed: openURL,
                child: const Text("READ MORE"),
              ),
            )
          ],
        ),
      ),
    );
  }
}
5. Helper Widgets
This widget, ArticleWidget, shows a glimpse of the news articles on the home screen for each news site. Here, we are accepting an article to show the constructor function.
In the build function, we are returning the GestureDetector widget, which, when the user taps, will lead to that complete Article Page, which we created in the previous section using the Navigator.push function. In the child argument, we are returning a Container where we have defined the color and margin and through which we are showing the Card widget which gives a nice look to the UI. Inside the Card widget, we are returning a Row Widget as the content is arranged horizontally where we show the image of the article using Image.network and a Column widget inside the Expanded widget.
Through the Column widget we are displaying the formatted Time and the title of the article. One important thing is that while using the Text widget to show the title, the overflow property is set to TextOverflow.fade, which fades the text if it is too large and protects it from bugs in our code.
import 'package:flutter/material.dart';

import 'package:news_aggregator/models/article.dart';
import '../currentArticlePage.dart';

class ArticleWidget extends StatelessWidget {
  const ArticleWidget({required this.article, super.key});

  final Article article;
  @override
  Widget build(BuildContext context) {
    return GestureDetector(
      onTap: () {
        Navigator.push(
            context,
            MaterialPageRoute(
                builder: (BuildContext ctx) =>
                    CurrentArticlePage(article: article)));
      },
      child: Container(
        color: Theme.of(context).primaryColor,
        margin: const EdgeInsets.symmetric(horizontal: 5, vertical: 5),
        child: Card(
          color: Theme.of(context).primaryColor,
          elevation: 3.0,
          child: Row(
            children: [
              Container(
                width: 150,
                child: Image.network(article.imageURL, fit: BoxFit.fill),
              ),
              Expanded(
                child: Column(
                  crossAxisAlignment: CrossAxisAlignment.center,
                  children: [
                    Container(
                      margin: const EdgeInsets.symmetric(horizontal: 10),
                      width: double.infinity,
                      child: Text(
                        article.formattedTime,
                        style:
                            const TextStyle(fontSize: 14, color: Colors.white),
                        textAlign: TextAlign.start,
                      ),
                    ),
                    Container(
                      margin: const EdgeInsets.all(10),
                      child: Text(
                        article.title,
                        style:
                            const TextStyle(fontSize: 18, color: Colors.white),
                        overflow: TextOverflow.fade,
                      ),
                    ),
                  ],
                ),
              ),
            ],
          ),
        ),
      ),
    );
  }
}
RetryRequest is a stateless widget used on the home screen and shown when the request fails. Here, we are accepting the retry function through the constructor function we created in the home page widget.
In the build function, we are returning Column widget, inside which we are showing the Text that the request has failed and an ElevatedButton through which retry function is called. Both these widgets are separated by SizedBox widget.
import 'package:flutter/material.dart';

class RetryRequest extends StatelessWidget {
  const RetryRequest({super.key, required this.retry});

  final void Function() retry;
  @override
  Widget build(BuildContext context) {
    return Container(
      child: Column(
        mainAxisAlignment: MainAxisAlignment.center,
        children: [
          const Text(
            'Request Failed!',
            style: TextStyle(fontSize: 16),
          ),
          const SizedBox(
            height: 15,
          ),
          ElevatedButton(
              style: ElevatedButton.styleFrom(
                backgroundColor: Colors.black87,
              ),
              onPressed: () {
                retry;
              },
              child: const Text(
                'RETRY!',
                style: TextStyle(color: Colors.white),
              ))
        ],
      ),
    );
  }
}
Flutter News Aggregator Output
Conclusion
This Flutter News Aggregator project was full of amazing widgets and various packages we used like http, intl, url_launcher. In this project, we got to learn several things like how to send an http request, how to decode json format, how to format date and much more. We also used various widgets like CircularProgressIndicator, ListView.builder, Divider, Image.network, Expanded and many more. We also created our own custom model of the article which helped in maintaining our code.
I hope you enjoyed working on this project!
Thank you for reading! Keep Learning Flutter!