


Master Python with 70+ Hands-on Projects and Get Job-ready - Learn Python
Interactive Online Courses: Elevate Skills & Succeed Enroll Now!
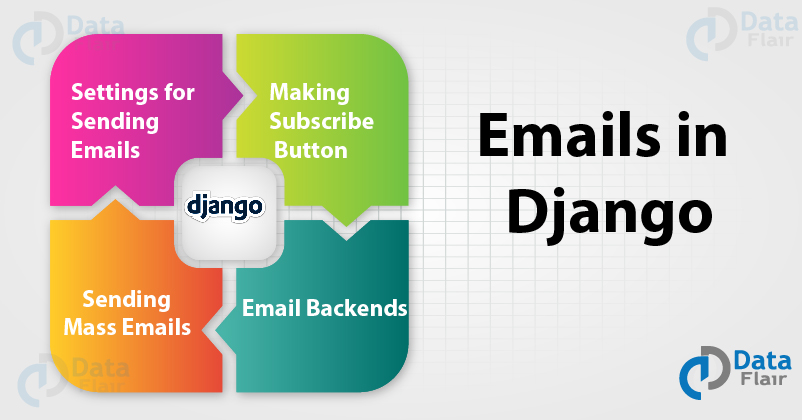
Django Emails Tutorial – We all have used the email feature of websites, whenever we forget our password or subscribe to any website, etc. Every time an email is sent to our inbox by the website including the link to reset the password.
Sending emails via websites is a great feature to have as it enhances the User Experience. We can achieve greater user communication. See, amazon.com, flipkart.com which send emails with their personalized offers. It’s all about emails generated from a server.
So, now let’s learn how to add emails to our website and send emails in Django.
Settings for Sending Emails in Django
The value changes according to the type of email services. These settings are to be added in the settings.py file of the project.
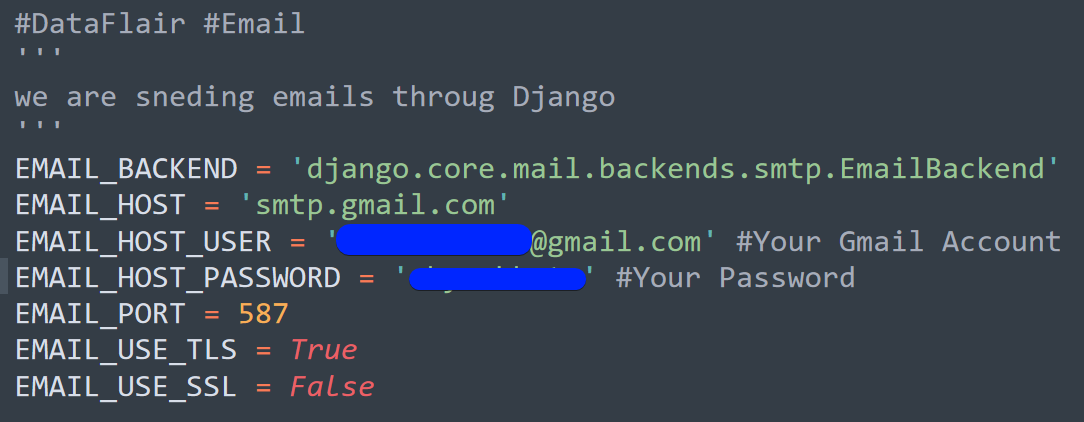
These are the settings for sending email in Django via Gmail.
Code:
#DataFlair
EMAIL_BACKEND =

‘django.core.mail.backends.smtp.EmailBackend’
EMAIL_HOST = ‘smtp.gmail.com’
EMAIL_USE_TLS = True
EMAIL_PORT = 587
EMAIL_HOST_USER = ‘your_account@gmail.com’
EMAIL_HOST_PASSWORD = ‘your account’s password’
Code Display:
Understanding the code:
The settings are pretty straight forward as:
-
EMAIL_BACKEND
This setting specifies the backend that we are going to use for sending an email in Django. There are multiple backends that Django provides.
-
EMAIL_HOST
This setting is to specify your email service provider. We are using the setting for Gmail.
-
EMAIL_HOST_USER
It is the account name from which we will send an email.
-
EMAIL_HOST_PASSWORD
The password of the email account that we are using.
-
EMAIL_PORT
This is the setting for Gmail, you can get yours on the web. It is the port used by the SMTP server.
- EMAIL_USE_TLS
This setting specifies whether the Email uses a TLS connection or not. It is True for Gmail.
-
EMAIL_USE_SSL
False for Gmail.
There are some more settings for email but for sending an email with Gmail, this much setup is enough.
Setting up Gmail for Django Mail API
We need to make some changes in our Gmail account to send an Email. Visit this link with your account signed in:
The link contains a specific setting that allows access via Django mail API. Since our web application is not a google registered service, it is a less secured app. Therefore, we allow less secured apps to our settings.
Then scroll down to this section of the page.
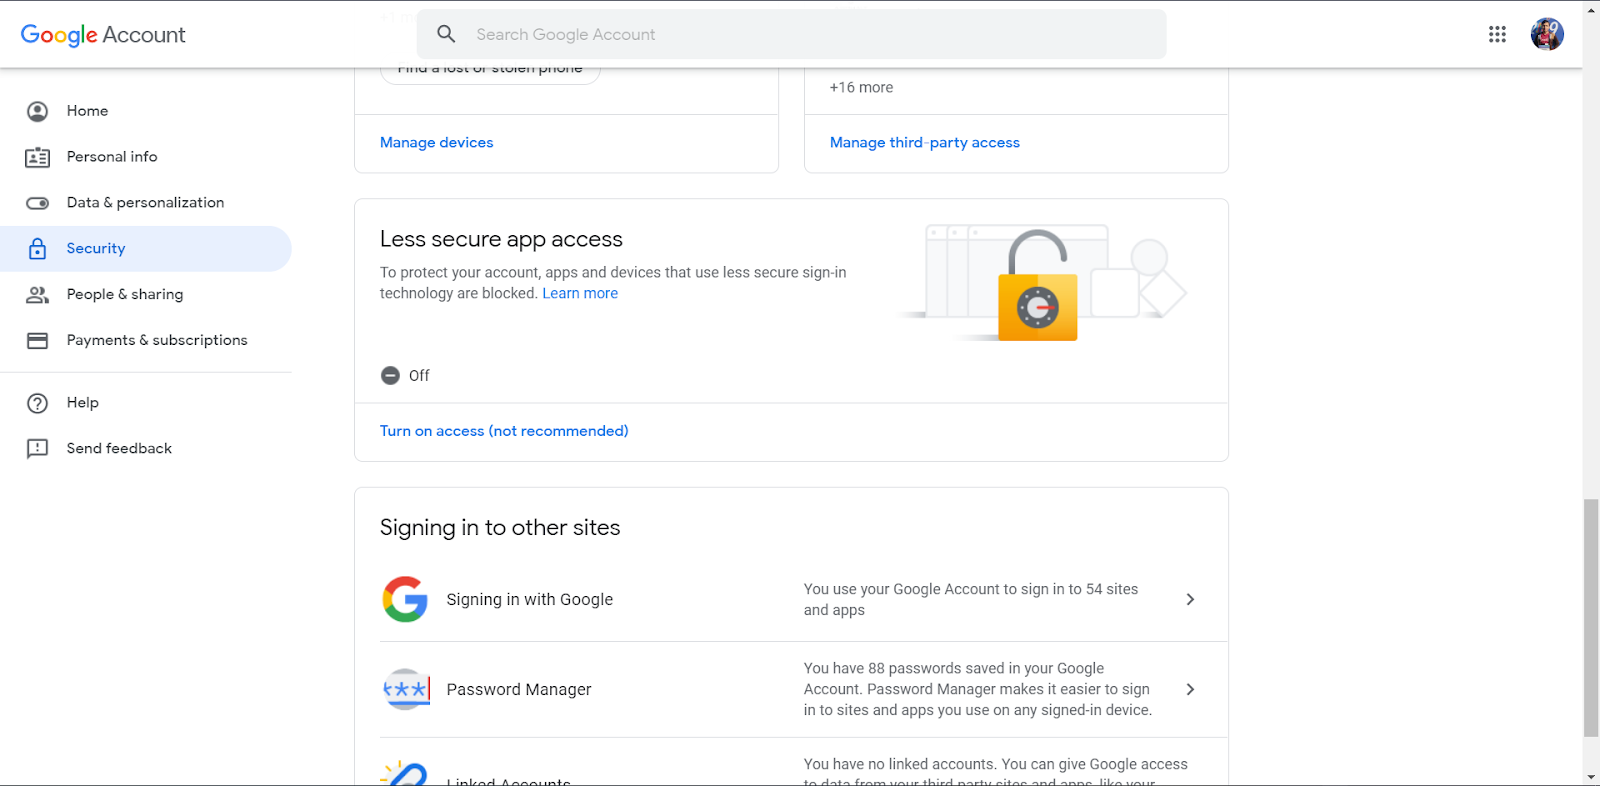
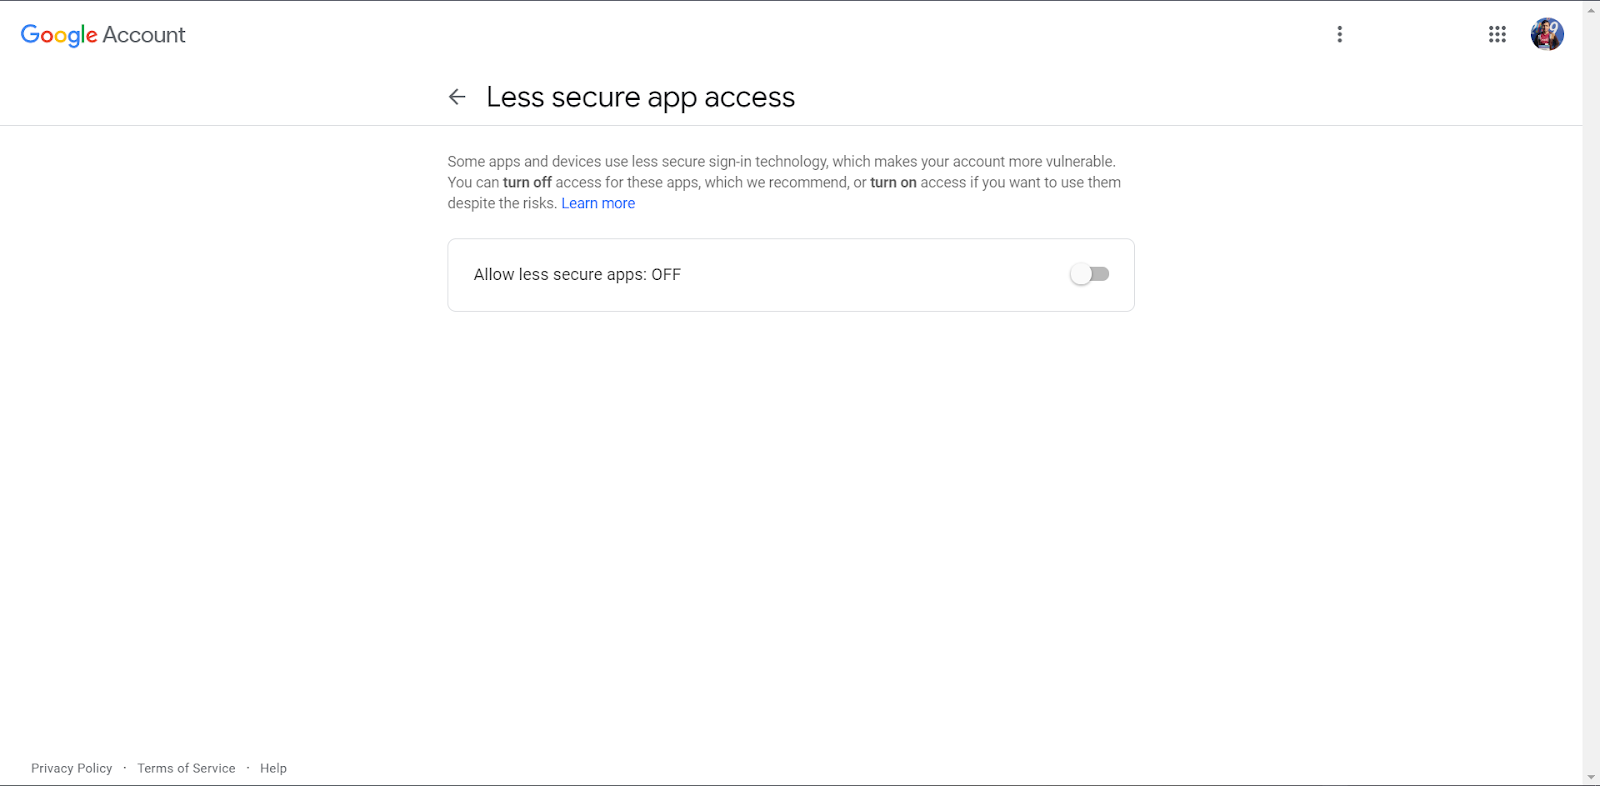
Less secure app access option will be present. Turn on the access.
========================================================
Note:
If you are just testing, then you can temporarily do this setting. For a permanent setup, I would recommend a new account. Since, using your main account will be risky.
========================================================
Now, we are ready to send emails with Django.
Sending Email with Gmail
We will be creating a subscribe page for our website. It will do these tasks:
- Take user email from the form.
- Send a welcome email to the user.
Making Subscribe Button in Django
1. Create a New Application
Open your terminal/ PowerShell and make a new Django application named subscribe.
Code:
python manage.py start-app subscribe
This command will add a new directory in your project.
Install the application in settings.py file.
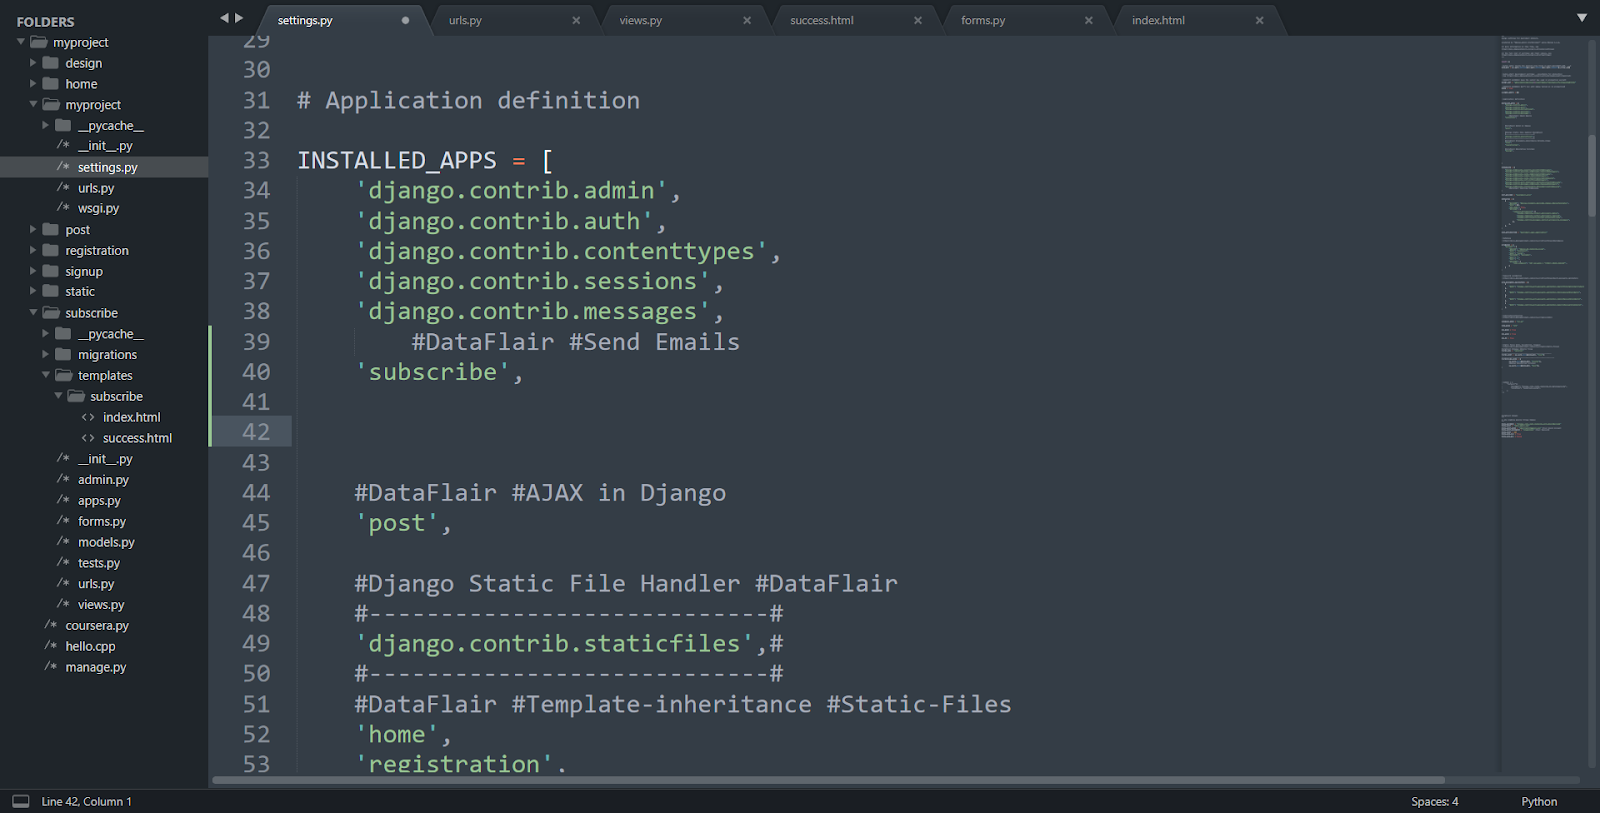
We have successfully done the above steps.
2. Create Forms
Make a new file forms.py in the subscribe directory. Paste this code in it.
from Django import forms

class Subscribe(forms.Form):
    Email = forms.EmailField()

    def __str__(self):
        return self.Email
Output:
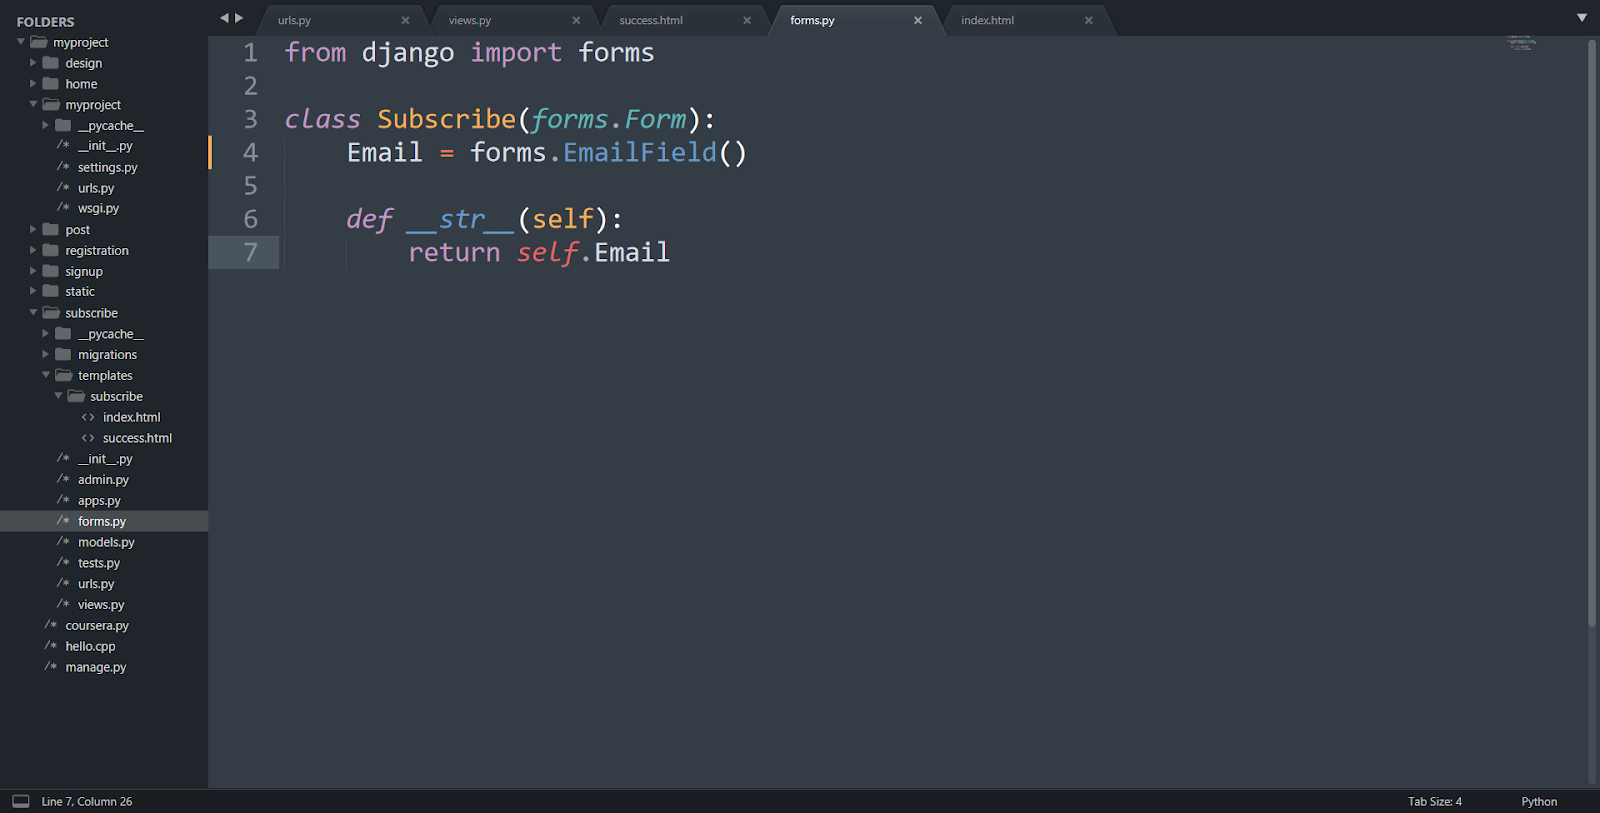
We have made a form with a single field which is an Email field. The __str__ method is optional. When the subscribe class is returned as a string, it will return its Email field.
3. Create Views
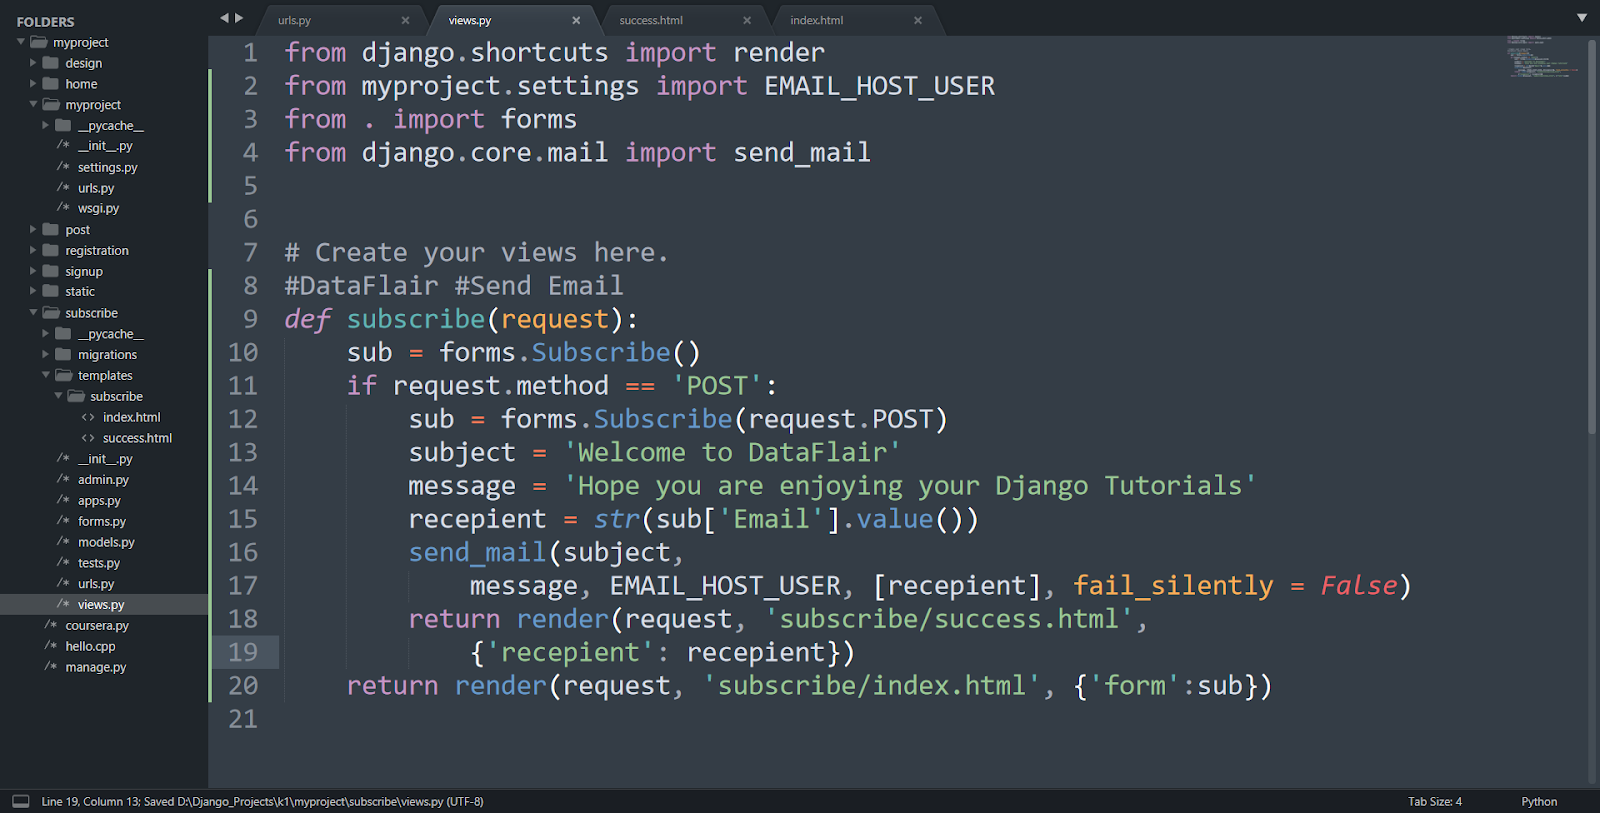
Paste this code in the subscribe/views.py file.
Code:
from django.shortcuts import render
from myproject.settings import EMAIL_HOST_USER
from . import forms
from django.core.mail import send_mail

# Create your views here.
#DataFlair #Send Email
def subscribe(request):
    sub = forms.Subscribe()
    if request.method == 'POST':
        sub = forms.Subscribe(request.POST)
        subject = 'Welcome to DataFlair'
        message = 'Hope you are enjoying your Django Tutorials'
        recepient = str(sub['Email'].value())
        send_mail(subject,
            message, EMAIL_HOST_USER, [recepient], fail_silently = False)
        return render(request, 'subscribe/success.html', {'recepient': recepient})
    return render(request, 'subscribe/index.html', {'form':sub})
Code Display:
Understanding the code:
This code is pretty straightforward. We have created a simple view function subscribe.
Note that we have imported two new things other than form:
The EMAIL_HOST_USER and send_mail() method.
We defined EMAIL_HOST_USER in settings.py. We are importing that value in the view function. Although sender email can be specified here, this approach saves us from errors.
Then inside subscribe its simple form display.
A sub is a form object. We are checking whether the data received is GET or POST. If the method is GET, it will give an empty form, otherwise, it will execute the code in if statement.
send_mail() method is imported from django.core.mail module. The send_mail() method handles the transmission of Emails. There are some important parameters of send_mail(), which we have defined here:
- subject: Contains the subject part of the Email.
- message: Contains the Email body.
- from_email: It is the sender’s mail address. Remember? we defined it in our settings.py file. This should be the same as defined in settings.py. therefore, we have imported it.
- recipient_list: It is the receivers email address. Apparently, we are taking this from our Form’s Email field. This field should always be a list of strings.
- fail_silently: It is True by default. We specify it false so that when the mail is not sent, we get an Exception. In this case, it will be smtplib.SMTPException. These are the required fields and can not be empty.
If the send_mail() is successful then render() is called. It will send the data to a success.html template else the request is not POST. It will directly render index.html and will contain the form.
4. Create Templates
Now, we will create templates. Make a new directory named templates in the subscribe directory. Then inside templates, make a new directory subscribe.
Inside this directory: subscribe/templates/subscribe
Make two files: index.html and success.html
Paste this code in index.html
Code:
<!DOCTYPE html>
<html>
<head>
         <title>DataFlair send email</title>
         <link rel="stylesheet"                 href="https://maxcdn.bootstrapcdn.com/bootstrap/3.3.7/css/bootstrap.min.css" integrity="sha384-BVYiiSIFeK1dGmJRAkycuHAHRg32OmUcww7on3RYdg4Va+PmSTsz/K68vbdEjh4u" crossorigin="anonymous">
</head>
<body>
    <center>
        <h1 class = 'alert alert-success'>Subscribe Form</h1>
        <h3 class="p-3 mb-2 bg-primary text-white" style = 'font-size: 50px;'>DataFlair Django Tutorials
    </h3>
    <form method="POST">
        <!-- Very Important csrf Token -->
        {% csrf_token %}
        <div class = "form-group">
            <p>
            <h3>{{ form.as_p }}</h3>
        </p>
            <br>
            <input type="submit" name="Subscribe" class = 'btn btn-primary btn-lg'>
                </div>
            </form>
        </center>
</body>
</html>
Code Display:
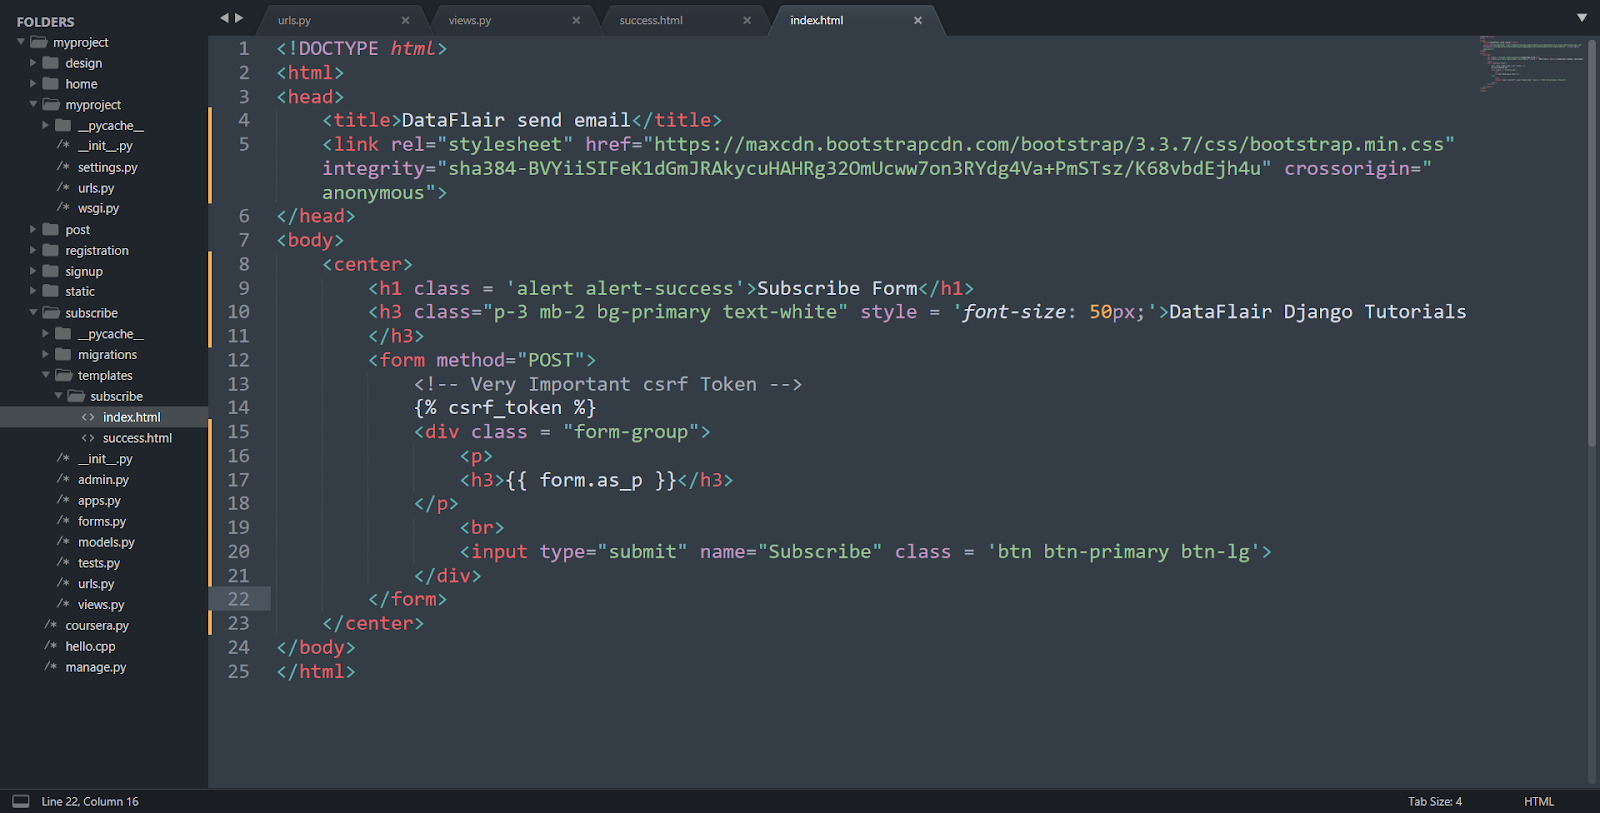
It’s a simple template using some bootstrap. You can skip the CSS part if you want. We are just displaying the form in this template.
Paste this code in success.html
Code:
<!DOCTYPE html>
<html>
<head>
    <title>Success</title>
</head>
<body>
    <h1>email sent successfully to: {{ recepient
    }}</h1>
</body>
</html>
Code Display:

It’s also a simple template. It will be loaded when email was sent successfully.
5. Configuring URLs
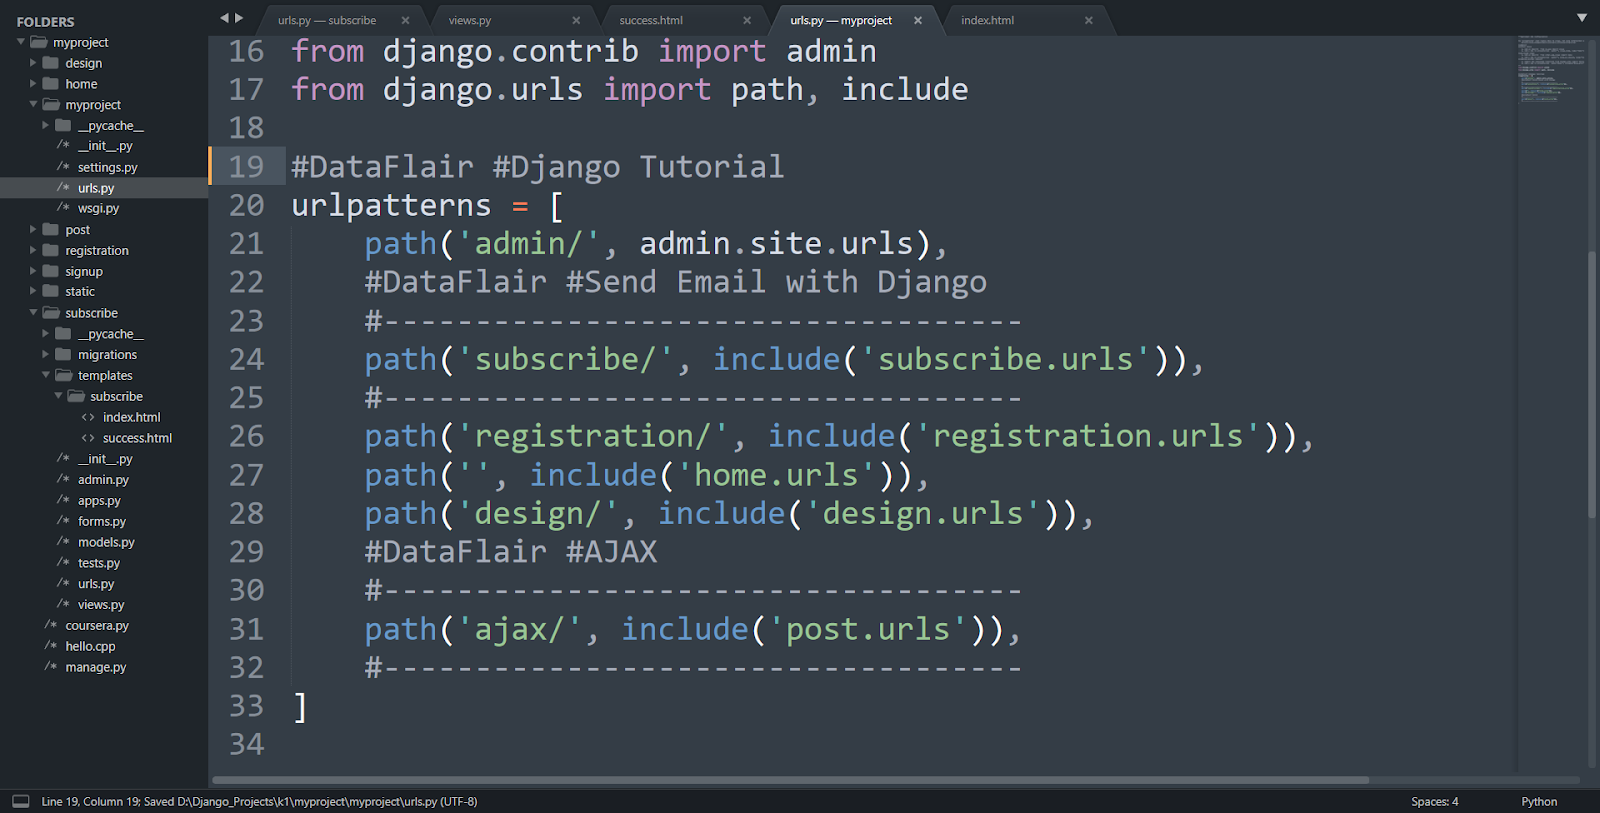
Now, we can configure our URLs in Django.
In urls.py or main urls-config, paste this code inside urlpatterns:
Code:
path('subscribe/', include('subscribe.urls')),
Code Display:
Then make a new file urls.py in subscribe directory.
Paste this code in subscribe/urls.py file.
Code:
from django.urls import path
from . import views

urlpatterns = [
    path('', views.subscribe, name = 'subscribe'),
]
Code Display:
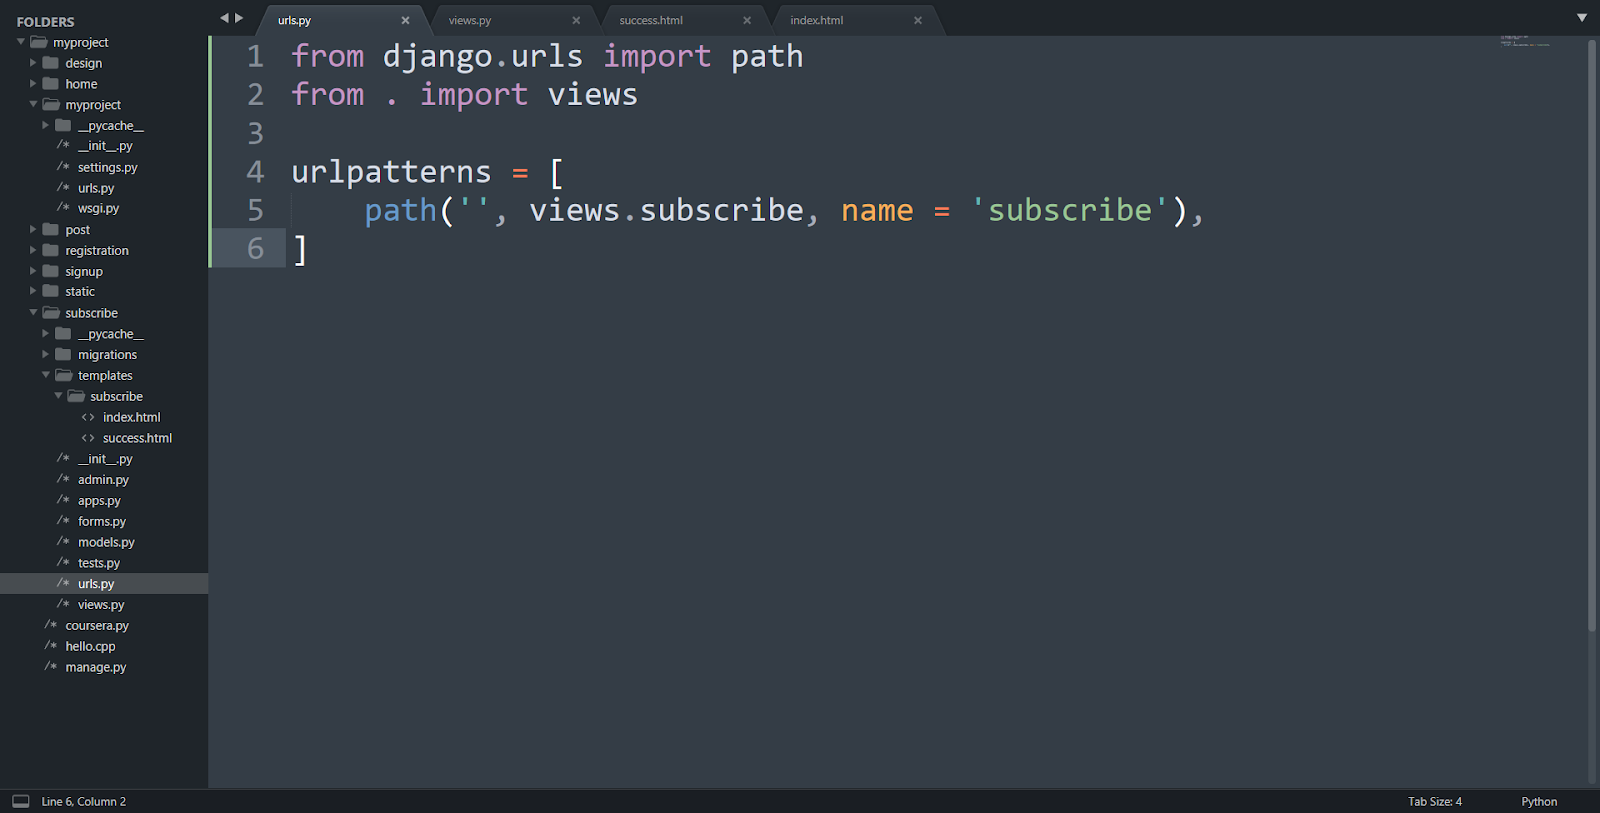
When subscribe is searched from URL-bar, Django will call subscribe function.
6. Testing
Start your development server. Now, search for URL: subscribe/ in the browser.
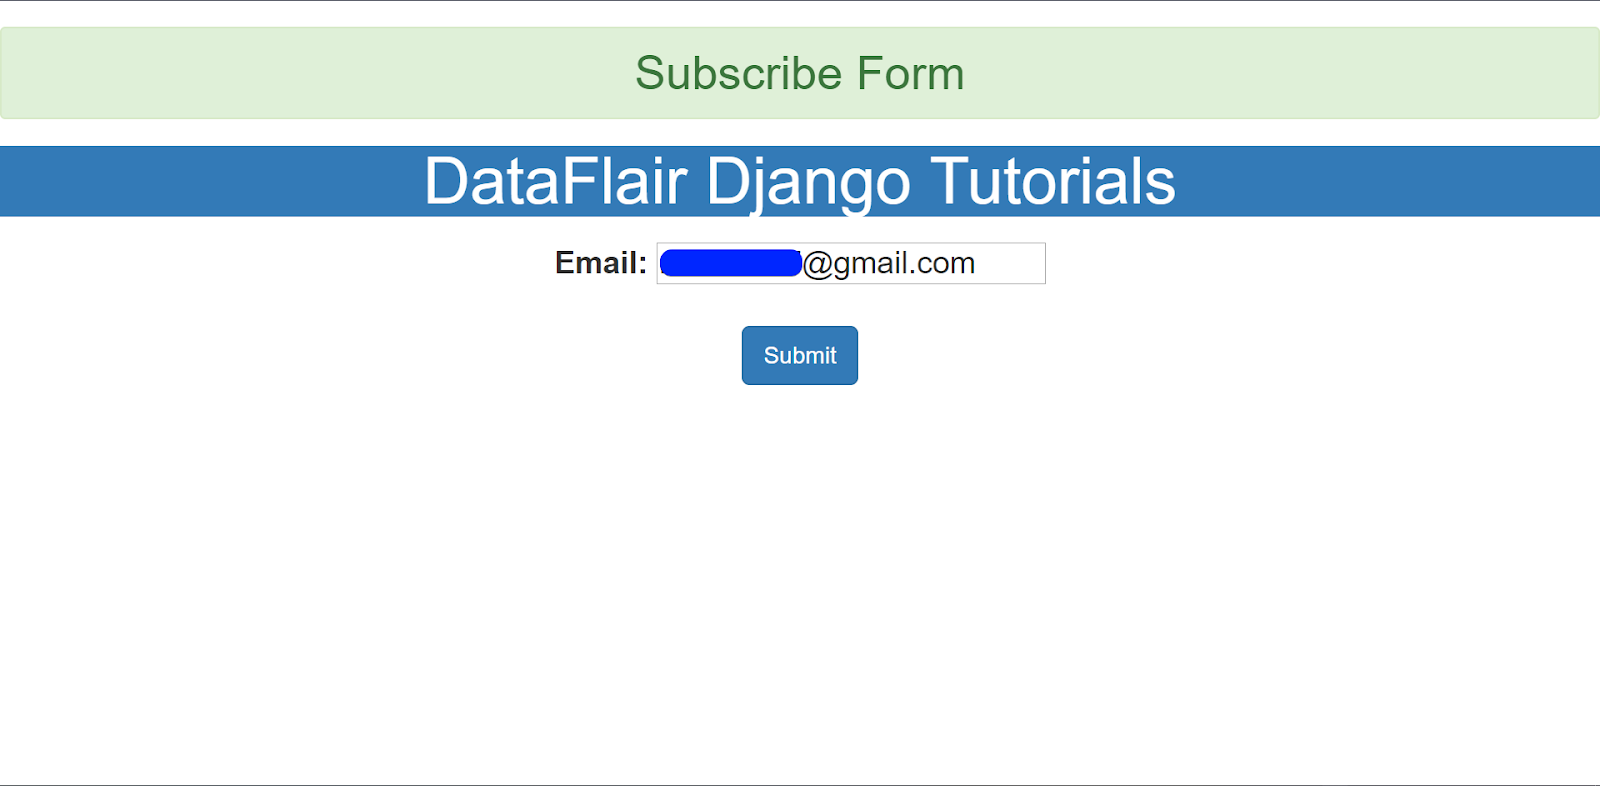
You will get this. Fill in the email field and click on submit.
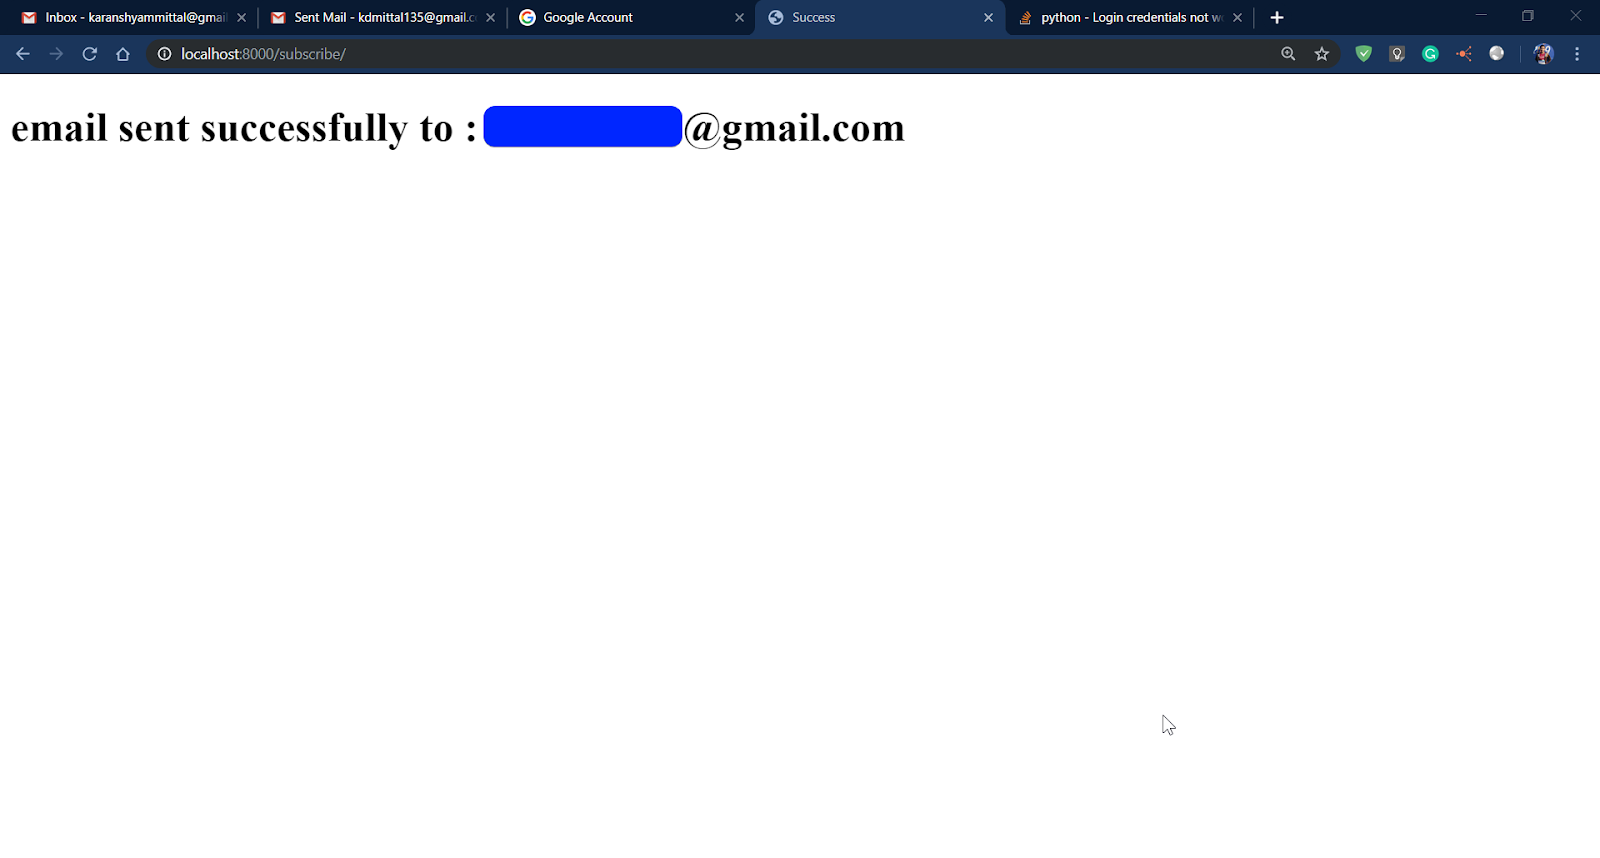
It is successfully sent.
To be sure, we can check in our sent box.

There the mail was sent successfully. That was how we can send emails via Gmail. Only the settings will change for another email service provider.
Any queries in Django Email tutorial till now? Mention them in the comment section
Sending Mass Emails in Django
We used send_mail() in the above example. You can very easily replace the same with the send_mass_mail() method.
There is a difference in sending mass mail though.
Rather than taking parameters like the subject, message, from_mail, recipient list, it takes in one data tuple parameter.
The data tuple is to be in this format:
datatuple = (Subject, message, from_email, recipient_list)
Other functions and parameters work the same way as send_mail().
Send_mass_mail() is a more popular method by choice for sending multiple emails at a time. It is more efficient then send_mail().
When we call send_mail(), it will always make a new connection for each call. For send_mass_mail(), the connection once started, will send multiple emails.
It depends on the use cases. As with a subscribe button, we don’t need multiple emails.
Some Other Methods
-
mail_admin()
It is one of the special features of Django. We can send emails directly to site admins. ADMIN is a list in settings.py. It is a Python list of tuples. The tuples contain the name of the admin and mail of admin.
ADMIN = [
    (‘ADMIN-NAME’, ‘ADMIN-MAIL’),
]
This method is used when the site goes online and Django DEBUG is False.
This method requires some settings and lists to be defined.
-
mail_managers()
It is the same method as mail_admin(). It sends the mail to managers instead of admin. This requires MANAGER setting, the same as the ADMIN list.
Prevents Header Injection
Django by default prevents Header Injection in sending mail. When any malicious hacker tries to edit the header list in the mail, Django will raise BadHeaderError. This exception will temporarily stop mail transmission.
Now, no one will be able to change the header of your Emails. It’s a very important feature. Your emails like reset passwords cannot be hijacked. These emails contain very secure and private data. You have to keep it safe from hackers. This will ensure your user’s trust.
EmailMessage Class
We just learned about send_mail() and send_mass_mail() in previous sections. Those are methods of EmailMessage Class. EmailMessage Class provides more advanced features for sending emails. You can send attachments, multi-part emails, etc..
The EmailMessage is responsible for making email itself. It is then the responsibility of Email backend to transmit the same. There are some important parameters of the EmailMessage class.
All of these parameters are optional and can be defined in any order. It is necessary though to define them before calling any send() method.
These are the parameters or data-members of EmailMessage Class:
- subject: The subject of the email.
- body: The body of the email. It is the plain text.
- from_email: If omitted, it will go to DEFAULT_FROM_EMAIL defined in settings.py.
- to: It is a list of recipient’s emails.
- bcc: It is also a list of emails used in the Bcc category.
- attachments: A list of attachments to put in a message. This can be a PDF, plain-text file, etc.
- cc: Contains a list of addresses similar to bcc and recipient list.
- reply_to: Contains a list of addresses for Reply-to field.
Some Important Methods of EmailMessage Class
Suppose, we have:
Msg = EmailMessage()
We have defined all the important parameters of Msg. Now, we will apply these methods one by one.
-
send()
This method will send the message.
Syntax :
Msg.send(failed_silently = False)
If any connection was specified in the Msg, send() will use that. Otherwise, it will go for the default backend connection.
It is important to note that empty recipients list will not raise an exception.
-
message()
This method is used to construct a subclass object of django.core.mail. It will create an object of django.core.mail.SafeMIMEText which holds the message to be sent.
-
recipients()
This method will return a list of recipients. It is as specified in the object.
Syntax:
Msg.recipients()
It will return all types of recipients, whether they are in cc, bcc, to all the fields.
-
attach()
This method is the reason we have to use the EmailMessage Class. When we need any attachments to be sent with the email, this method is called.
Msg.attach( ‘file_name.type’, content, ‘MIME/ type’)
It will create a new attachment and add the same with the Msg. You can skip the MIME type parameter. It will then guess the MIME type with the file name.
The content is the information inside the file.
It’s an awesome feature of Django.
Note:
In MIMEType = message/rfc822, we can attach the EmailMessage class as an object.
If the MIME Type is text/, the content should be a string.
The binary data is also acceptable in content. It will be decoded using UTF-8. If this fails, then data will be sent unchanged.
-
attach_file()
This method is a bit different from the attach() method. It is used to attach files from the file system.
Syntax:
Msg.attach_file(‘path to the file’)
The file stored at that path will be attached to the email.
The binary data is handled similarly as attach().
Email Backends in Django
An Email backend is responsible for actually transmitting Email. The Email backend class has three important methods:
- open() will start a connection. This connection will be a long one and will not terminate with interruptions.
- close() will terminate the connection.
- send_message(email_messages) returns a list of EmailMessage objects. This method will open and close connection implicitly.
Django provides multiple backends for sending Emails. You can totally make your own Email backends. It’s so customizable and yet so secure and powerful.
These are some of the default backends provided by Django out of the box.
You can get the backend from the get_connection() method. This can be imported from django.core.mail module.
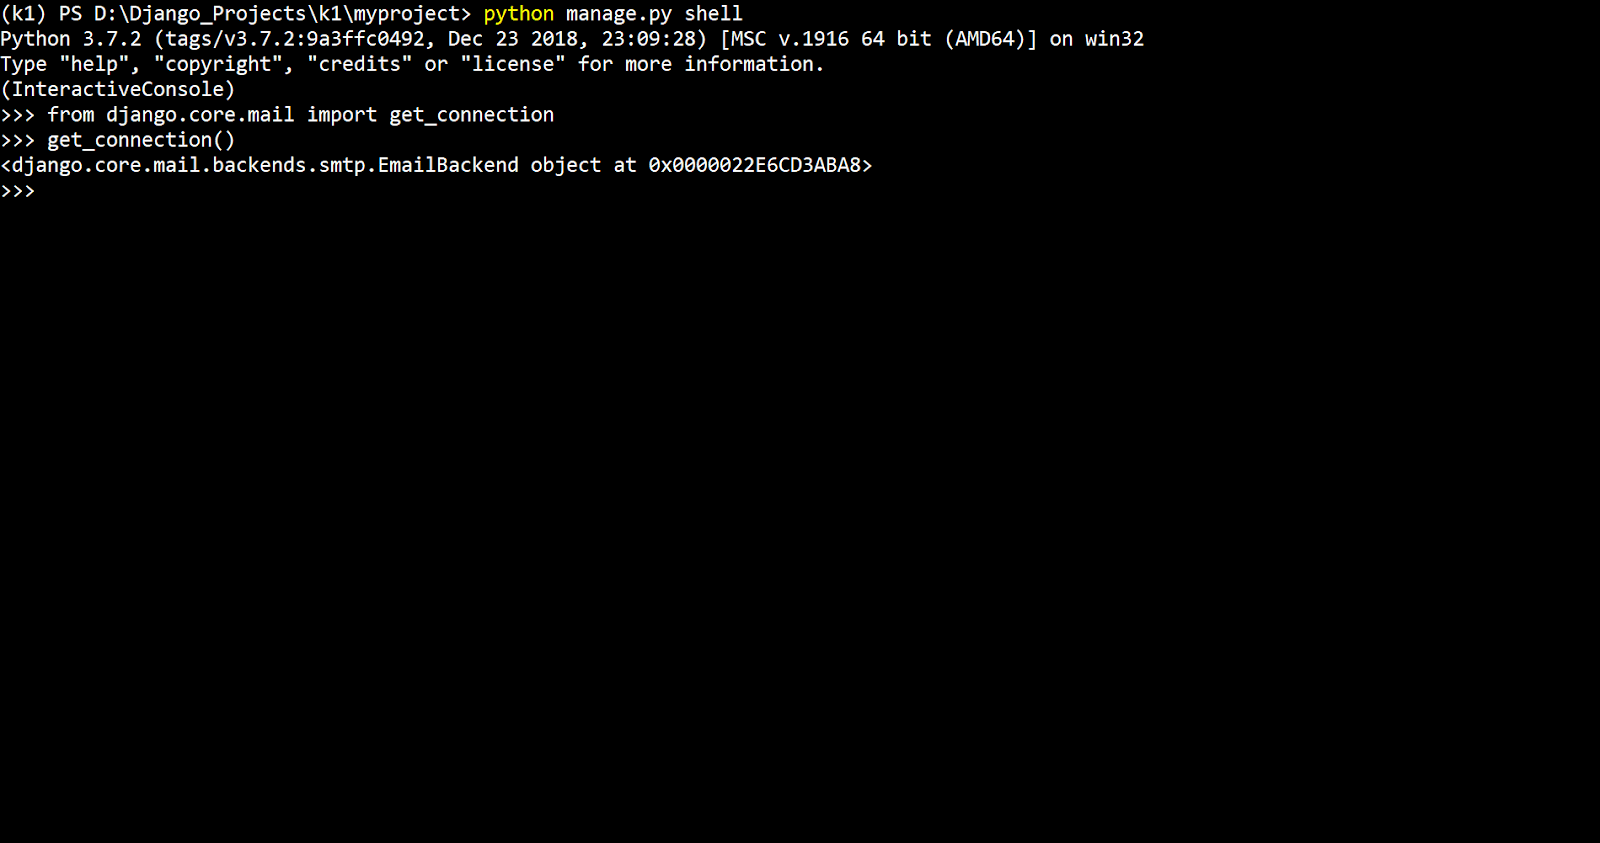
In the above shell, we have printed our Email backend. Django has multiple backends as mentioned above. Only the SMTP backend is mostly used. Other backends are more development-oriented.
-
SMTP backend
It is used to transmit Emails on an SMTP connection. We have used this backend to send Emails. We have defined these settings in our settings.py file. It is the default email backend if not specified.
django.core.mail.backends.smtp.EmailBackend
The settings we defined in our project in the previous section are for this.
It is the utility backend that is actually used to send Emails.
-
Console backend
If you just want to test the Email being sent, this backend comes in handy. As its name, the backend will print the Email you sent. It will not send the Email, but just print it in the console.
Make your settings like:
EMAIL_BACKEND = ‘django.core.mail.backends.console.EmailBackend’
This backend is not intended to be used in a production environment.
-
File backend
The file backend is similar to the console backend. It is also useful for development purposes.
The file backend writes the Email to a file. Every time a new mail is sent it makes a new file.
To use this backend, paste this code in your settings.py
EMAIL_BACKEND = 'django.core.mail.backends.filebased.EmailBackend'
EMAIL_FILE_PATH = '/file-directory/’
Remember to give it a file path. It will store all its Email files there.
-
In-memory backend
This backend is also not for a production environment. This backend stores the messages in the outbox attribute of django.core.mail module. This attribute is created when the first mail is sent.
Outbox attribute is a list of EmailMessage objects to be sent.
EMAIL_BACKEND = 'django.core.mail.backends.locmem.EmailBackend'
This backend is provided to let developers test and develop Email API more easily.
-
Dummy backend
This is the Dummy backend. It will literally do nothing with your messages. You don’t need to specify any other setting other then EMAIL_BACKEND for this.
EMAIL_BACKEND = 'django.core.mail.backends.dummy.EmailBackend'
As you guessed, it is not for a production environment.
-
Custom backends
Django also gives you the power to make your own backends. That does require a more in-depth knowledge of django.core.email.
It should be noted that Custom Email backends are subclasses of BaseEmailBackend. It is located in django.core.mail.backends.base module. You can take some reference from smtp.EmailBackend.
Summary
Sending Emails in Django is easy. The best part is that Default backends provided by Django are all secure. They raise proper errors when something is wrong with the header.
Email is a great utility for websites. It comes in handy whether we are subscribing to a website or resetting the password.
Hope you enjoyed this article. Do share your feedback regarding Django Emails article in the comment section.