


Machine Learning courses with 110+ Real-time projects Start Now!!
Cats vs Dogs classification is a fundamental Deep Learning project for beginners. If you want to start your Deep Learning Journey with Python Keras, you must work on this elementary project.
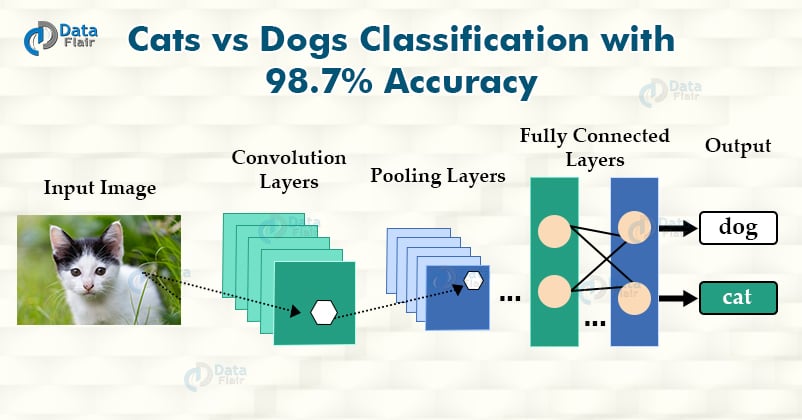
In this Keras project, we will discover how to build and train a convolution neural network for classifying images of Cats and Dogs.
The Asirra (Dogs VS Cats) dataset:
The Asirra (animal species image recognition for restricting access) dataset was introduced in 2013 for a machine learning competition. The dataset includes 25,000 images with equal numbers of labels for cats and dogs.
Dataset: Cats and Dogs dataset
Deep Learning Project for Beginners – Cats and Dogs Classification
Steps to build Cats vs Dogs classifier:
1. Import the libraries:
import numpy as np
import pandas as pd
from keras.preprocessing.image import ImageDataGenerator,load_img
from keras.utils import to_categorical
from sklearn.model_selection import train_test_split
import matplotlib.pyplot as plt
import random
import os
2. Define image properties:
Image_Width=128
Image_Height=128
Image_Size=(Image_Width,Image_Height)
Image_Channels=3
3. Prepare dataset for training model:
filenames=os.listdir("./dogs-vs-cats/train")

categories=[]
for f_name in filenames:
    category=f_name.split('.')[0]
    if category=='dog':
        categories.append(1)
    else:
        categories.append(0)

df=pd.DataFrame({
    'filename':filenames,
    'category':categories
})
4. Create the neural net model:
from keras.models import Sequential
from keras.layers import Conv2D,MaxPooling2D,\
     Dropout,Flatten,Dense,Activation,\
     BatchNormalization

model=Sequential()

model.add(Conv2D(32,(3,3),activation='relu',input_shape=(Image_Width,Image_Height,Image_Channels)))
model.add(BatchNormalization())
model.add(MaxPooling2D(pool_size=(2,2)))
model.add(Dropout(0.25))

model.add(Conv2D(64,(3,3),activation='relu'))
model.add(BatchNormalization())
model.add(MaxPooling2D(pool_size=(2,2)))
model.add(Dropout(0.25))

model.add(Conv2D(128,(3,3),activation='relu'))
model.add(BatchNormalization())
model.add(MaxPooling2D(pool_size=(2,2)))
model.add(Dropout(0.25))

model.add(Flatten())
model.add(Dense(512,activation='relu'))
model.add(BatchNormalization())
model.add(Dropout(0.5))
model.add(Dense(2,activation='softmax'))

model.compile(loss='categorical_crossentropy',
  optimizer='rmsprop',metrics=['accuracy'])
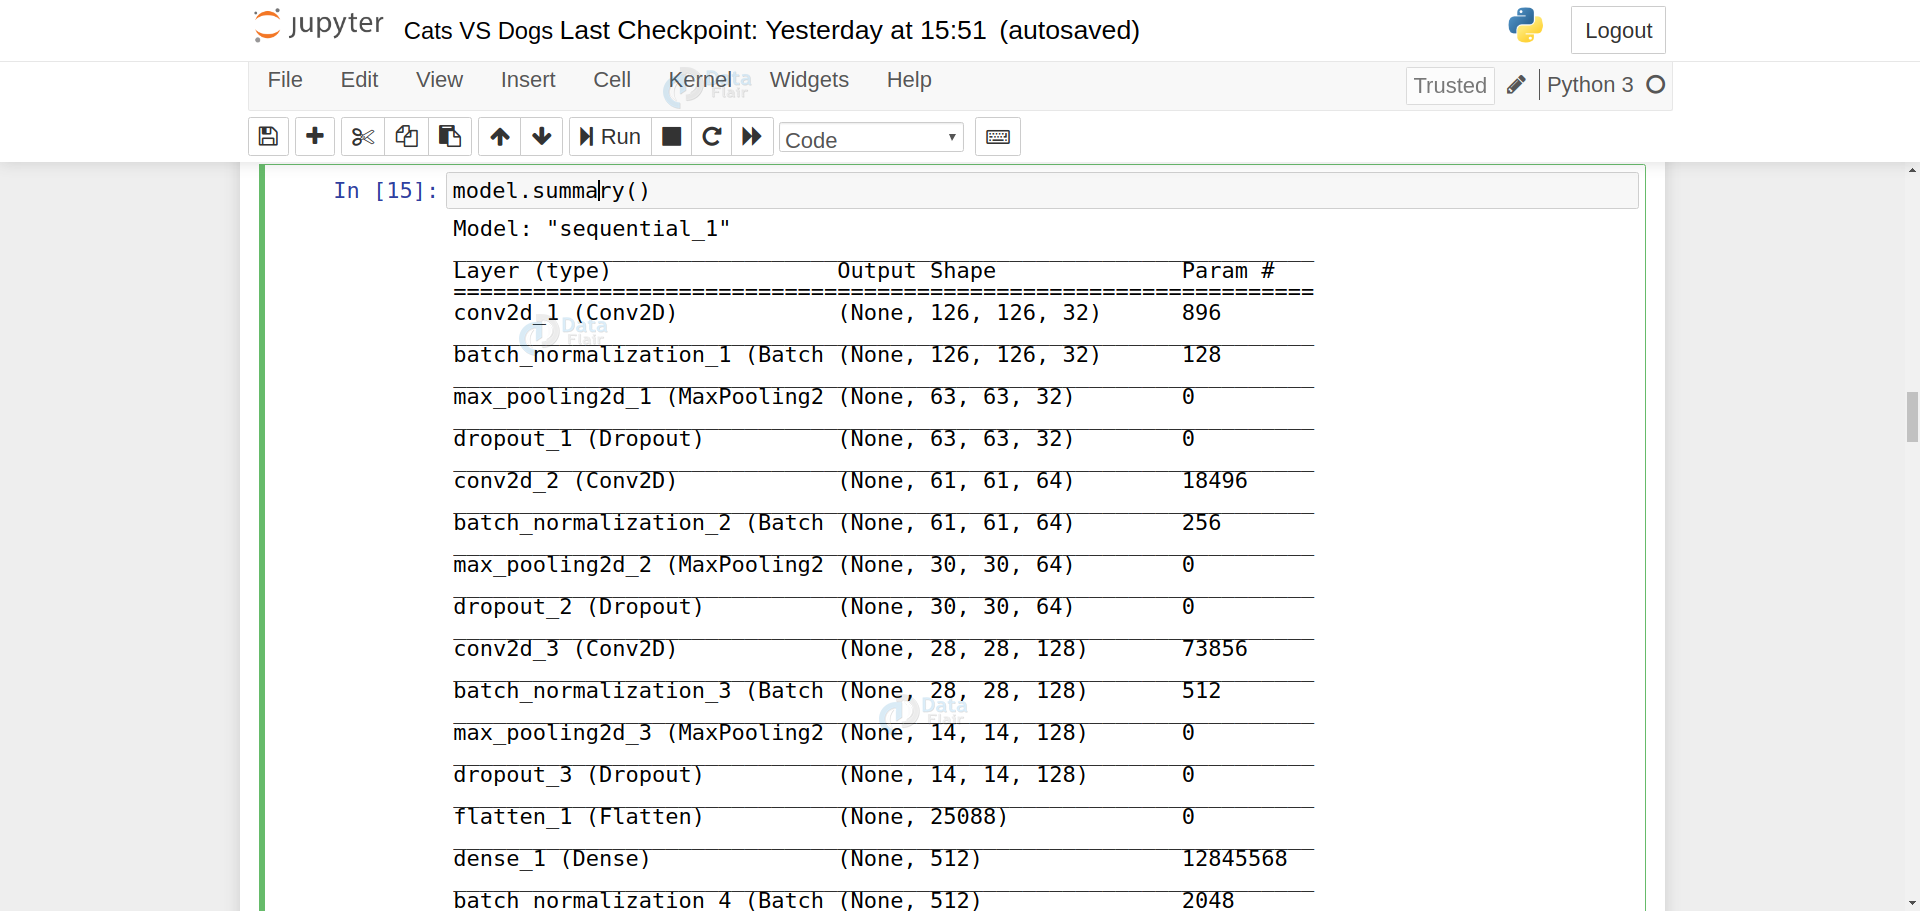
5. Analyzing model:
model.summary()
6. Define callbacks and learning rate:
from keras.callbacks import EarlyStopping, ReduceLROnPlateau
earlystop = EarlyStopping(patience = 10)
learning_rate_reduction = ReduceLROnPlateau(monitor = 'val_acc',patience = 2,verbose = 1,factor = 0.5,min_lr = 0.00001)
callbacks = [earlystop,learning_rate_reduction]
7. Manage data:
df["category"] = df["category"].replace({0:'cat',1:'dog'})
train_df,validate_df = train_test_split(df,test_size=0.20,
  random_state=42)

train_df = train_df.reset_index(drop=True)
validate_df = validate_df.reset_index(drop=True)

total_train=train_df.shape[0]
total_validate=validate_df.shape[0]
batch_size=15
8. Training and validation data generator:
train_datagen = ImageDataGenerator(rotation_range=15,
                                rescale=1./255,
                                shear_range=0.1,
                                zoom_range=0.2,
                                horizontal_flip=True,
                                width_shift_range=0.1,
                                height_shift_range=0.1
                                )

train_generator = train_datagen.flow_from_dataframe(train_df,
                                                 "./dogs-vs-cats/train/",x_col='filename',y_col='category',
                                                 target_size=Image_Size,
                                                 class_mode='categorical',
                                                 batch_size=batch_size)

validation_datagen = ImageDataGenerator(rescale=1./255)
validation_generator = validation_datagen.flow_from_dataframe(
    validate_df,
    "./dogs-vs-cats/train/",
    x_col='filename',
    y_col='category',
    target_size=Image_Size,
    class_mode='categorical',
    batch_size=batch_size
)

test_datagen = ImageDataGenerator(rotation_range=15,
                                rescale=1./255,
                                shear_range=0.1,
                                zoom_range=0.2,
                                horizontal_flip=True,
                                width_shift_range=0.1,
                                height_shift_range=0.1)

test_generator = train_datagen.flow_from_dataframe(train_df,
                                                 "./dogs-vs-cats/test/",x_col='filename',y_col='category',
                                                 target_size=Image_Size,
                                                 class_mode='categorical',
                                                 batch_size=batch_size)
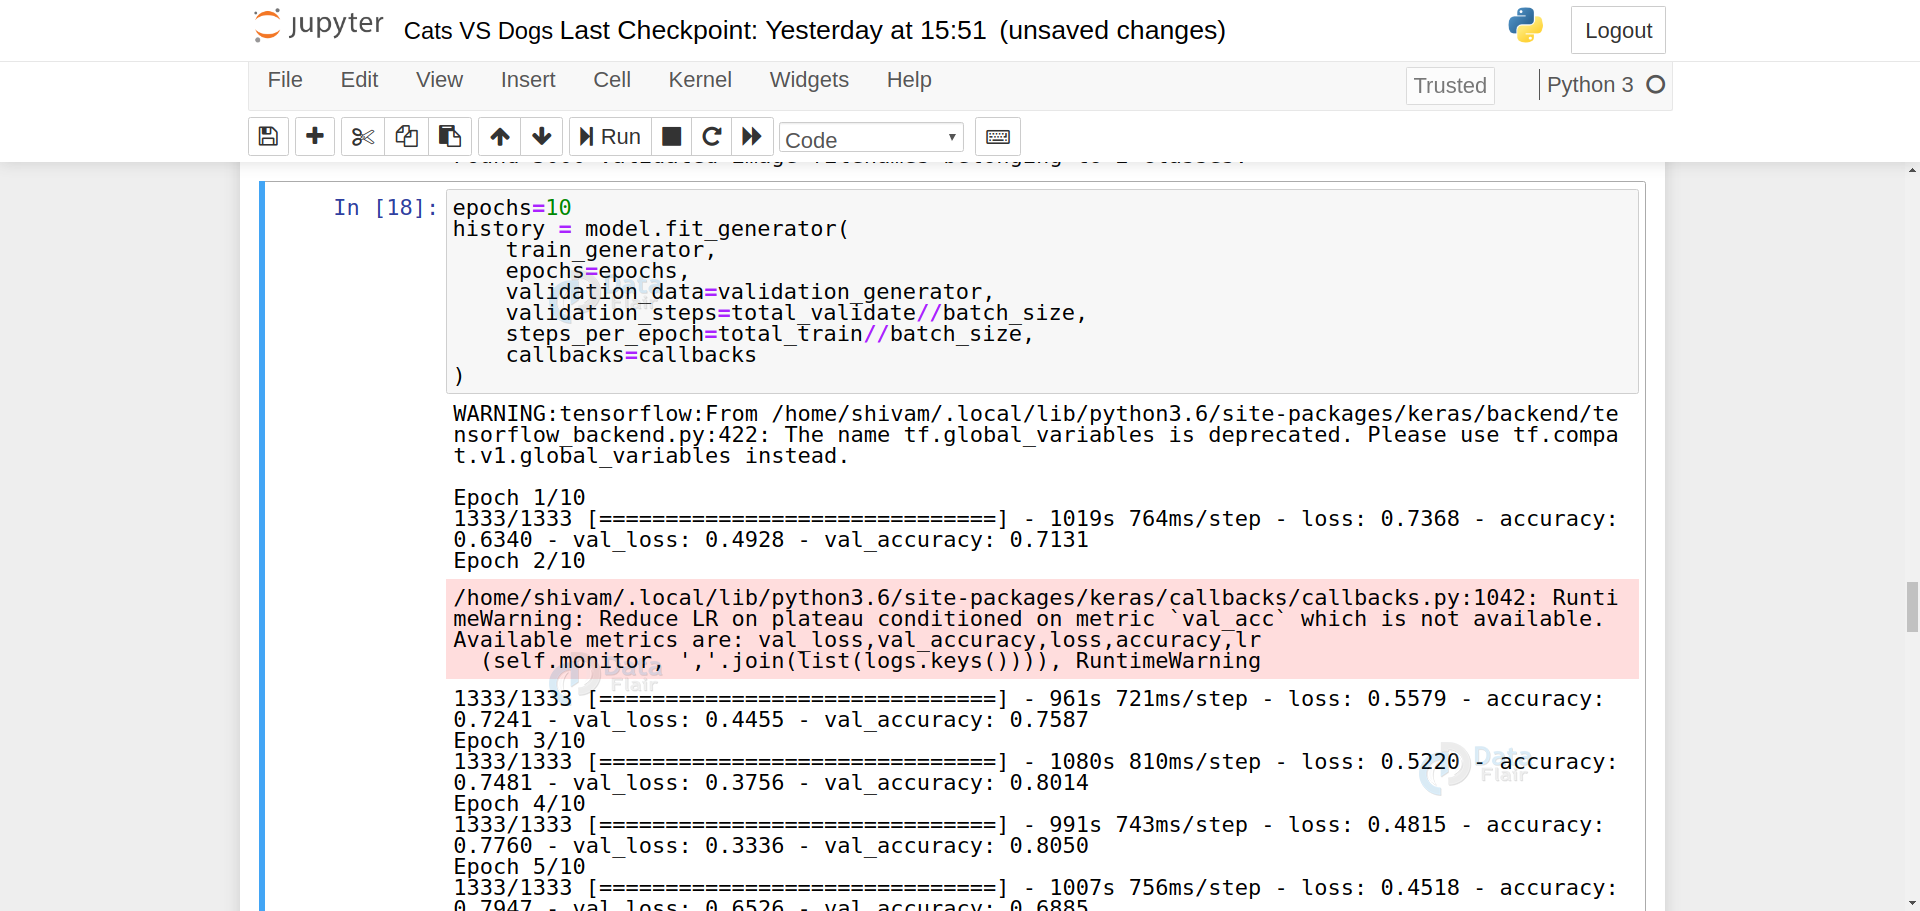
9. Model Training:
epochs=10
history = model.fit_generator(
    train_generator,
    epochs=epochs,
    validation_data=validation_generator,
    validation_steps=total_validate//batch_size,
    steps_per_epoch=total_train//batch_size,
    callbacks=callbacks
)
10. Save the model:
model.save("model1_catsVSdogs_10epoch.h5")
11. Test data preparation:
test_filenames = os.listdir("./dogs-vs-cats/test1")
test_df = pd.DataFrame({
    'filename': test_filenames
})
nb_samples = test_df.shape[0]
12. Make categorical prediction:
predict = model.predict_generator(test_generator, steps=np.ceil(nb_samples/batch_size))
13. Convert labels to categories:
test_df['category'] = np.argmax(predict, axis=-1)

label_map = dict((v,k) for k,v in train_generator.class_indices.items())
test_df['category'] = test_df['category'].replace(label_map)

test_df['category'] = test_df['category'].replace({ 'dog': 1, 'cat': 0 })
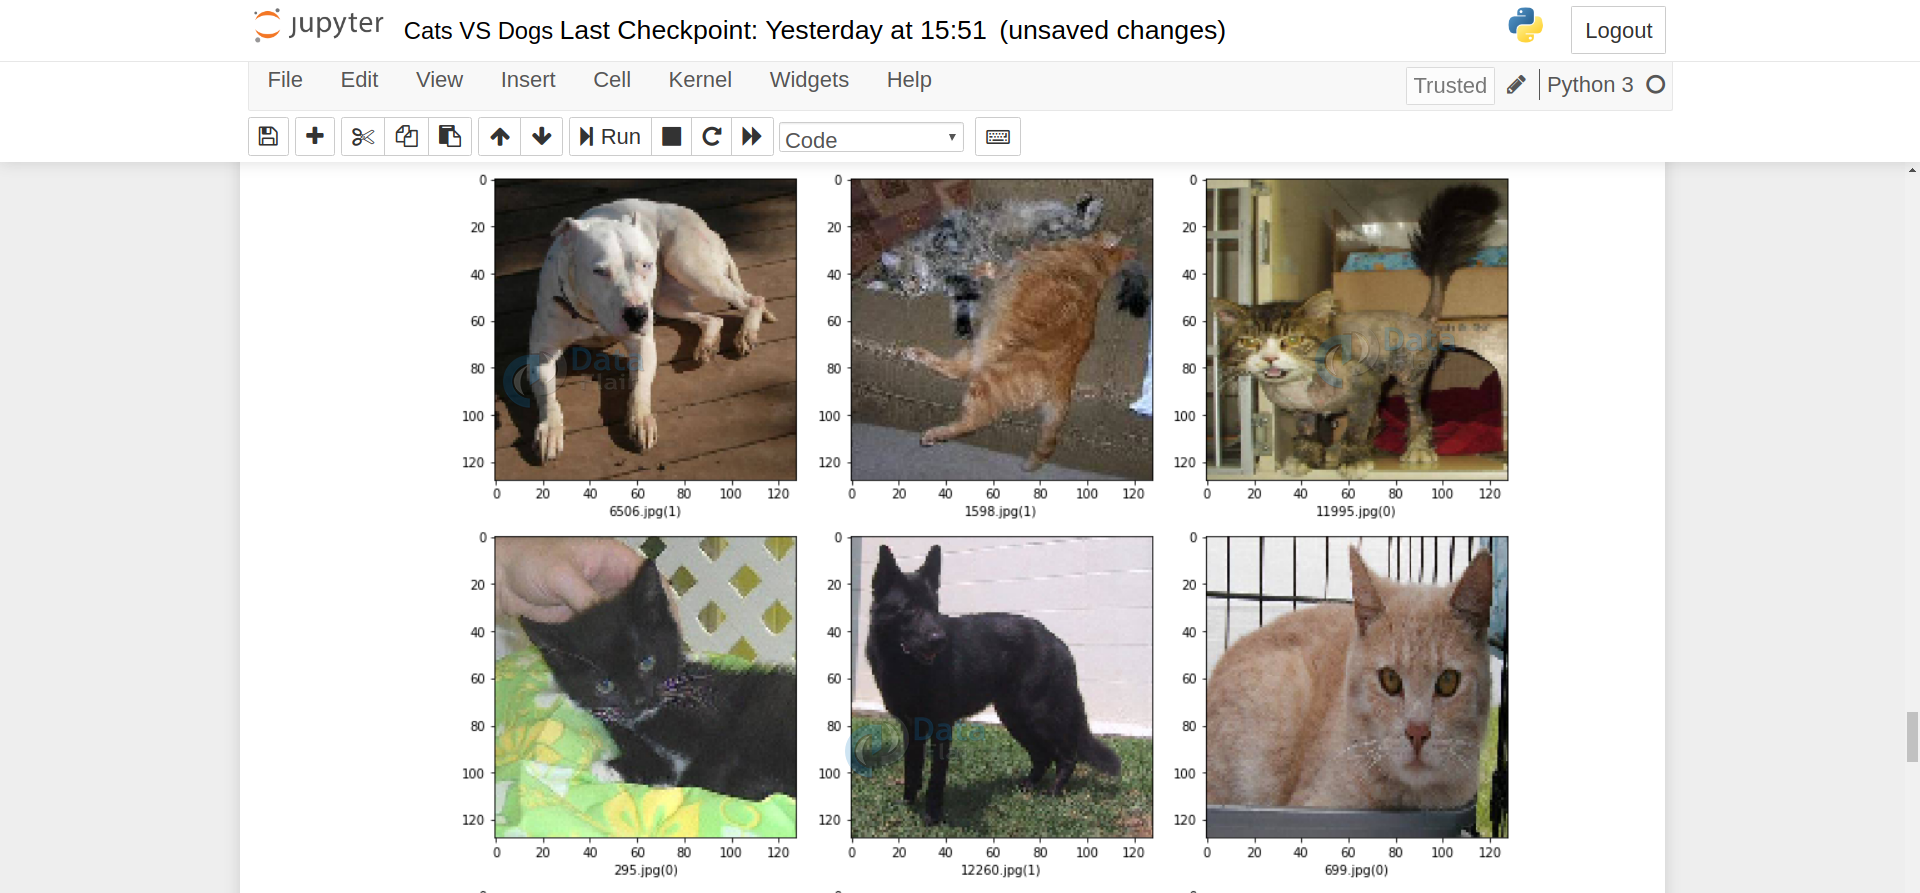
14. Visualize the prediction results:
sample_test = test_df.head(18)
sample_test.head()
plt.figure(figsize=(12, 24))
for index, row in sample_test.iterrows():
    filename = row['filename']
    category = row['category']
    img = load_img("./dogs-vs-cats/test1/"+filename, target_size=Image_Size)
    plt.subplot(6, 3, index+1)
    plt.imshow(img)
    plt.xlabel(filename + '(' + "{}".format(category) + ')' )
plt.tight_layout()
plt.show()
15. Test your model performance on custom data:
results={
    0:'cat',
    1:'dog'
}
from PIL import Image
import numpy as np
im=Image.open("__image_path_TO_custom_image")
im=im.resize(Image_Size)
im=np.expand_dims(im,axis=0)
im=np.array(im)
im=im/255
pred=model.predict_classes([im])[0]
print(pred,results[pred])
Cats VS Dogs Classifier GUI:
We do not want to run predict_classes method every time we want to test our model. That’s why we need a graphical interface. Here we will build the GUI using Tkinter python.
To install Tkinter :
sudo apt-get install python3-tk
Now create a new directory, copy your model (“model1_catsVSdogs_10epoch.h5”) to this directory.
Create a file gui.py and paste the below code:
import tkinter as tk
from tkinter import filedialog
from tkinter import *
from PIL import ImageTk, Image
import numpy

from keras.models import load_model
model = load_model('model1_catsVSdogs_10epoch.h5')
#dictionary to label all traffic signs class.
classes = {
    0:'its a cat',
    1:'its a dog',

}
#initialise GUI
top=tk.Tk()
top.geometry('800x600')
top.title('CatsVSDogs Classification')
top.configure(background='#CDCDCD')
label=Label(top,background='#CDCDCD', font=('arial',15,'bold'))
sign_image = Label(top)
def classify(file_path):
    global label_packed
    image = Image.open(file_path)
    image = image.resize((128,128))
    image = numpy.expand_dims(image, axis=0)
    image = numpy.array(image)
    image = image/255
    pred = model.predict_classes([image])[0]
    sign = classes[pred]
    print(sign)
    label.configure(foreground='#011638', text=sign)
def show_classify_button(file_path):
    classify_b=Button(top,text="Classify Image",
   command=lambda: classify(file_path),
   padx=10,pady=5)
    classify_b.configure(background='#364156', foreground='white',
font=('arial',10,'bold'))
    classify_b.place(relx=0.79,rely=0.46)

def upload_image():
    try:
        file_path=filedialog.askopenfilename()
        uploaded=Image.open(file_path)
        uploaded.thumbnail(((top.winfo_width()/2.25),
    (top.winfo_height()/2.25)))
        im=ImageTk.PhotoImage(uploaded)
        sign_image.configure(image=im)
        sign_image.image=im
        label.configure(text='')
        show_classify_button(file_path)
    except:
        pass
upload=Button(top,text="Upload an image",command=upload_image,padx=10,pady=5)
upload.configure(background='#364156', foreground='white',font=('arial',10,'bold'))
upload.pack(side=BOTTOM,pady=50)
sign_image.pack(side=BOTTOM,expand=True)
label.pack(side=BOTTOM,expand=True)
heading = Label(top, text="CatsVSDogs Classification",pady=20, font=('arial',20,'bold'))
heading.configure(background='#CDCDCD',foreground='#364156')
heading.pack()
top.mainloop()
Save this file and run using:
python3 gui.py
Summary:
This Deep Learning project for beginners introduces you to how to build an image classifier. This project takes The Asirra (catsVSdogs) dataset for training and testing the neural network. In this project, we have learned:
- How to create a neural network in Keras for image classification
- How to prepare the dataset for training and testing
- How to visualize the dataset
- How to save the model
- How to test our model performance on custom data
- How to create a GUI for the execution of deep learning project
What Next?
Now, It’s a good time to deep dive into deep learning: Deep Learning Project – Develop Image Caption Generator with CNN & LSTM.