


Machine Learning courses with 110+ Real-time projects Start Now!!
Step into the realm where images reveal their hidden secrets. Welcome to the world of ‘OpenCV Canny Edge Detection.’
In this journey, we’ll delve into the wizardry of algorithms that transform seemingly ordinary pictures into landscapes of edges and contours. Just as a skilled artist highlights every brushstroke, Canny Edge Detection illuminates the intricate details of objects, opening a gateway to a new dimension of image interpretation.
Prepare to be captivated as we unravel the magic behind this technique and harness the power of OpenCV to see the unseen.
Let’s first define edge detection, shall we?
A fundamental method of image processing called edge detection looks for boundaries inside a picture. In essence, it’s the process of highlighting abrupt changes in intensity or color between neighboring pixels. These changes often correspond to significant transitions in the underlying objects or structures present in the image.
Edge detection algorithms work by analyzing the gradient of intensity or color in an image. They identify regions where the gradient is the steepest, indicating potential edges. The output of an edge detection process is typically a binary image where edge pixels are marked, providing a clear visual representation of object boundaries.
One of the most popular and effective edge detection techniques is the Canny edge detection algorithm. It’s celebrated for its ability to accurately locate edges while minimizing false positives and negatives. Through careful processing involving blurring, gradient calculation, non-maximum suppression, and thresholding, the Canny algorithm transforms raw pixel data into a map of pronounced edges.
Let’s Know Hysteresis Thresholding
At this stage, it is determined which edges are actually edges and which ones are not. We require the threshold values minVal and maxVal for this. Any edges with gradients of intensity more than maxVal are certain to be edges, and any below minVal are certain to be non-edges, so they should be disregarded. Based on their connectedness, those who fall between these two thresholds are categorized as edges or non-edges. They are regarded as being a part of edges if they are linked to “sure-edge” pixels. If not, they are likewise thrown away.
Look at the picture below:
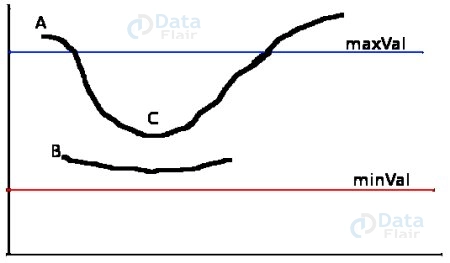
The edge A is a “sure-edge” because it is above the maximum value. The whole curve is obtained even though edge C is below maxVal since it connects to edge A, which is likewise regarded as a legitimate edge. Although edge B is in the same region as edge C and is above minVal, it is not related to any other “sure-edges” and is therefore disregarded. Therefore, it is crucial that we choose minVal and maxVal appropriately in order to obtain the desired outcome.
On the grounds that edges are long lines, this stage also eliminates noise from little pixels.
Suppression :
After determining the gradient’s size and direction, the entire image is scanned to weed out any extraneous pixels that might not be the edge. For this, it is determined whether each pixel is a local maximum in its neighborhood in the gradient’s direction. See the illustration below:
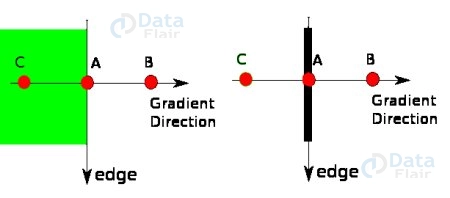
In a vertical sense, Point A is at the edge. The edge’s gradient direction is typical. Points B and C are on a gradient. So, points A, B, and C are examined to determine whether they constitute a local maximum. If so, it is taken into account for the following step; if not, it is suppressed (set to zero).
A binary image with “thin edges” is the end outcome, to put it briefly.
Canny Edge Detection in OpenCV: Revealing Hidden Structures
Unveil the magic of edge detection with the precision of OpenCV’s Canny algorithm. This section brings you into the heart of image interpretation, where edges are more than meets the eye. Dive into the workings of Canny edge detection, explore its key steps, and master its implementation through cv2.Canny().
Working of Canny Edge Detection:
1. Smoothing:
- The process begins by applying a Gaussian blur to the input image. This blurring operation reduces noise and removes small variations in pixel intensity that could be erroneously detected as edges.
- The Gaussian blur is achieved by convolving the image with a Gaussian kernel, which assigns more weight to the central pixels and gradually decreases the weight towards the edges of the kernel.
2. Gradient Calculation:
- The gradient magnitude and direction at each pixel of the blurred image are calculated using the Sobel operator.
- The gradient magnitude reveals the rate of intensity change at a given pixel, indicating potential edge locations. Higher gradients correspond to rapid intensity changes, which are characteristic of edges.
- The gradient direction provides insight into the orientation of the edges. It’s calculated separately for the x and y directions and is often converted to an angle in degrees.
3. Non-Maximum Suppression:
- This step enhances edge thinning by suppressing non-maximum pixels in the gradient direction.
- In order to compare the gradient magnitude of the current pixel with its neighbors, the algorithm scans along the gradient direction. The only pixel that is kept is the one with the greatest gradient magnitude in its immediate neighborhood.
- The result is a thinned set of edge pixels that form continuous lines along the most pronounced intensity changes.
4. Hysteresis Thresholding:
- Edge pixels are classified into three categories: strong edges, weak edges, and non-edges.
- This stage aims to link weak edges to strong edges, forming coherent edge contours.
- Pixels with gradient magnitudes above the higher threshold are considered strong edges. Pixels below the lower threshold are disregarded as non-edges.
- Pixels with gradient magnitudes between the two thresholds are marked as weak edges. If a weak edge pixel is adjacent to a strong edge pixel, it’s promoted to a strong edge pixel, contributing to continuous edge contours.
Mastering the intricacies of Canny edge detection empowers you to decipher the intricate structures within images. By grasping each step, you can leverage the algorithm’s power to highlight significant transitions, opening the door to advanced image analysis and computer vision tasks.
cv2.Canny():
Syntax:
edges = cv2.Canny(image, threshold1, threshold2, apertureSize, L2gradient)
Parameters:
- Image: The source image.
- Threshold1, threshold2: Lower and upper thresholds for edge linking.
- apertureSize: Size of the Sobel kernel (optional).
- L2gradient: Flag for using L2 gradient norm (optional).
Code with Explanation:
import cv2
# Load the source image
src_image = cv2.imread(r"C:\Users\satchit\OneDrive\Desktop\OpenCV Data Flair\opencv cannyedge detection\wildlife-tiger.jpg", cv2.IMREAD_GRAYSCALE)
# Apply Gaussian blur to the source image
blurred_image = cv2.GaussianBlur(src_image, (5, 5), 0)
# Apply Canny edge detection using cv2.Canny()
edges = cv2.Canny(blurred_image, threshold1=100, threshold2=200)
# Display the original image
cv2.imshow('Original Image', src_image)
cv2.waitKey(0)
# Display the blurred image
cv2.imshow('Blurred Image', blurred_image)
cv2.waitKey(0)
# Display the edge-detected image
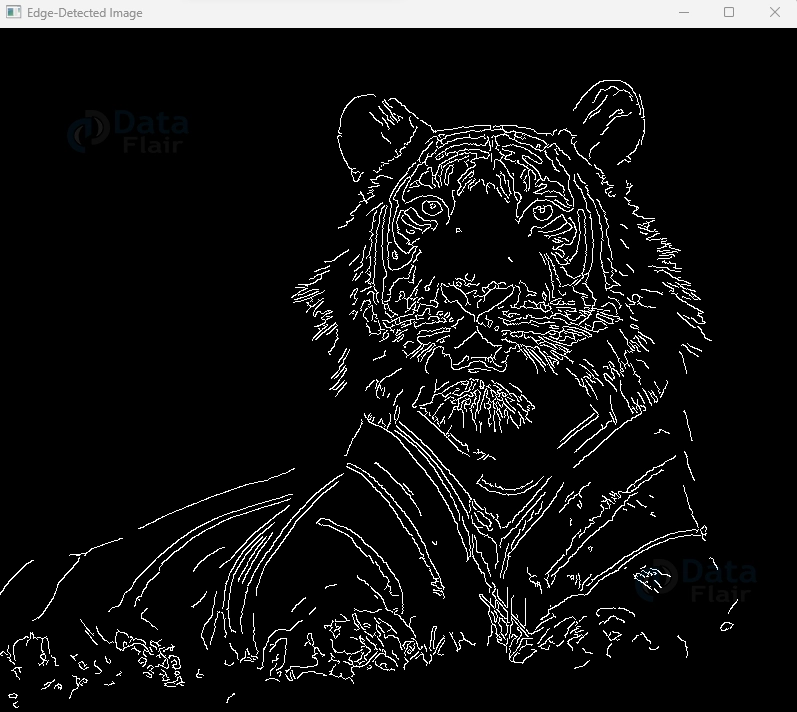
cv2.imshow('Edge-Detected Image', edges)
cv2.waitKey(0)
cv2.destroyAllWindows()
Original Image:

Blurred Image:

Canny Image:
Explanation:
1. Load the grayscale source image using cv2.imread() with cv2.IMREAD_GRAYSCALE.
2. Apply Canny edge detection using cv2.Canny(). Adjust `threshold1` and `threshold2` to control edge detection sensitivity.
3. Display both the original grayscale image and the edge-detected image using cv2.imshow().
Mastering Canny edge detection opens a window to image features hidden in plain sight. By understanding its intricacies and implementing it through OpenCV, you’re equipped to unravel the structural secrets embedded within images, making your visual interpretation more insightful than ever before.
Canny Image with ApertureSize and L2gradient: Enhancing Edge Detection Precision
In the realm of image analysis, precision is paramount. Dive into the nuanced world of Canny edge detection in OpenCV, where we explore how adjusting the ApertureSize and utilizing the L2gradient parameter can refine edge detection results. In this section, we’ll unravel the syntax, parameters, and code implementation of Canny edge detection, allowing you to master the art of accentuating image boundaries with finesse.
cv2.Canny() with ApertureSize and L2gradient:
Syntax:
edges = cv2.Canny(image, threshold1, threshold2, apertureSize, L2gradient)
Parameters:
- Image: The source image.
- threshold1, threshold2: Lower and upper thresholds for edge linking.
- apertureSize: Size of the Sobel kernel. The default is 3.
- L2gradient: Flag for using L2 gradient norm. The default is False.
Code with Explanation:
import cv2
# Load the source image
src_image = cv2.imread(r"C:\Users\satchit\OneDrive\Desktop\OpenCV Data Flair\opencv cannyedge detection\wildlife-tiger.jpg", cv2.IMREAD_GRAYSCALE)
# Apply Canny edge detection with ApertureSize and L2gradient using cv2.Canny()
edges = cv2.Canny(src_image, threshold1=100, threshold2=200, apertureSize=5, L2gradient=True)
# Display the original and edge-detected images
cv2.imshow('Original Image', src_image)
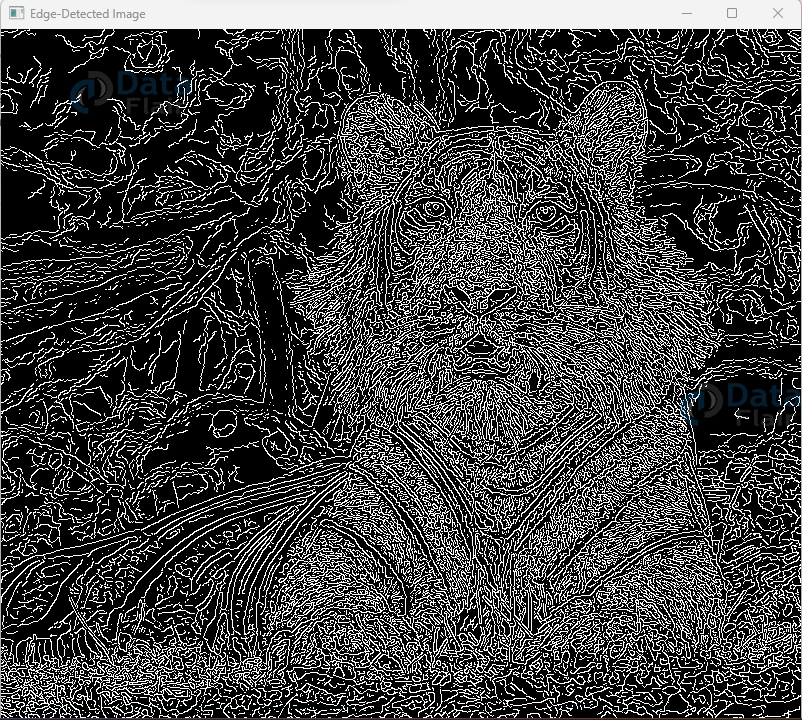
cv2.imshow('Edge-Detected Image', edges)
cv2.waitKey(0)
cv2.destroyAllWindows()
Original Image:

Image with ApertureSize and L2gradient:
Explanation:
1. Load the grayscale source image using cv2.imread() with cv2.IMREAD_GRAYSCALE.
2. Apply Canny edge detection using cv2.Canny(). Fine-tune edge detection by adjusting threshold1 and threshold2.
3. Incorporate the apertureSize parameter to define the Sobel kernel size. A larger apertureSize may capture longer edges effectively.
4. Utilize the L2gradient parameter to compute the gradient magnitude using the L2 norm, enhancing edge detection accuracy.
5. Display both the original grayscale image and the edge-detected image using cv2.imshow().
Through harnessing ApertureSize and L2gradient, you hold the reins to mold Canny edge detection to your needs. These parameters allow you to achieve greater precision, ensuring your edge detection results align harmoniously with the intricacies of your images.
Summary
In the realm of image analysis, we’ve embarked on a voyage through Canny edge detection, uncovering the subtleties that define object boundaries. With a glimpse into the world of ApertureSize and the potency of L2gradient, you’ve unlocked the keys to precision.
A minor adjustment to ApertureSize yielded remarkable results, allowing you to sculpt edges with finesse. Meanwhile, embracing L2gradient magnified the accuracy of edge detection, delivering pixel-perfect outcomes.
As we observed these facets in action through code, the transformative impact on edge detection became evident. Armed with this newfound mastery, you’re poised to unravel the complex narratives embedded in images. Each parameter tweak, each code snippet, draws you closer to a realm where pixels are narratives waiting to be read.