How to Use Bollinger Bands in Tableau
FREE Online Courses: Transform Your Career – Enroll for Free!
1. Objective
In our last tutorial, we discuss Tableau Reference Band and in this Bollinger Bands tutorial, we are going to study about What is Bollinger bands in Tableau. Moreover, we will discuss how to use Tableau Bollinger Bands. At last, we learn various parameter controls, with an example of Bollinger Bands in Tableau.
So, let us start with Tableau Bollinger Bands.
What is Bollinger Bands – How to Use Them
2. Tableau Bollinger Bands
Bollinger Bands in Tableau is a money related exchanging apparatus that is utilized to characterize the overarching high and low costs in a market to portray the exchanging band of a monetary instrument or product. Tableau Bollinger Bands are an instability marker like the Keltner channel.
Let’s revise Tableau Box Plot and Whisker Plot
Bollinger Bands in Tableau comprise of an N-period moving normal (MA), an upper band at K times an N-period standard deviation over the moving normal (MA + Kσ), and a lower band at K times an N-period standard deviation beneath the moving normal (MA − Kσ)
The apparatus was imagined by John Bollinger in the 1980s and trademarked by him in 2011.
3. How to Use Bollinger Bands in Tableau?
We’ll take a gander at time arrangement information utilizing Tableau Bollinger Bands. A specialized stock examiner named John Bollinger built up the procedure and trademarked the name. Bollinger groups just plot the moving normal of a stock’s end cost. Regularly the moving normal depends on 20 days of verifiable information and two standard deviations from the end cost of stock or file of intrigue.
Read about Tableau Funnel Plot in detail
There isn’t generally anything exceptional about this strategy. In the event that you see how to process moving normal and standard deviation, you can make a Bollinger Band in Tableau. Here’s a completed time arrangement diagram that examines the S&P500 Index:
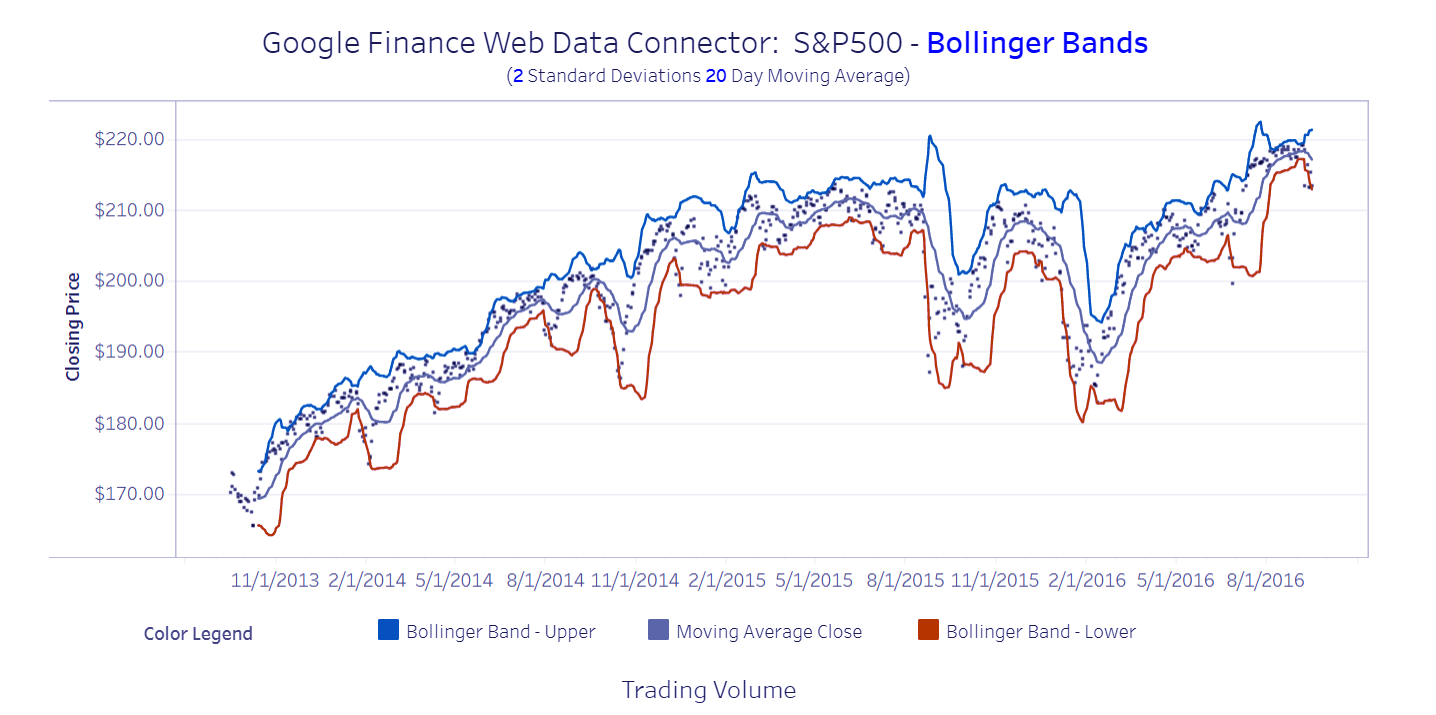
Tableau Bollinger Bands- Time Arrangement Diagram
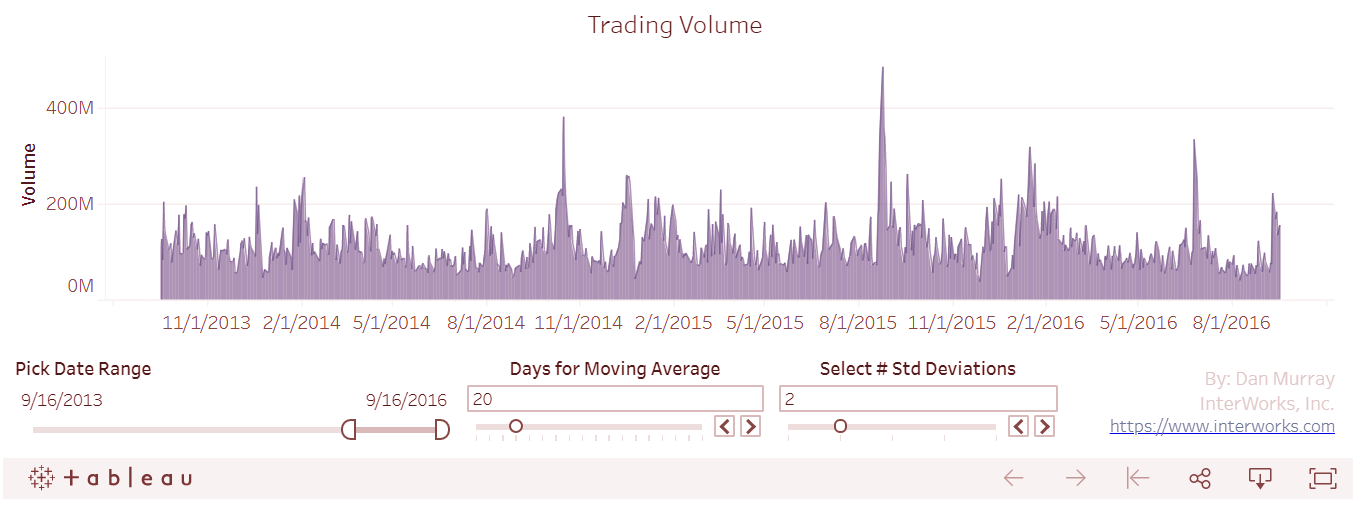
Tableau Bollinger Bands- Trading Volume
This dashboard uses a web information connector (WDC) to pull information from Google. You can discover an assortment of web information connectors on our WDC POC site. I utilized the stock value history web information connector to pull the day by day shutting costs backpedaling to 2001. You can utilize this connector to break down a wide assortment of stocks essentially by altering the association, entering an alternate stock or record and refreshing the information source. The dashboard data will change to mirror the new information source chose.
Let’s look at Tableau Charts – Tableau Area Chart
The outline at the base of the dashboard demonstrates the everyday exchanging volume. It’s a basic time arrangement utilizing an Area stamp compose. The time arrangement at the best plots four unique measurements on the chose stock:
- Day by day shutting cost
- Moving normal shutting value (utilizing a table estimation)
- Upper Bollinger Bands
- Lower Bollinger Bands
4. The Parameter Controls
The available parameters controls of Tableau Bollinger bands–
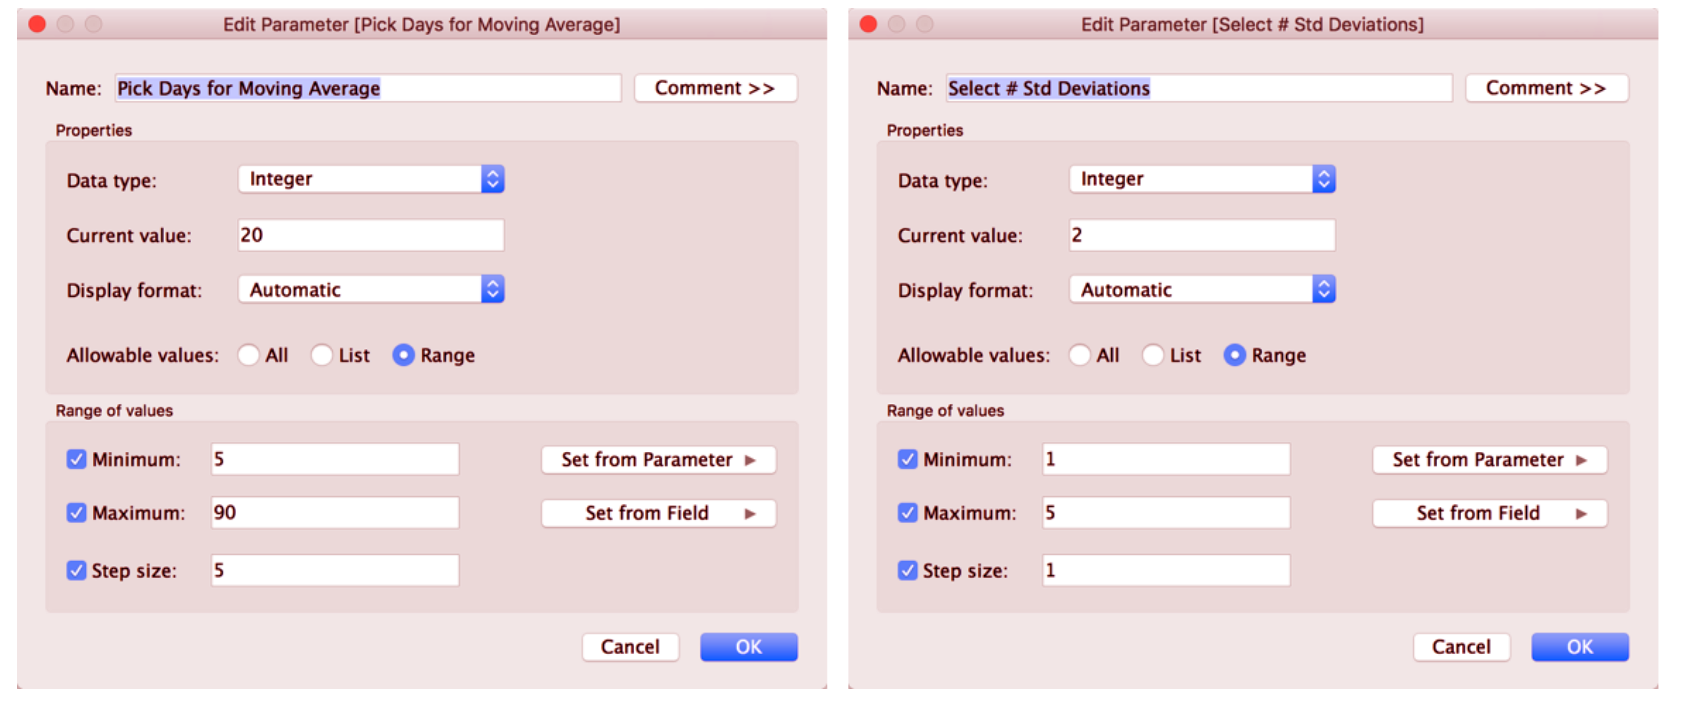
Parameters Controls – Bollinger bands in Tableau
a. Make the Moving Average
To make the moving normal line, right-tap on the AVG(Close) field pill on the Row retire and select Create table figuring. Simply select the moving normal choice and pick 20 days.
Let’s Create Waterfall Chart in Tableau
Once you’ve done that, the line will now plot a 20-day moving normal of the end cost. Drag the nearby field from the Datasheet into the Row retire again to plot the normal every day close sum, at that point influence a double pivot to a diagram with the left hub plotting the AVG(Close) esteem and the correct hub plotting the moving normally. Change the check sort of the AVG(Close) plot to a Shape (filled circle).
You should now have circles being plotted from the left pivot that demonstrates the normal every day shutting cost. From the correct pivot, you will have a line that is plotting the 20-day moving normally. I propose you control-drag the table count pill for the moving normal to the Measures retire and name the field Moving Average Close.
Next, alter the Moving Average Close figured esteem—supplanting the 20 with the parameter Pick Days for Moving Average.
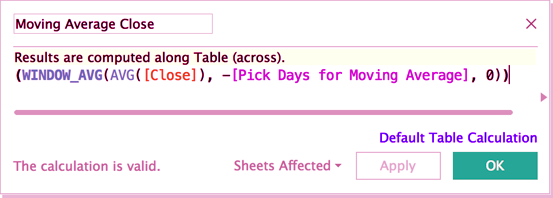
Tableau Bollinger Bands – Moving Average Close
Read about Tableau Bubble Chart – Building Bubble Chart
b. Creating the Bollinger Bands
The equation uses the moving normal figured before alongside the parameter controls that empower you to change the number of standard deviations plotted from the normal shutting cost and the number of days to use for the moving normal estimation. When you have the lower Bollinger Band made, copy the field and alter it to make the upper Bollinger Band by adding the standard deviation to the moving normal as opposed to deducting it, at that point add both of the fields to the correct hub with the Moving Average Close field. Alter the shade of the lines and the hover imprints to your taste.
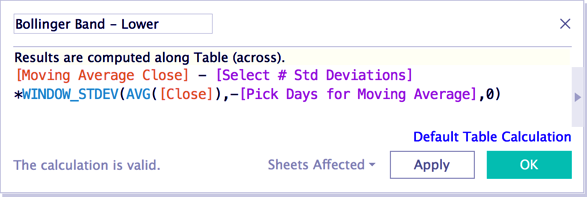
Creating the Bollinger Bands in Tableau
The Dashboard
In the wake of completing the Stock Trend time-arrangement worksheet, I altered the title of the snappy channel and the parameter controls to be more engaging at that point set the Pick Date Range channel to apply it to all worksheets utilizing this information source.
5. Conclusion
Hence, We studied the Bollinger bands in Tableau, how to use them and parameter controls. Furthermore, if you have any query feel free to ask in a comment section.
Related Topic- Tableau Donut Chart
For reference
Did you know we work 24x7 to provide you best tutorials
Please encourage us - write a review on Google


You didnt show how to place pills in the Tableau sheets