Interesting Python Project of Gender and Age Detection with OpenCV
Free Machine Learning courses with 130+ real-time projects Start Now!!
Today, we are introducing our fourth python project that is gender and age detection with OpenCV. It is very interesting and one of my favorite project. DataFlair has published more interesting python projects on the following topics with source code:
- Fake News Detection Python Project
- Parkinson’s Disease Detection Python Project
- Color Detection Python Project
- Speech Emotion Recognition Python Project
- Breast Cancer Classification Python Project
- Age and Gender Detection Python Project
- Handwritten Digit Recognition Python Project
- Chatbot Python Project
- Driver Drowsiness Detection Python Project
- Traffic Signs Recognition Python Project
- Image Caption Generator Python Project
If these projects are helping you then please share your feedback with us. It will motivate us, to provide more such useful content you.
Without talking much, let’s start the gender and age detection Python Project.
Gender and Age Detection Python Project
First introducing you with the terminologies used in this advanced python project of gender and age detection –
What is Computer Vision?
Computer Vision is the field of study that enables computers to see and identify digital images and videos as a human would. The challenges it faces largely follow from the limited understanding of biological vision. Computer Vision involves acquiring, processing, analyzing, and understanding digital images to extract high-dimensional data from the real world in order to generate symbolic or numerical information which can then be used to make decisions. The process often includes practices like object recognition, video tracking, motion estimation, and image restoration.
What is OpenCV?
OpenCV is short for Open Source Computer Vision. Intuitively by the name, it is an open-source Computer Vision and Machine Learning library. This library is capable of processing real-time image and video while also boasting analytical capabilities. It supports the Deep Learning frameworks TensorFlow, Caffe, and PyTorch.
What is a CNN?
A Convolutional Neural Network is a deep neural network (DNN) widely used for the purposes of image recognition and processing and NLP. Also known as a ConvNet, a CNN has input and output layers, and multiple hidden layers, many of which are convolutional. In a way, CNNs are regularized multilayer perceptrons.
Gender and Age Detection Python Project- Objective
To build a gender and age detector that can approximately guess the gender and age of the person (face) in a picture using Deep Learning on the Adience dataset.
Gender and Age Detection – About the Project
In this Python Project, we will use Deep Learning to accurately identify the gender and age of a person from a single image of a face. We will use the models trained by Tal Hassner and Gil Levi. The predicted gender may be one of ‘Male’ and ‘Female’, and the predicted age may be one of the following ranges- (0 – 2), (4 – 6), (8 – 12), (15 – 20), (25 – 32), (38 – 43), (48 – 53), (60 – 100) (8 nodes in the final softmax layer). It is very difficult to accurately guess an exact age from a single image because of factors like makeup, lighting, obstructions, and facial expressions. And so, we make this a classification problem instead of making it one of regression.
The CNN Architecture
The convolutional neural network for this python project has 3 convolutional layers:
- Convolutional layer; 96 nodes, kernel size 7
- Convolutional layer; 256 nodes, kernel size 5
- Convolutional layer; 384 nodes, kernel size 3
It has 2 fully connected layers, each with 512 nodes, and a final output layer of softmax type.
To go about the python project, we’ll:
- Detect faces
- Classify into Male/Female
- Classify into one of the 8 age ranges
- Put the results on the image and display it
The Dataset
For this python project, we’ll use the Adience dataset; the dataset is available in the public domain and you can find it here. This dataset serves as a benchmark for face photos and is inclusive of various real-world imaging conditions like noise, lighting, pose, and appearance. The images have been collected from Flickr albums and distributed under the Creative Commons (CC) license. It has a total of 26,580 photos of 2,284 subjects in eight age ranges (as mentioned above) and is about 1GB in size. The models we will use have been trained on this dataset.
Prerequisites
You’ll need to install OpenCV (cv2) to be able to run this project. You can do this with pip-
pip install opencv-python
Other packages you’ll be needing are math and argparse, but those come as part of the standard Python library.
Steps for practicing gender and age detection python project
1. Download this zip. Unzip it and put its contents in a directory you’ll call gad.
The contents of this zip are:
- opencv_face_detector.pbtxt
- opencv_face_detector_uint8.pb
- age_deploy.prototxt
- age_net.caffemodel
- gender_deploy.prototxt
- gender_net.caffemodel
- a few pictures to try the project on
For face detection, we have a .pb file- this is a protobuf file (protocol buffer); it holds the graph definition and the trained weights of the model. We can use this to run the trained model. And while a .pb file holds the protobuf in binary format, one with the .pbtxt extension holds it in text format. These are TensorFlow files. For age and gender, the .prototxt files describe the network configuration and the .caffemodel file defines the internal states of the parameters of the layers.
2. We use the argparse library to create an argument parser so we can get the image argument from the command prompt. We make it parse the argument holding the path to the image to classify gender and age for.
3. For face, age, and gender, initialize protocol buffer and model.
4. Initialize the mean values for the model and the lists of age ranges and genders to classify from.
5. Now, use the readNet() method to load the networks. The first parameter holds trained weights and the second carries network configuration.
6. Let’s capture video stream in case you’d like to classify on a webcam’s stream. Set padding to 20.
7. Now until any key is pressed, we read the stream and store the content into the names hasFrame and frame. If it isn’t a video, it must wait, and so we call up waitKey() from cv2, then break.
8. Let’s make a call to the highlightFace() function with the faceNet and frame parameters, and what this returns, we will store in the names resultImg and faceBoxes. And if we got 0 faceBoxes, it means there was no face to detect.
Here, net is faceNet- this model is the DNN Face Detector and holds only about 2.7MB on disk.
- Create a shallow copy of frame and get its height and width.
- Create a blob from the shallow copy.
- Set the input and make a forward pass to the network.
- faceBoxes is an empty list now. for each value in 0 to 127, define the confidence (between 0 and 1). Wherever we find the confidence greater than the confidence threshold, which is 0.7, we get the x1, y1, x2, and y2 coordinates and append a list of those to faceBoxes.
- Then, we put up rectangles on the image for each such list of coordinates and return two things: the shallow copy and the list of faceBoxes.
9. But if there are indeed faceBoxes, for each of those, we define the face, create a 4-dimensional blob from the image. In doing this, we scale it, resize it, and pass in the mean values.
10. We feed the input and give the network a forward pass to get the confidence of the two class. Whichever is higher, that is the gender of the person in the picture.
11. Then, we do the same thing for age.
12. We’ll add the gender and age texts to the resulting image and display it with imshow().
DO YOU KNOW – Data Scientists require a good knowledge of Python
What are you waiting for? Start learning Python Now!!
Python Project Examples for Gender and Age Detection
Let’s try this gender and age classifier out on some of our own images now.
We’ll get to the command prompt, run our script with the image option and specify an image to classify:
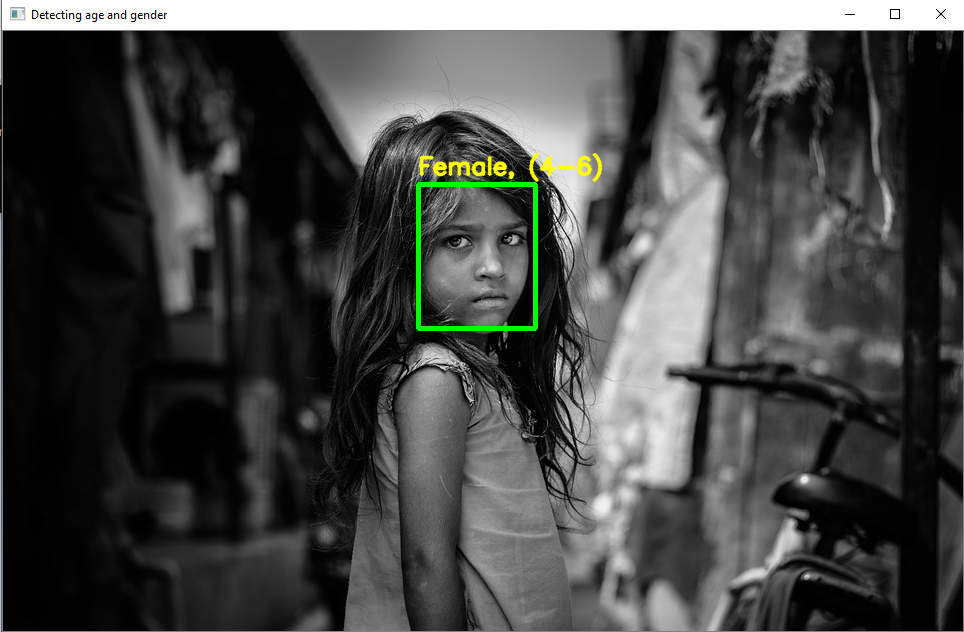
Python Project Example 1
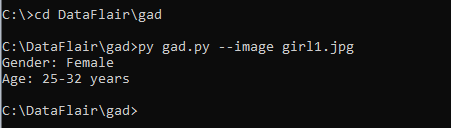
Output:
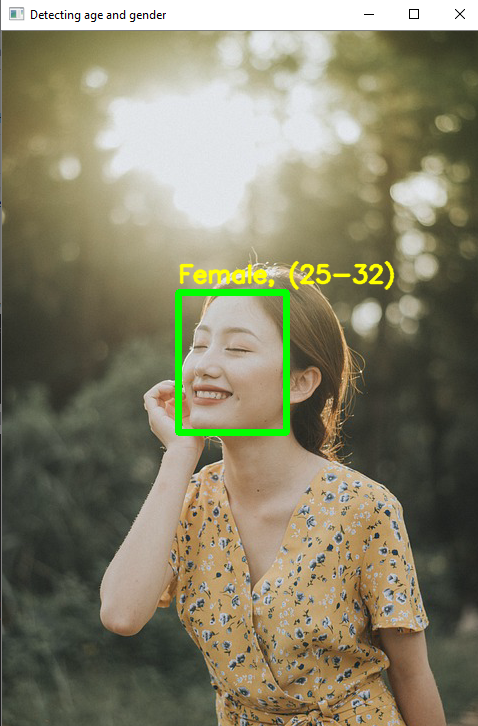
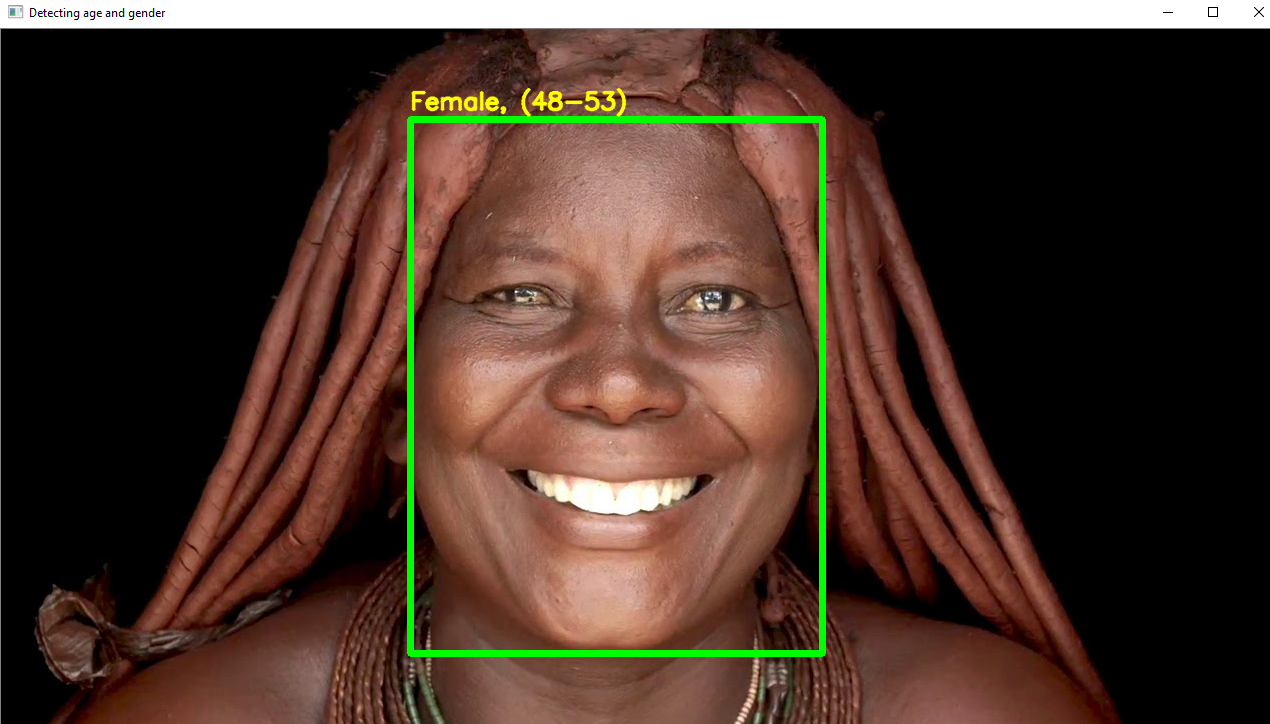
Python Project Example 2

Output:

Python Project Example 3

Output:
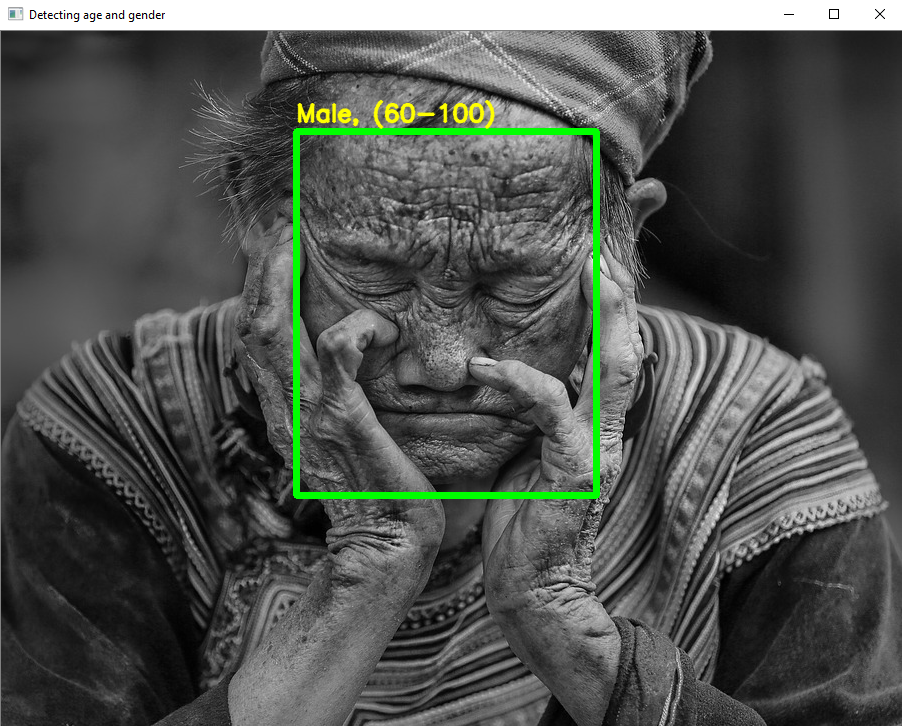
Python Project Example 4

Output:
Python Project Example 5

Output:
Python project Example 6

Output:
Summary
In this python project, we implemented a CNN to detect gender and age from a single picture of a face. Did you finish the project with us? Try this on your own pictures. Check more cool projects in python with source code published by DataFlair.
If you enjoyed the above python project, do comment and let us know your thoughts.
Happy learning😊
Did we exceed your expectations?
If Yes, share your valuable feedback on Google


please can you share with me the source code?
have you done this project?
if you have a source code of this project then please share with me
How can i check and add image as it is given in the example. I’m unable to do as shown in the example.
C:\Users\Downloads\gad>python gad.py –image woman1.jpg
Gender: Female
Age: 38-43 years
Make sure open cv is installed use this comment pip install opencv-python
how to add images to check like in which part of the code shoulld we pass the image??
it is in zip file
hello sir .have you done this project?
i am facing some problems if you can please help
In the example, the gad.py is the Python file that contains the code. And we are giving the input, that is, the image by separting with ‘–‘. In this, we need to make sure both the code file and the images are at the same location, that is pointed in the prompt. Hoping that your query is answered.
How to get additional gender like in place of kid I should get the male kid and female kid and how to save the segmentation results in csv ?
hi use
python gad.py –image woman1.jpg
and prior to that make sure to install opencv in working directory of project using anaconda command prompt
pip install opencv-python
how to add images to check like in which part of the code shoulld we pass the image??
I enjoyed this project. It’s really cool, increasing my confidence level.
hello have you done this ? i am facing some problem ,can you please guide.
how to use use video stream feature
You can capture the images from the video stream. For this, you can use the OpenCV module. You can import the module and use the code vid= cv2.VideoCapture(‘video.mp4’) to capture the video. And then you can run a while loop that runs till all the images are captured by using the condition as vid.isOpened(). Inside the loop you can read the frames, which is the second output from the command vid.read(). Hope this helps!
where is the source code?
how to draw use case diagrams for this project
it is very easy
i have a problem with this
why age classes have gap ? for example what is age = 35 class????
It is predicting the posible range of the person in the picture, rather than a single value. I hope your question is answered.
Dfd for this project
please can you share with me the source code?
This project idea is cool
I’m inspired, Thank you
Can you also add the live streaming feature
please can someone share the sourcecode of this??
You can get the frames from the video stream from the camera. For this, you can use the OpenCV module. You can import the module and use the code vid= cv2.VideoCapture(0) to capture the video from the default camera attached to the device. And then you can run a while loop with True as the condition. Inside the loop, write vid.read() to capture frames as the second output.
Hello,
under what license are the source codes?
i am getting “ValueError: cannot convert float NaN to integer” when i run this gad.py
in line 23.
How to fix this. i am using numpy 1.21.0 and python 3.8.6 on windows 7 32 bit
You can convert the NaN by using the function numpy.nan_to_num() which gives a zero, positive_infinity with a very large number and negative_infinity with a very small (or negative) number in place of NaN. You can also drop NaN values using the command df.dropna(). Or replace them by writing df.fillna(n) where n is the number you want to replace with. Hope this solves your problem.
I had fun running this project for school! I am nonbinary AFAB and I showed up as male 82-99% of the time on live video. Thanks, you guys!
Hi! I am testing this project on other images, I am afraid that this code is not working properly. This says John Cena age as 25-32 .. and also Tom Holland’s age 25-32 and more…
Please can i get the full source code for this project?
Hello Sir,
Which dataset u have used in this project ? Suppose i want to use another dataset then how to add it ?
how to run this GAD file in Mac terminal can someone please help?
Please send me the source code for this project
it is possible to detect multiple people in single image??????
Can please send this project as munch as in detail format
Can I get the source code of this project and also the proposal please, I have to pick to some Knowledge for doing neural networks study, being the sudent of computer Science.
what algoritham is used in this project??
please share this project
hello sir
Is there any video explanation of the sourse code i cannot understand the flow of code pls
or
is there ant explanation of code sir.