Python Forensics | Hash Function, Virtualization & much more
Python course with 57 real-time projects - Learn Python
1. Python Forensics
Investigating and analyzing to gather and preserve evidence from a computing device lies at the heart of cyber forensics. This should be presentable in a court of law. With its wide applications, Python also finds good use in digital forensics. With it, we can extract evidence, gather data, and also encrypt passwords. It will help us preserve the integrity of evidence. In this tutorial on Python Forensics, we will learn Naming Conventions, Hash Functions, Cracking an Encryption, Virtualization, Network Forensics, Dshell and Scapy, Searching, Indexing, Python Imaging Library and Mobile Forensics with Detailed Explanation.

Python Forensics
If you’re new to Python, however, you should begin today with A Python Introduction and then if you face any queries on Python Forensics, please comment. So, let’s begin with the Python Forensics.
2. Introduction to Computational Forensics
A quantitative approach to the methodology of the forensic sciences, Computational Forensics(CF) helps study and solve problems in various forensic disciplines. This is using computer-based modeling, computer simulation, analysis, and recognition.
On the basis of pattern evidence, such as toolmarks, fingerprints, shoeprints, and documents, it makes use of a gamut of objects, processes, and substances. It also involves physiological and behavioral patterns, DNA, digital evidence and crime scenes.
We can make use of algorithms dealing with signal and image processing, computer vision, computer graphics, data mining, data visualization, statistical pattern recognition, machine learning, and robotics.
But how is this different from computer forensics? While computer forensics studies digital evidence, computational forensics deals with various types of evidence.
3. Naming Conventions for a Basic Python Forensics Application
In order to follow Python Forensics guidelines to build a basic application, we must follow certain naming conventions and patterns. Take a look at the following table:
| Naming Convention | Example | |
| Constants | Uppercase; words separated by underscores | SPEED_LIMIT |
| Local variable | camelCase with optional underscores | currentSpeed |
| Global variable | Prefix gl_with camelCase with optional underscores | gl_maximumSpeed |
| Function | PascalCase with optional underscores; active voice | ConvertToMilesPerHour(…) |
| Object | Prefix ob_ with camelCase | ob_mySpeedrecorder |
| Module | Prefix _ with camelCase | _speedRecorder |
| Class | Prefix class_ with PascalCase; keep it brief | class_SpeedSystem |
Consider a hashing algorithm to encrypt data. This is one-way and takes as input a stream of binary data. Now considering real-life situations, this could be a password or a file, or even binary or other kinds of digital data. The algorithm takes this input and produces a message digest(md). These digests are unique, and no two inputs will generate the same. Take a demo:
import sys,string,md5
print("Enter full name")
line=sys.stdin.readline()
line=line.rstrip()
md5_object=md5.new()
md5_object.update(line)
print(md5_object.hexdigest())
exit
This program makes use of the md5 hashing algorithm. It takes your full name, encrypts it, and secures it. Next in the Python Forensics tutorial we introduce you to the concept of Hash Functions.
4. Python Hash Functions
A hash function maps a large amount of data to a fixed value, into a specified length. An input always delivers the same output. This is a hash sum and it holds a characteristic with specific information.
Since it is practically impossible to revert a hash function, you’ll rarely find a third-party attack (like brut-force) on it. This is why we also call it a one-way cryptographic algorithm.
Take a look at this code:
>>> import uuid
>>> import hashlib
>>> def hash_password(password):
    salt = uuid.uuid4().hex
    return hashlib.sha256(salt.encode() + password.encode()).hexdigest() + ':' + salt
>>> def check_password(hashed_password, user_password):
    password, salt = hashed_password.split(':')
    return password == hashlib.sha256(salt.encode() + user_password.encode()).hexdigest()
>>> new_pass = input('Enter required password ')
Please enter required password ayushi
>>> hashed_password = hash_password(new_pass)
>>> print('The string to store in the db is: ' + hashed_password)
The string to store in the db is: b1076bdba4cd3f71b927a7d43b8c0c6b767cf0b310c2371a192572f7f671f271:17de37c5292f4bbc88e74acca7cdefb2
>>> old_pass = input('Enter new password ')Re-enter new password ayu$hi
>>> if check_password(hashed_password, old_pass):
    print(‘You entered the correct password’)
else:
    print(‘Passwords do not match’)
Passwords do not match
This is the flowchart for this code:
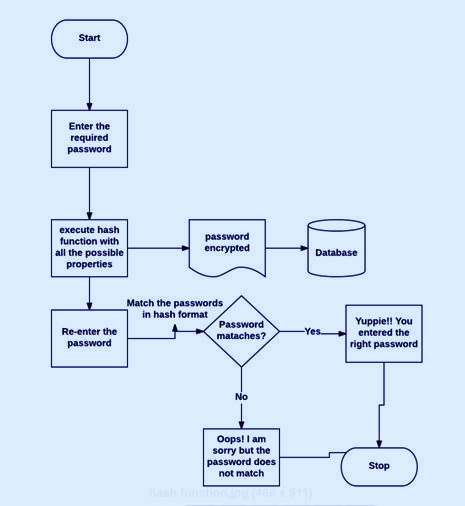
Python Forensics – Hash Function
In the ideal cryptographic hash function:
- We can easily compute the hash value for any given input
- It is infeasible to generate the original input from a given hash value
- It is infeasible to modify the input without changing the hash value
- It is infeasible to find two different inputs with the same hash value
Read: Functions in Python Programming Language
5. How to Crack an Encryption in Python?
We must crack the text data we fetch during analysis and evidence. Let’s discuss some basic cryptographic terminology before that.
Plain text is the original message in human-readable format. Cipher text is what an encryption algorithm turns this pain text into. Consider the Caesar cipher by Julius Caesar to save the secret text from his enemies. Here, we take each letter in the plain text and shift it three places in the alphabet. It will turn each A to a D, each B to an E, and so on.
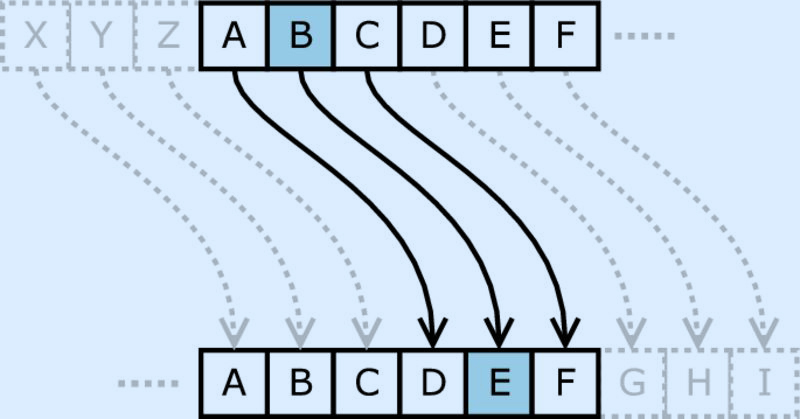
Python Forensics – Cracking an Encryption
The kinds of pattern evidences we use are:
- Tire Tracks and Marks
- Impressions
- Fingerprints
We crack the vector data in such biometric data to collect fool-proof evidence. Let’s take an example.
>>> import sys
>>> def decrypt(k,cipher):
    plaintext=''
    for each in cipher:
        p = (ord(each)-k) % 126
        if p < 32:
            p+=95
            plaintext += chr(p)
            print(plaintext)
>>> cipher = input('Enter message: ')
Enter message: Ayushi
>>> for i in range(1,95,1):
    decrypt(i,cipher)
~
}
|
{
z
y
x
w
v
u
t
s
r
q
p
o
n
m
l
k
j
i
h
g
f
e
d
c
b
a
`
_
~
}
}~
|
|}
{
{|
z
z{
y
yz
x
xy
w
wx
v
vw
u
uv
t
tu
~
~s
~st
}
}r
}rs
~
~|
~|q
~|qr
}
}{
}{p
}{pq
|
|z
|zo
|zop
{
{y
{yn
{yno
~
~z
~zx
~zxm
~zxmn
}
}y
}yw
}ywl
}ywlm
|
|x
|xv
|xvk
|xvkl
{
{w
{wu
{wuj
{wujk
z
zv
zvt
zvti
zvtij
>>>
Read: Packages in Python
6. Virtualization
When we emulate IT systems like servers, workstations, networks, and storage, it is an act of virtualization. It is creating a virtual instance of such a resource. The hypervisor helps emulate such virtual hardware.
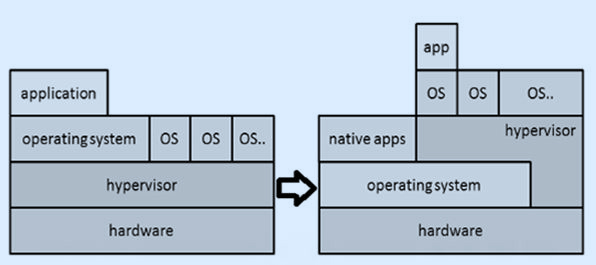
Python Forensics – Virtualization
So what do we use it for in computational forensics? Here’s where we use it:
- For each investigation, we can use the workstation in a validated state.
- Attaching the dd image of a drive as a secondary drive on a virtual machine, we can recover data.
- We can also use the machine as a recovery software to gather evidences.
This is how we can create a virtual machine using Python:
Step 1
Let’s call our machine ‘dummy’. Each VM shall have at least 512 MB of memory, expressed in bytes.
vm_memory = 512 * 1024 * 1024
Step 2
Attach this VM to the default cluster.
vm_cluster = api.clusters.get(name = "Default")
Step 3
Boot the VM from the virtual HDD.
vm_os = params.OperatingSystem(boot = [params.Boot(dev = "hd")])
We then combine all options into a VM parameter object. Finally, we call the add method of the vms collection to the VM.
Let’s take an example.
from ovirtsdk.api import API #importing API library
from ovirtsdk.xml import params

try: #Api credentials is required for virtual machine
   api = API(url = "https://HOST",
      username = "Ayushi",
      password = "abc123",
      ca_file = "ca.crt")

   vm_name = "dummy"
   vm_memory = 512 * 1024 * 1024 #calculating the memory in bytes
   vm_cluster = api.clusters.get(name = "Default")
   vm_template = api.templates.get(name = "Blank")

   #assigning the parameters to operating system
   vm_os = params.OperatingSystem(boot = [params.Boot(dev = "hd")])

   vm_params = params.VM(name = vm_name,
      memory = vm_memory,
      cluster = vm_cluster,
      template = vm_template
      os = vm_os)

   try:
      api.vms.add(vm = vm_params)
      print("Virtual machine '%s' added." % vm_name #output if it is successful)
   except Exception as ex:
      print("Adding virtual machine '%s' failed: %s" % (vm_name, ex))
      api.disconnect()

except Exception as ex:
The output:
Virtual machine ‘dummy’ added
7. Network Forensics in Python
In modern Python Forensics network environments, investigating can face a number of difficulties. Imagine responding to a breach support, investigating insider activities, validating regulatory compliances, or performing assessments pertaining to vulnerability. Let’s discuss some basic terminology for network programming.
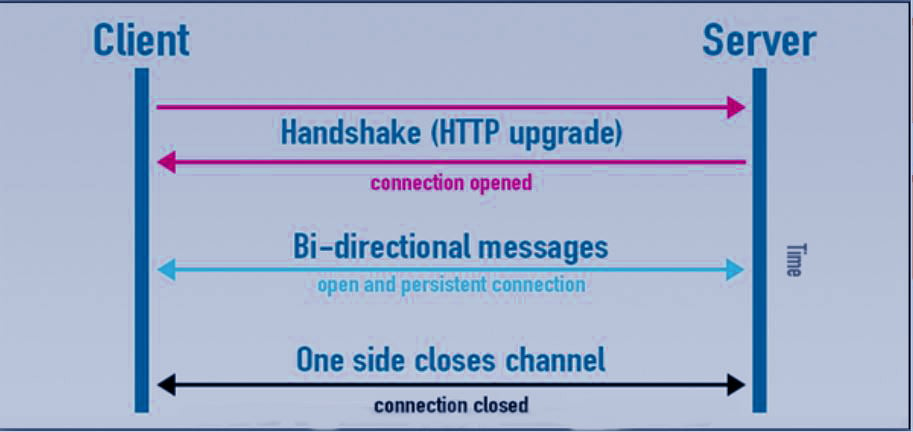
Python Forensics – Network Forensics
- Client- The part of the client-server architecture that runs on a personal computer and workstation.
- Server- The part of the client-server architecture that provides services to different computer programs in the same or other computers.
- WebSockets- A protocol between the client and the server that runs over a persistent TCP connection. Using this, it is possible to send bi-directional messages between the TCP socket connection.
Using these protocols, we can validate information sent to or received by third-party users. But we must also secure the channel since we use encryption.
Let’s take a look at a program that a client uses for handshaking:
>>> import socket
# create a socket object
>>> s = socket.socket(socket.AF_INET, socket.SOCK_STREAM)
# get local machine name
>>> host = socket.gethostname()
>>> port = 8080
# connection to hostname on the port.
>>> s.connect((host, port))
# Receive no more than 1024 bytes
>>> tm = s.recv(1024)
>>> print("The client waits for connection")
>>> s.close()
Output:
The client waits for connection
Before moving forward with the Python Forensics tutorial, you should read up on Python Modules.
8. Python Scapy & Dshell
a. Python Dshell
This is a network forensic analysis toolkit based on Python. The US Army Research Laboratory developed it and released it open-source in 2014. This toolkit makes forensic investigation easy. We have the following decoders in Dshell:
- dns: Extract DNS-related queries
- reservedips: Identify solutions for DNS problems
- large-flows: List netflows
- rip-http: Extract files from HTTP traffic
- Protocols: Identify non-standard protocols
You can access the clone repository on GitHub:
https://github.com/USArmyResearchLab/Dshell
b. Python Scapy
A Python-based tool to analyze and manipulate network traffic, you can find Scapy here:
http://www.secdev.org/projects/scapy/
With Scapy, you can analyze packet manipulation. You can also decode and capture packets of a wide number of protocols. Unlike Dshell, it provides a detailed report about network traffic to the investigator. It can also use third-party tools or OS fingerprinting to plot.
import scapy, GeoIP #Imports scapy and GeoIP toolkit
from scapy import *
geoIp = GeoIP.new(GeoIP.GEOIP_MEMORY_CACHE) #locates the Geo IP address
      def locatePackage(pkg):
      src = pkg.getlayer(IP).src #gets source IP address
      dst = pkg.getlayer(IP).dst #gets destination IP address
      srcCountry = geoIp.country_code_by_addr(src) #gets Country details of source
      dstCountry = geoIp.country_code_by_addr(dst) #gets country details of destination
      print src+"("+srcCountry+") >> "+dst+"("+dstCountry+")\n"
Output:
D:\Python code>python dshell.py
src INDIA >> dst USA
9. Python Forensics – Searching
With a keyword from the message, we can search for evidence. And with some expertise and knowledge, we know what to search in a file, and also what to search in deleted files.
Python helps us with this with its standard library modules. With searching, we can find answers to questions like ‘who’, ‘what’, ‘where’, and ‘when’.
Let’s take a Python example to find a substring.
>>> s1="He came by for blood and milk"
>>> s2="blood"
>>> s1.find(s2)
15
>>> s1.find(s2,10)
15
>>> s1.find(s2,20)
-1
10. Python Forensics – Indexing
In Python Forensics, with indexing, we can gather potential evidence from a file, a disk image, a network trace, or a memory snapshot.
Through indexing, we can search a keyword, and carry out interactive searching using the index to rapidly locate keywords. We can also use it to list keywords in a sorted list.
>>> groceries=['rope','milk','knife']
>>> groceries.index('knife')
2
>>> groceries.index('rope')>>> s1.index(s2)
15
11. Python Imaging Library
Both simple data structures like databases and complex ones like JPEG images hold data. We can access the simple ones using simple desktop tools, and the complex ones using sophisticated programming tools.
With the PIL, we can process images using the Python interpreter. It supports a gamut of file formats; download the source files from:
http://www.pythonware.com/products/pil/
This is how we extract data from images:
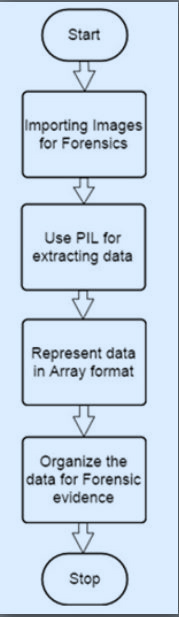
Python Forensics – Imaging Library
Let’s demonstrate this on an image of penguins.

Python Forensics – Penguin Demonstration
Use PIL to open this image:
from PIL import Image
>>> im = Image.open('Capture.jpeg', 'r')
>>> pix_val = list(im.getdata())
>>> pix_val_flat = [x for sets in pix_val for x in sets]
>>> print pix_val_flat
This notes necessary points, including pixel values.
Output:
[255, 255, 255, 255, 255, 255, 255, 255, 255, 255, 255, 255, 255, 255, 255, 255, 255, 255, 255, 255, 255, 255, 255, 255, 255, 255, 255, 255, 255, 255, 255, 255, 255, 255, 255, 255, 255, 255, 255, 255, 255, 255, 255, 255, 255, 255, 255, 255, 255, 255, 255, 255, 255, 255, 255, 255, 255, 255, 255, 255, 255, 255, 255, 255, 255, 255, 255, 255, 255, 255, 255, 255, 255, 255, 255, 255, 255, 255, 255, 255, 255, 255, 255, 255, 255, 255, 255, 255, 255, 255, 255, 255, 255, 255, 255, 255, 255, 255, 255, 255, 255, 255, 255, 255, 255, 255, 255, 255, 255, 255, 255, 255, 255, 255, 255, 255, 255, 255, 255, 255, 255, 255, 255, 255, 255, 255, 255, 255, 255, 255, 255, 255, 255, 255, 255, 255, 255, 255, 255, 255, 255, 255, 255, 255, 255, 255, 255, 255, 255, 255, 255, 255, 255, 255, 255, 255, 255, 255, 255, 255, 255, 255, 255, 255, 255, 255, 255, 255, 255, 255, 255, 255, 255, 255, 255, 255, 255, 255, 255, 255, 255, 255]
12. Mobile Forensics in Python
Although considered non-standard in digital investigations, we can make use of smartphones to ease our process.
Through proper investigation in Python Forensics, we may search for received calls or calls made. We can also extract messages, photos, and other evidence. Let’s see how to get through a lockscreen to extract data.
In Android, we can use a PIN or an alphanumeric password. This can be between 4 and 16 digits/characters. The smartphone stores this inside a file password.key in /data/system. Android stores a salted SHA1-hashsum and MD5-hashsum of this password. Let’s try processing this.
>>> public byte[] passwordToHash(String password) {
  if (password == null) {
     return null;
  }
  String algo = null;
  byte[] hashed = null;
  try {
     byte[] saltedPassword = (password + getSalt()).getBytes();
     byte[] sha1 = MessageDigest.getInstance(algo = "SHA-1").digest(saltedPassword);
     byte[] md5 = MessageDigest.getInstance(algo = "MD5").digest(saltedPassword);
     hashed = (toHex(sha1) + toHex(md5)).getBytes();
  } catch (NoSuchAlgorithmException e) {
     Log.w(TAG, "Failed to encode string because of missing algorithm: " + algo);
  }
  return hashed;
}
We can’t crack this using a dictionary attack, since the hashed password is in a salt file. This is a string of a 64-bit random integer represented hexadecimally. This is all about Python Forensics.
13. Conclusion
It only comes with practice, so don’t forget to sharpen your blades. An investigation is only as good as an investigator. Let us know of any queries in the comments on this article on Python Forensics.
We work very hard to provide you quality material
Could you take 15 seconds and share your happy experience on Google


Happy to see Such useful cryptography and network security concepts in python programming. Particularly Forensics, Hash Function Cracking encryption and decryption modules. always everyone preferred java programming for implement cryptography and Network Security. but python also done the same.