Python Chatbot Project – Learn to build your first chatbot using NLTK & Keras
Free Machine Learning courses with 130+ real-time projects Start Now!!
Hey Siri, What’s the meaning of Life?
As per all the evidence, it’s chocolate for you.
Soon as I heard this reply from Siri, I knew I found a perfect partner to savour my hours of solitude. From stupid questions to some pretty serious advice, Siri has been always there for me.
How amazing it is to tell someone everything and anything and not being judged at all. A top class feeling it is and that’s what the beauty of a chatbot is.
This is the 9th project in the 20 Python projects series by DataFlair and make sure to bookmark other interesting projects:
- Fake News Detection Python Project
- Parkinson’s Disease Detection Python Project
- Color Detection Python Project
- Speech Emotion Recognition Python Project
- Breast Cancer Classification Python Project
- Age and Gender Detection Python Project
- Handwritten Digit Recognition Python Project
- Chatbot Python Project
- Driver Drowsiness Detection Python Project
- Traffic Signs Recognition Python Project
- Image Caption Generator Python Project
What is Chatbot?
A chatbot is an intelligent piece of software that is capable of communicating and performing actions similar to a human. Chatbots are used a lot in customer interaction, marketing on social network sites and instantly messaging the client. There are two basic types of chatbot models based on how they are built; Retrieval based and Generative based models.
1. Retrieval based Chatbots
A retrieval-based chatbot uses predefined input patterns and responses. It then uses some type of heuristic approach to select the appropriate response. It is widely used in the industry to make goal-oriented chatbots where we can customize the tone and flow of the chatbot to drive our customers with the best experience.
2. Generative based Chatbots
Generative models are not based on some predefined responses.
They are based on seq 2 seq neural networks. It is the same idea as machine translation. In machine translation, we translate the source code from one language to another language but here, we are going to transform input into an output. It needs a large amount of data and it is based on Deep Neural networks.
About the Python Project – Chatbot
In this Python project with source code, we are going to build a chatbot using deep learning techniques. The chatbot will be trained on the dataset which contains categories (intents), pattern and responses. We use a special recurrent neural network (LSTM) to classify which category the user’s message belongs to and then we will give a random response from the list of responses.
Let’s create a retrieval based chatbot using NLTK, Keras, Python, etc.
Download Chatbot Code & Dataset
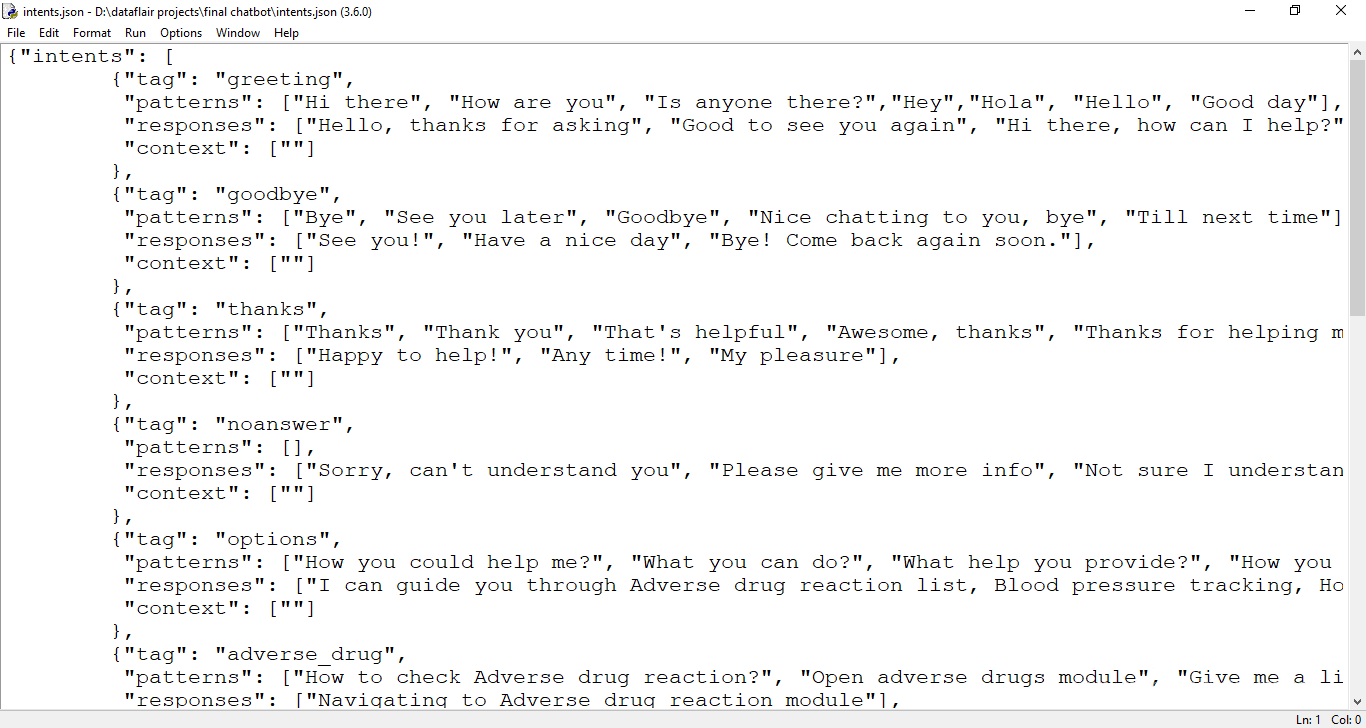
The dataset we will be using is ‘intents.json’. This is a JSON file that contains the patterns we need to find and the responses we want to return to the user.
Please download python chatbot code & dataset from the following link: Python Chatbot Code & Dataset
Prerequisites
The project requires you to have good knowledge of Python, Keras, and Natural language processing (NLTK). Along with them, we will use some helping modules which you can download using the python-pip command.
pip install tensorflow, keras, pickle, nltk
How to Make Chatbot in Python?
Now we are going to build the chatbot using Python but first, let us see the file structure and the type of files we will be creating:
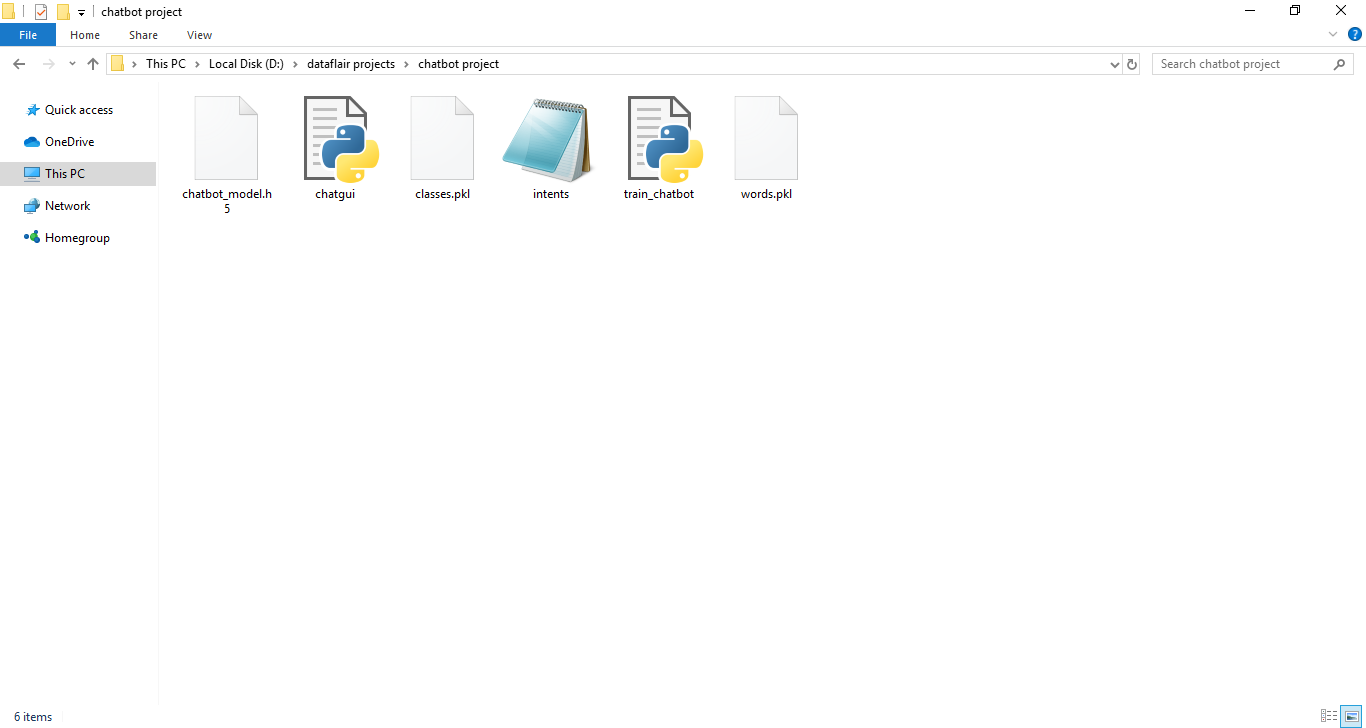
- Intents.json – The data file which has predefined patterns and responses.
- train_chatbot.py – In this Python file, we wrote a script to build the model and train our chatbot.
- Words.pkl – This is a pickle file in which we store the words Python object that contains a list of our vocabulary.
- Classes.pkl – The classes pickle file contains the list of categories.
- Chatbot_model.h5 – This is the trained model that contains information about the model and has weights of the neurons.
- Chatgui.py – This is the Python script in which we implemented GUI for our chatbot. Users can easily interact with the bot.
Here are the 5 steps to create a chatbot in Python from scratch:
- Import and load the data file
- Preprocess data
- Create training and testing data
- Build the model
- Predict the response
1. Import and load the data file
First, make a file name as train_chatbot.py. We import the necessary packages for our chatbot and initialize the variables we will use in our Python project.
The data file is in JSON format so we used the json package to parse the JSON file into Python.
import nltk
from nltk.stem import WordNetLemmatizer
lemmatizer = WordNetLemmatizer()
import json
import pickle

import numpy as np
from keras.models import Sequential
from keras.layers import Dense, Activation, Dropout
from keras.optimizers import SGD
import random

words=[]
classes = []
documents = []
ignore_words = ['?', '!']
data_file = open('intents.json').read()
intents = json.loads(data_file)
This is how our intents.json file looks like.
2. Preprocess data
When working with text data, we need to perform various preprocessing on the data before we make a machine learning or a deep learning model. Based on the requirements we need to apply various operations to preprocess the data.
Tokenizing is the most basic and first thing you can do on text data. Tokenizing is the process of breaking the whole text into small parts like words.
Here we iterate through the patterns and tokenize the sentence using nltk.word_tokenize() function and append each word in the words list. We also create a list of classes for our tags.
for intent in intents['intents']:
    for pattern in intent['patterns']:

        #tokenize each word
        w = nltk.word_tokenize(pattern)
        words.extend(w)
        #add documents in the corpus
        documents.append((w, intent['tag']))

        # add to our classes list
        if intent['tag'] not in classes:
            classes.append(intent['tag'])
Now we will lemmatize each word and remove duplicate words from the list. Lemmatizing is the process of converting a word into its lemma form and then creating a pickle file to store the Python objects which we will use while predicting.
# lemmatize, lower each word and remove duplicates
words = [lemmatizer.lemmatize(w.lower()) for w in words if w not in ignore_words]
words = sorted(list(set(words)))
# sort classes
classes = sorted(list(set(classes)))
# documents = combination between patterns and intents
print (len(documents), "documents")
# classes = intents
print (len(classes), "classes", classes)
# words = all words, vocabulary
print (len(words), "unique lemmatized words", words)

pickle.dump(words,open('words.pkl','wb'))
pickle.dump(classes,open('classes.pkl','wb'))
3. Create training and testing data
Now, we will create the training data in which we will provide the input and the output. Our input will be the pattern and output will be the class our input pattern belongs to. But the computer doesn’t understand text so we will convert text into numbers.
# create our training data
training = []
# create an empty array for our output
output_empty = [0] * len(classes)
# training set, bag of words for each sentence
for doc in documents:
# initialize our bag of words
bag = []
# list of tokenized words for the pattern
pattern_words = doc[0]
# lemmatize each word - create base word, in attempt to represent related words
pattern_words = [lemmatizer.lemmatize(word.lower()) for word in pattern_words]
# create our bag of words array with 1, if word match found in current pattern
for w in words:
bag.append(1) if w in pattern_words else bag.append(0)
# output is a '0' for each tag and '1' for current tag (for each pattern)
output_row = list(output_empty)
output_row[classes.index(doc[1])] = 1
training.append([bag, output_row])
# shuffle our features and turn into np.array
random.shuffle(training)
training = np.array(training)
# create train and test lists. X - patterns, Y - intents
train_x = list(training[:,0])
train_y = list(training[:,1])
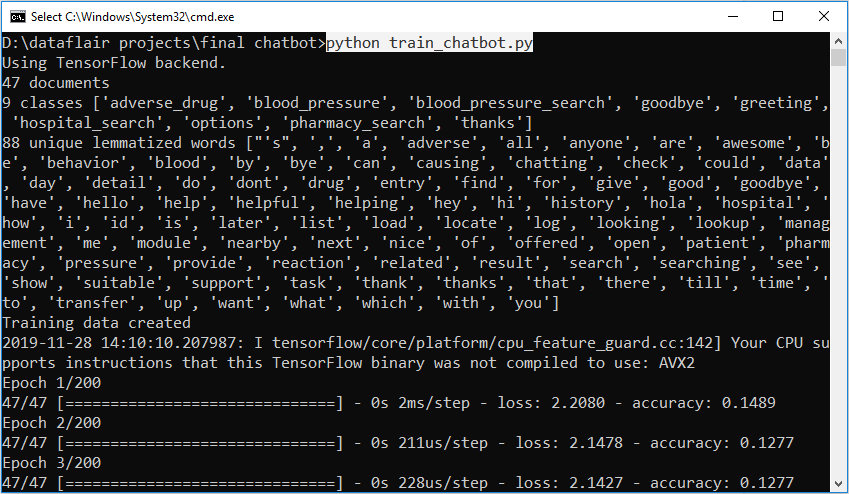
print("Training data created")4. Build the model
We have our training data ready, now we will build a deep neural network that has 3 layers. We use the Keras sequential API for this. After training the model for 200 epochs, we achieved 100% accuracy on our model. Let us save the model as ‘chatbot_model.h5’.
# Create model - 3 layers. First layer 128 neurons, second layer 64 neurons and 3rd output layer contains number of neurons
# equal to number of intents to predict output intent with softmax
model = Sequential()
model.add(Dense(128, input_shape=(len(train_x[0]),), activation='relu'))
model.add(Dropout(0.5))
model.add(Dense(64, activation='relu'))
model.add(Dropout(0.5))
model.add(Dense(len(train_y[0]), activation='softmax'))

# Compile model. Stochastic gradient descent with Nesterov accelerated gradient gives good results for this model
sgd = SGD(lr=0.01, decay=1e-6, momentum=0.9, nesterov=True)
model.compile(loss='categorical_crossentropy', optimizer=sgd, metrics=['accuracy'])

#fitting and saving the model
hist = model.fit(np.array(train_x), np.array(train_y), epochs=200, batch_size=5, verbose=1)
model.save('chatbot_model.h5', hist)

print("model created")
5. Predict the response (Graphical User Interface)
To predict the sentences and get a response from the user to let us create a new file ‘chatapp.py’.
We will load the trained model and then use a graphical user interface that will predict the response from the bot. The model will only tell us the class it belongs to, so we will implement some functions which will identify the class and then retrieve us a random response from the list of responses.
Again we import the necessary packages and load the ‘words.pkl’ and ‘classes.pkl’ pickle files which we have created when we trained our model:
import nltk
from nltk.stem import WordNetLemmatizer
lemmatizer = WordNetLemmatizer()
import pickle
import numpy as np

from keras.models import load_model
model = load_model('chatbot_model.h5')
import json
import random
intents = json.loads(open('intents.json').read())
words = pickle.load(open('words.pkl','rb'))
classes = pickle.load(open('classes.pkl','rb'))
To predict the class, we will need to provide input in the same way as we did while training. So we will create some functions that will perform text preprocessing and then predict the class.
def clean_up_sentence(sentence):
    # tokenize the pattern - split words into array
    sentence_words = nltk.word_tokenize(sentence)
    # stem each word - create short form for word
    sentence_words = [lemmatizer.lemmatize(word.lower()) for word in sentence_words]
    return sentence_words
# return bag of words array: 0 or 1 for each word in the bag that exists in the sentence

def bow(sentence, words, show_details=True):
    # tokenize the pattern
    sentence_words = clean_up_sentence(sentence)
    # bag of words - matrix of N words, vocabulary matrix
    bag = [0]*len(words)
    for s in sentence_words:
        for i,w in enumerate(words):
            if w == s:
                # assign 1 if current word is in the vocabulary position
                bag[i] = 1
                if show_details:
                    print ("found in bag: %s" % w)
    return(np.array(bag))

def predict_class(sentence, model):
    # filter out predictions below a threshold
    p = bow(sentence, words,show_details=False)
    res = model.predict(np.array([p]))[0]
    ERROR_THRESHOLD = 0.25
    results = [[i,r] for i,r in enumerate(res) if r>ERROR_THRESHOLD]
    # sort by strength of probability
    results.sort(key=lambda x: x[1], reverse=True)
    return_list = []
    for r in results:
        return_list.append({"intent": classes[r[0]], "probability": str(r[1])})
    return return_list
After predicting the class, we will get a random response from the list of intents.
def getResponse(ints, intents_json):
    tag = ints[0]['intent']
    list_of_intents = intents_json['intents']
    for i in list_of_intents:
        if(i['tag']== tag):
            result = random.choice(i['responses'])
            break
    return result

def chatbot_response(text):
    ints = predict_class(text, model)
    res = getResponse(ints, intents)
    return res
Now we will develop a graphical user interface. Let’s use Tkinter library which is shipped with tons of useful libraries for GUI. We will take the input message from the user and then use the helper functions we have created to get the response from the bot and display it on the GUI. Here is the full source code for the GUI.
#Creating GUI with tkinter
import tkinter
from tkinter import *


def send():
    msg = EntryBox.get("1.0",'end-1c').strip()
    EntryBox.delete("0.0",END)

    if msg != '':
        ChatLog.config(state=NORMAL)
        ChatLog.insert(END, "You: " + msg + '\n\n')
        ChatLog.config(foreground="#442265", font=("Verdana", 12 ))

        res = chatbot_response(msg)
        ChatLog.insert(END, "Bot: " + res + '\n\n')

        ChatLog.config(state=DISABLED)
        ChatLog.yview(END)

base = Tk()
base.title("Hello")
base.geometry("400x500")
base.resizable(width=FALSE, height=FALSE)

#Create Chat window
ChatLog = Text(base, bd=0, bg="white", height="8", width="50", font="Arial",)

ChatLog.config(state=DISABLED)

#Bind scrollbar to Chat window
scrollbar = Scrollbar(base, command=ChatLog.yview, cursor="heart")
ChatLog['yscrollcommand'] = scrollbar.set

#Create Button to send message
SendButton = Button(base, font=("Verdana",12,'bold'), text="Send", width="12", height=5,
                    bd=0, bg="#32de97", activebackground="#3c9d9b",fg='#ffffff',
                    command= send )

#Create the box to enter message
EntryBox = Text(base, bd=0, bg="white",width="29", height="5", font="Arial")
#EntryBox.bind("<Return>", send)


#Place all components on the screen
scrollbar.place(x=376,y=6, height=386)
ChatLog.place(x=6,y=6, height=386, width=370)
EntryBox.place(x=128, y=401, height=90, width=265)
SendButton.place(x=6, y=401, height=90)

base.mainloop()
6. Run the chatbot
To run the chatbot, we have two main files; train_chatbot.py and chatapp.py.
First, we train the model using the command in the terminal:
python train_chatbot.py
If we don’t see any error during training, we have successfully created the model. Then to run the app, we run the second file.
python chatgui.py
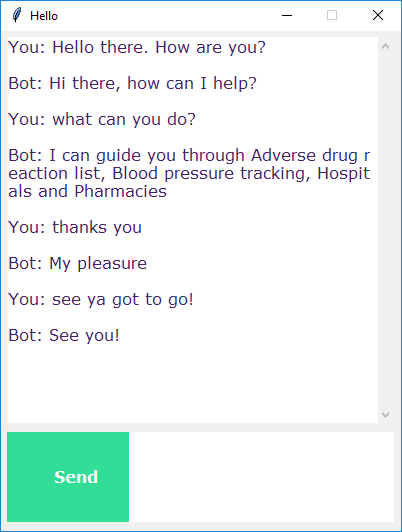
The program will open up a GUI window within a few seconds. With the GUI you can easily chat with the bot.
Screenshots:
Summary
In this Python data science project, we understood about chatbots and implemented a deep learning version of a chatbot in Python which is accurate. You can customize the data according to business requirements and train the chatbot with great accuracy. Chatbots are used everywhere and all businesses are looking forward to implementing bot in their workflow.
I hope you will practice by customizing your own chatbot using Python and don’t forget to show us your work. And, if you found the article useful, do share the project with your friends and colleagues.
Did you like our efforts? If Yes, please give DataFlair 5 Stars on Google


hello, I’ve got a question…
every time i get an error after running training:
VisibleDeprecationWarning: Creating an ndarray from ragged nested sequences (which is a list-or-tuple of lists-or-tuples-or ndarrays with different lengths or shapes) is deprecated. If you meant to do this, you must specify ‘dtype=object’ when creating the ndarray.
training = np.array(training)
hello i ve got a question regarding the training
i always get this error:
VisibleDeprecationWarning: Creating an ndarray from ragged nested sequences (which is a lis
t-or-tuple of lists-or-tuples-or ndarrays with different lengths or shapes) is deprecated. If you meant to do this, you must specify ‘dtype=object’ when creating the ndarray.
training = np.array(training)
what do i need to do, to get rid of it
just add this dtype=object to the below line in the code.
training = np.array(training, dtype=object)
Is there a way that I can add new line for json response in intents. And can I pass image as response?
Bro where should I execute this program and what are the extension files we should do in it
This is a great blog post – So clear and easy to follow. All your hard work is so much appreciated.
Thanks so much for this chatbot……. But after installing change the second line in the train_chatbot.py file to nltk.download() inorder to install the missing packages
where do i have to insert it? do i have to seperate input and answer for this? thx
hii can I get an advanced python project I want to show in my final year project
please suggest to me some of the best advanced-level project
with source code
hi i need a advanced level python project for my final year submission.
with source code can you suggest me some of the best project available freely
I am getting a problem that Redource pinky not found. Please use NLTK Downloader to obtain resource
LookupError Traceback (most recent call last)
~\anaconda3\lib\site-packages\nltk\corpus\util.py in __load(self)
83 try:
—> 84 root = nltk.data.find(f”{self.subdir}/{zip_name}”)
85 except LookupError:
~\anaconda3\lib\site-packages\nltk\data.py in find(resource_name, paths)
582 resource_not_found = f”\n{sep}\n{msg}\n{sep}\n”
–> 583 raise LookupError(resource_not_found)
584
I’m getting this error . How to fix this?in train_chatbot.py
i am getting error in train_chatbot.py as LookupError .How can i fix this?
how can we create fallback prompt, where if bot didn’t understand the question he respond “I didn’t understand” or something like that
hi, this is what i get as the error
TypeError: expected string or bytes-like object
Thank you for your Guide, I did all the things whatever you suggested and My chatbot got ready. Now I need to make API’s with using the Pre-trained Model file . How to make API’s in this so I can integrate this Chatbot with my Different Project ?
hey bro where are you going to use this
Hey buddy, is this project working good, if we follow all the procedures in this blog. Or do we have to make some changes
Hi, I have a question about the project. Why don’t you have a second dataset to check if the trained model is working correctly with test data as well? Thank you in advance.
getting these errors
5 import numpy as np
7 from keras.models import load_model
—-> 8 model = load_model(‘chatbot_model.h5’)
9 import json
10 import random
File ~\miniconda3\Lib\site-packages\keras\src\saving\saving_api.py:262, in load_model(filepath, custom_objects, compile, safe_mode, **kwargs)
254 return saving_lib.load_model(
255 filepath,
256 custom_objects=custom_objects,
257 compile=compile,
258 safe_mode=safe_mode,
259 )
261 # Legacy case.
–> 262 return legacy_sm_saving_lib.load_model(
263 filepath, custom_objects=custom_objects, compile=compile, **kwargs
264 )
File ~\miniconda3\Lib\site-packages\keras\src\utils\traceback_utils.py:70, in filter_traceback..error_handler(*args, **kwargs)
67 filtered_tb = _process_traceback_frames(e.__traceback__)
68 # To get the full stack trace, call:
69 # `tf.debugging.disable_traceback_filtering()`
—> 70 raise e.with_traceback(filtered_tb) from None
71 finally:
72 del filtered_tb
File ~\miniconda3\Lib\site-packages\h5py\_hl\files.py:562, in File.__init__(self, name, mode, driver, libver, userblock_size, swmr, rdcc_nslots, rdcc_nbytes, rdcc_w0, track_order, fs_strategy, fs_persist, fs_threshold, fs_page_size, page_buf_size, min_meta_keep, min_raw_keep, locking, alignment_threshold, alignment_interval, meta_block_size, **kwds)
553 fapl = make_fapl(driver, libver, rdcc_nslots, rdcc_nbytes, rdcc_w0,
554 locking, page_buf_size, min_meta_keep, min_raw_keep,
555 alignment_threshold=alignment_threshold,
556 alignment_interval=alignment_interval,
557 meta_block_size=meta_block_size,
558 **kwds)
559 fcpl = make_fcpl(track_order=track_order, fs_strategy=fs_strategy,
560 fs_persist=fs_persist, fs_threshold=fs_threshold,
561 fs_page_size=fs_page_size)
–> 562 fid = make_fid(name, mode, userblock_size, fapl, fcpl, swmr=swmr)
564 if isinstance(libver, tuple):
565 self._libver = libver
File ~\miniconda3\Lib\site-packages\h5py\_hl\files.py:235, in make_fid(name, mode, userblock_size, fapl, fcpl, swmr)
233 if swmr and swmr_support:
234 flags |= h5f.ACC_SWMR_READ
–> 235 fid = h5f.open(name, flags, fapl=fapl)
236 elif mode == ‘r+’:
237 fid = h5f.open(name, h5f.ACC_RDWR, fapl=fapl)
File h5py\_objects.pyx:54, in h5py._objects.with_phil.wrapper()
File h5py\_objects.pyx:55, in h5py._objects.with_phil.wrapper()
File h5py\h5f.pyx:102, in h5py.h5f.open()
OSError: Unable to synchronously open file (file signature not found)