TensorFlow MNIST Dataset and Softmax Regression
Free TensorFlow course with real-time projects Start Now!!
In our last TensorFlow Tutorial, we discussed TensorBoard. Today, we will see TensorFlow MNIST Dataset. This TensorFlow MNIST tutorial will teach us the meaning of TensorFlow MNIST.
Moreover, we will discuss softmax regression and implementation of MNIST dataset in TensorFlow. Also, we will see the training and accuracy of TensorFlow MNIST dataset.
Here, we will learn how to create a function that is a model for recognizing handwritten digits by looking at each pixel in the image, then using TensorFlow to train the model to predict the image by making it look at thousands of examples which are already labeled (supervised learning).
You will then check the model’s accuracy with a test dataset. Let’s get started.
What is TensorFlow MNIST Dataset?
MNIST dataset in TensorFlow, containing information of handwritten digits spiltted into three parts:
- Training Data (mnist.train) – 55000 datapoints
- Validation Data (mnist.validate) – 5000 datapoints
- Test Data (mnist.test) – 10000 datapoints
And available on Yan Lecun’s website, http://yann.lecun.com/exdb/mnist/ . Now before we start, it is important to note that every datapoint has two parts: an image (x) and a corresponding label (y) describing the actual image and each image is a 28×28 array, i.e. 784 numbers.
The label of the image is a number between 0 and 9 corresponding to the TensorFlow MNIST image. To download and use MNIST Dataset, use the following commands:
from tensorflow.examples.tutorials.mnist import input_data
mnist = input_data.read_data_sets("MNIST_data/", one_hot=True)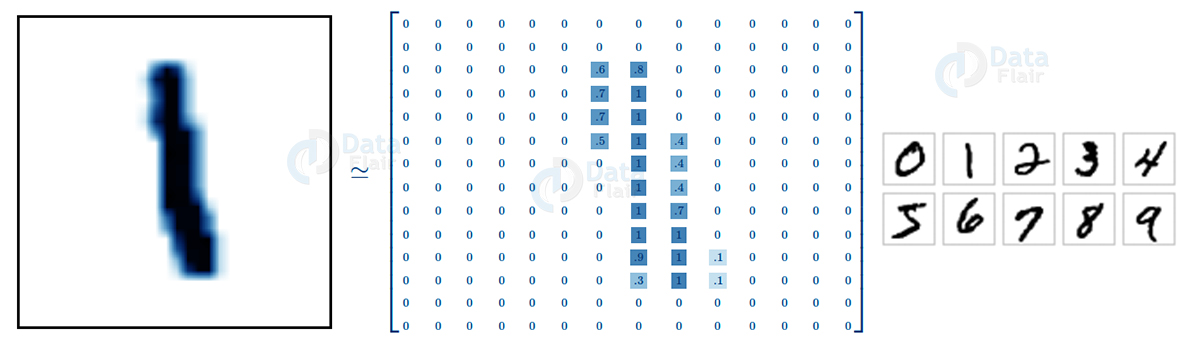
MNIST Dataset in TensorFlow
Softmax Regression in TensorFlow
As the label suggests, there are only ten possibilities of an TensorFlow MNIST to be from 0 to 9. Your aim is to look at an image and say with particular certainty (probability) that a given image is a particular digit.
Softmax is usually used when there is a possibility of an object being one of several different possibilities as the regression gives you values between 0 and 1 that sum up to 1. Therefore, your approach should be simple.
TensorFlow MNIST Dataset- Softmax Regression
TensorFlow MNIST Dataset- Softmax Regression
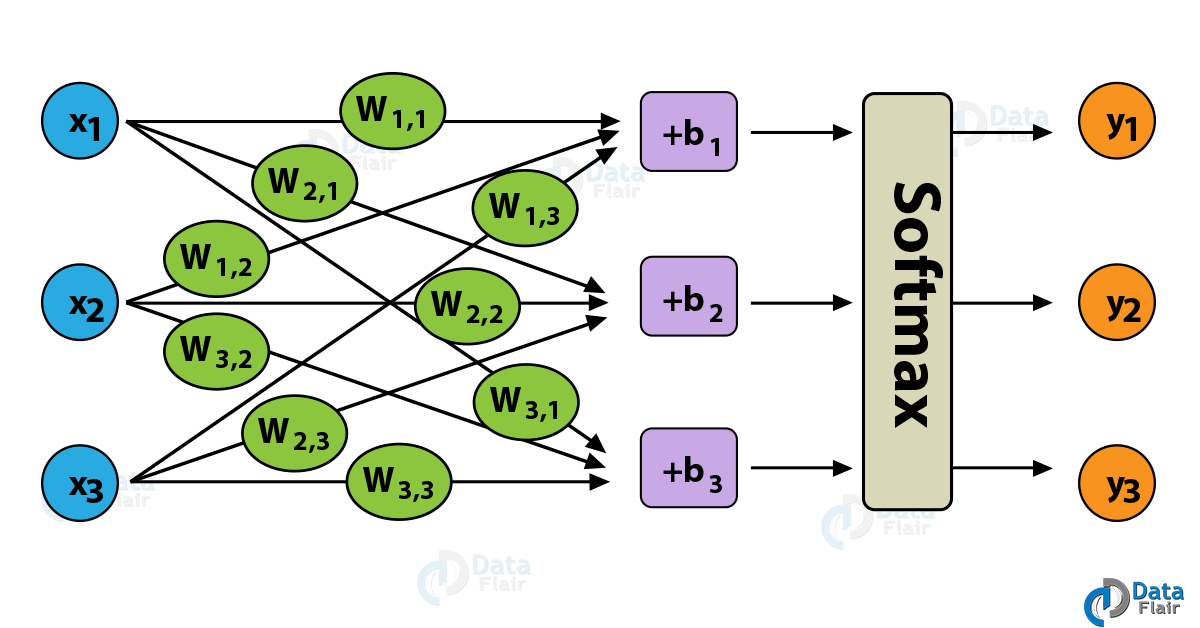
First, you classify an TensorFlow MNIST image to be in a certain class and then represent it as a probability of being correct or not. Now, to tally up all the objects in a particular class, you can do a weighted sum of the pixel intensities.
You also need to add a bias to concur that some things are more likely independent of the input. Softmax normalizes the weights and adds them up to one forming a probability distribution.
What you are doing is nothing but exponentiating the inputs and then normalizing them. The thing to note is that no hypothesis has a negative or a zero weight.
Implementation of MNIST Dataset in TensorFlow
The benefit of using TensorFlow MNIST dataset classification is that it lets you describe a graph of interacting operations that run entirely outside Python.
First, we import the TensorFlow library using
import tensorflow as tf
Then you create a placeholder, a value that you’ll input when you ask the library to run a computation using
x = tf.placeholder(tf.float32, [None, 784])
You should then add weights and biases to your model. Using Variable, which is a modifiable tensor that has a scope in the graph of interacting operations.
W = tf.Variable(tf.zeros([784, 10]))
b = tf.Variable(tf.zeros([10]))
Notice that shape of W is [784, 10] as you want to produce 10-dimensional vectors of evidence for different classes by multiplying 784-dimensional image vectors by it. You can add b to the output as it has a shape of [10].
TensorFlow MNIST – Training
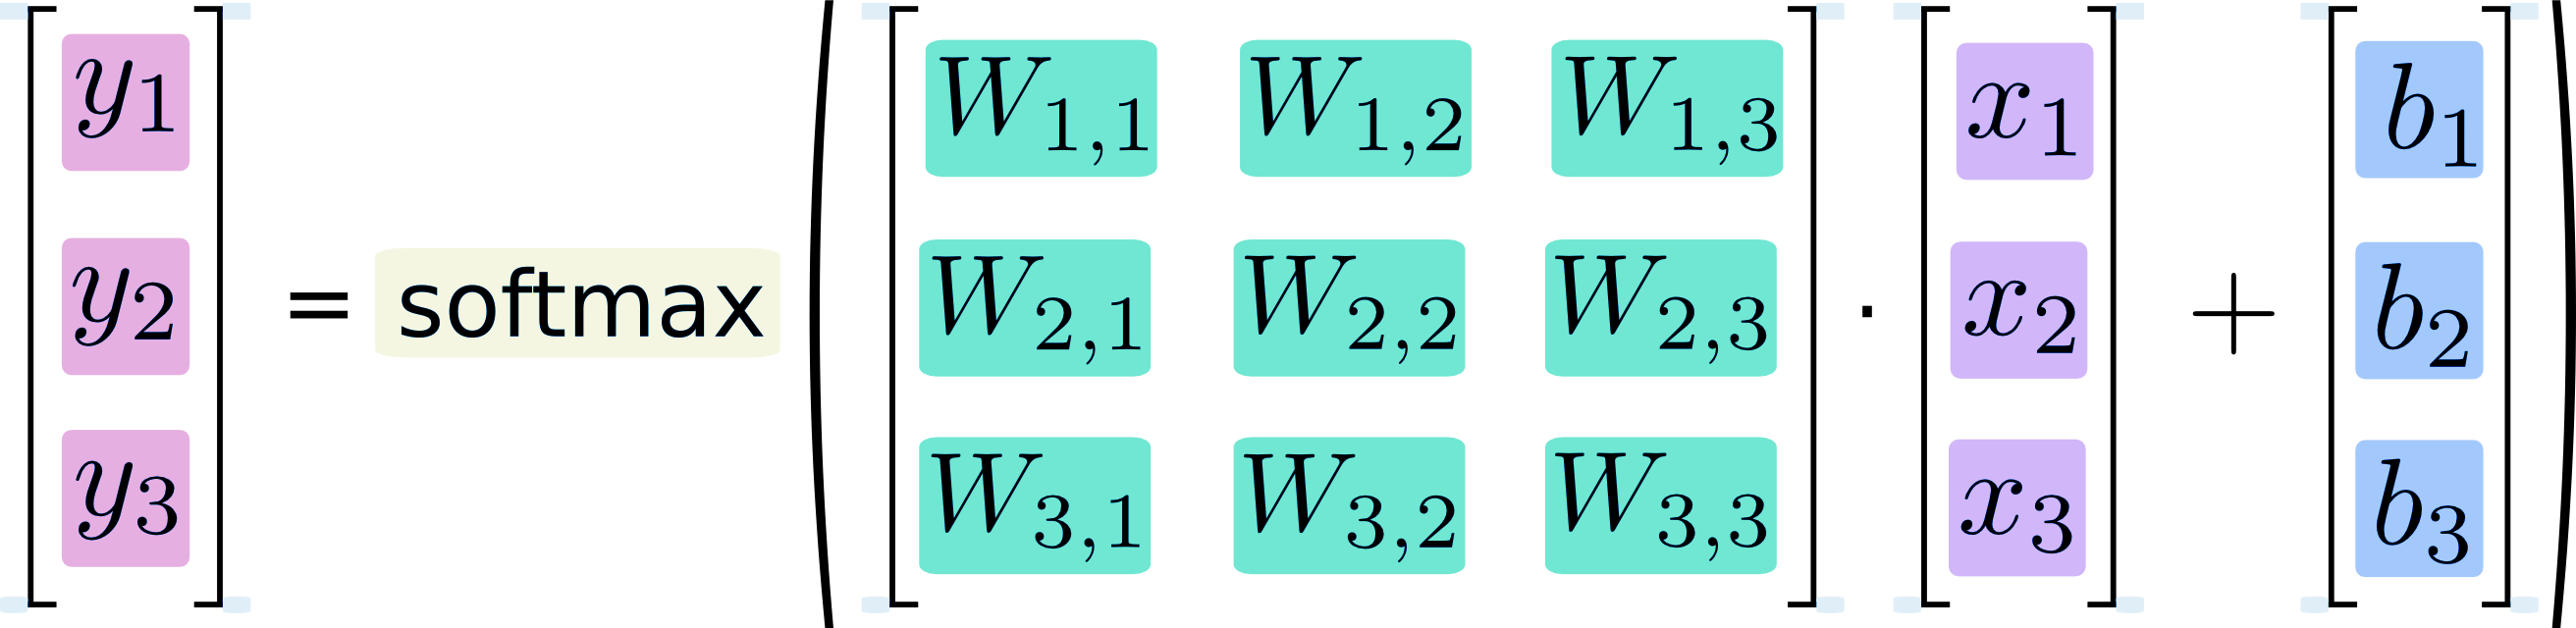
You define a model by multiplying the feature matrix with the weight and add a bias to it, then running it through a softmax function.
y = tf.nn.softmax(tf.matmul(x, W) + b)
You use a cost function or a mean squared error function to find the deviation of your results from the actual data. The less the error, the better is the model. Another very common function is the cross-entropy, which measures how inefficient your predictions are.
The function is described as below, where y represents the predictions and y’ is the actual distribution. You implement it by adding a placeholder
y_ = tf.placeholder(tf.float32, [None, 10])
Then defining the cross-entropy by
cross_entropy = tf.reduce_mean(-tf.reduce_sum(y_ * tf.log(y), reduction_indices=[1]))
Now, that you have successfully defined your model, it’s time to train it. You can do this with the help of gradient descent and back propagation. There are many other optimization algorithms available as well such as logistic regression, dynamic relaxation and many more.
But in the given example, you use gradient descent with a learning rate of 0.5 for cost function optimization.
train_step = tf.train.GradientDescentOptimizer(0.5).minimize(cross_entropy)
Before training, you need to start a session and initialize the variable you created earlier.
sess = tf.InteractiveSession()
This starts an interactive session and the variables are initialized by
tf.global_variables_initializer().run()
Now, it’s time to train it. You can change the number of epochs (iterations) to suit your model.
for _ in range(1000):
  batch_xs, batch_ys = mnist.train.next_batch(100)
  sess.run(train_step, feed_dict={x: batch_xs, y_: batch_ys})
Checking Accuracy With Test Dataset
You check the accuracy by comparing your results with a test dataset. Here, you can make use of tf.argmax function which lets you know the index of the highest value in a tensor along a particular axis.
correct_prediction = tf.equal(tf.argmax(y,1), tf.argmax(y_,1))
This gives you the list of Booleans and then you take the mean after converting to floating point numbers.
accuracy = tf.reduce_mean(tf.cast(correct_prediction, tf.float32))
Then, you can print out the accuracy by
print(sess.run(accuracy, feed_dict={x: mnist.test.images, y_: mnist.test.labels}))So, this was all about TensorFlow MNIST Dataset and Softmax Regression tutorial. Hope you like our explanation.
Conclusion
Hence, we have learned TensorFlow MNIST Dataset and Softmax Regression. Congratulations on your first use of a machine learning algorithm. Moreover, we discussed the implementation of the MNIST dataset in TensorFlow. We learned how to train a model and to get the best accuracy.
The best TensorFlow MNIST models give an accuracy of around 97%. You might get an accuracy around 89-90 %, but don’t frown. The more you work on it, the better you keep getting at it.
Next up, is image recognition using TensorFlow. Furthermore, if you have any query, feel free to ask through the comment section.
You give me 15 seconds I promise you best tutorials
Please share your happy experience on Google


Thanks you for this useful example.
I get the following warning:
WARNING:tensorflow:From :2: read_data_sets (from tensorflow.contrib.learn.python.learn.datasets.mnist) is deprecated and will be removed in a future version.
can you please update the first few rows of the program to accommodate all suggested corrections?