Content Providers in Android – Learn to implement various methods
FREE Online Courses: Enroll Now, Thank us Later!
Content providers provide the content/data to Android applications from an Android system or other Android applications. Let’s go through the details of the content provider in Android through this article, but first, let’s take a glance of topics that we will discuss:
- What are Content Providers
- CRUD operations
- Examples
- Accessing data with Content provider
- Implementing Content Provider
What are Content Providers in Android?
Content Providers are an important component of Android. They handle the access to the central repository and supply data from one application to another on request. This task of handling is done by methods of ContentResolver class. So, content providers can store data in various ways such as files, database or over the internet.
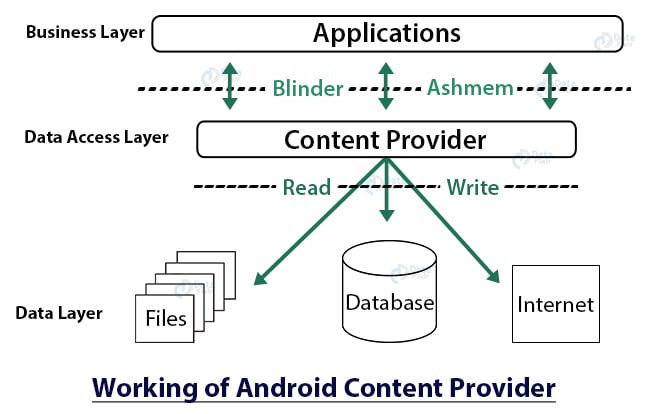
Many a time we need to share our data with applications and that’s where it becomes useful. The following diagram depicts how the content provider helps in sharing data with applications from data stores.
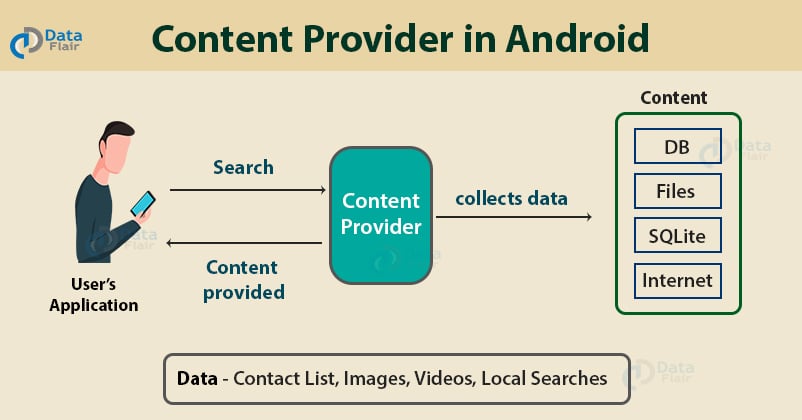
As can be seen, the content provider lets us collect the data centrally and provide them to applications as shown in the above diagram. Content providers act the same as database and also we can query it to add, delete, insert or update the data.
It can be understood that a content provider hides the database details and also, it lets an application share data among other applications. Content providers are not limited to texts, but also contains images and videos as well.
CRUD Operations
Content providers provide the following four basic operations. These are also known as CRUD operations, where
C – Create
R – Read
U – Update
D – Delete
The above are the four operations of content providers :
- Create: It is used for the creation of data in content providers.
- Read: It reads the data stored in the content provider.
- Update: It lets the editing in existing data in content providers.
- Delete: It deletes the existing data stored in its Storage.
Examples of Android Content Providers
To understand content providers with examples, consider the following examples :
- The Gallery that contains images.
- Contact lists that contain Contact details.
- A dictionary that has collections of all the words that are used.
- The music playlist has a list of songs.
- Call logs contain the call details.
This is how exactly content providers work.
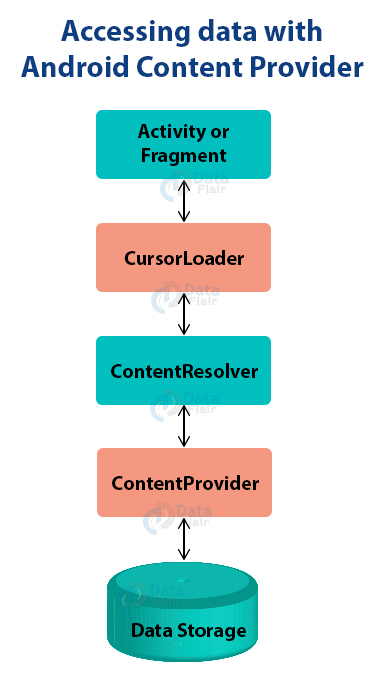
Accessing Data with Content Provider
We need to use the ContentResolver object in our application, in order to communicate with the content providers for data access. Now to enable communication between the user interface and ContentResolver, we use another object, CursorLoader to run query asynchronously. This CursorLoader will be called using Activity/Fragment of the application.
Then, the content provider receives the query from the client and executes and returns the result.
To understand how it works, consider the following diagram:
Wait! Have you completed the Android Activity Tutorial
Methods of Content Provider in Android
Let’s see the following methods of content provider:
- onCreate() – This method in Android initializes the provider as soon as the receiver is created.
- query() – It receives a request in the form of a query from the user and responds with a cursor in Android.
- insert() – This method is used to insert the data into our content provider.
- update() – This method is used to update existing data in a row and return the updated row data.
- delete() – This method deletes existing data from the content provider.
- getType() – It returns the Multipurpose Internet Mail Extension type of data to the given Content URI.
Content URIs
Content URIs are the uniform resource identifiers that identify the data in the content providers. A content URI includes two things: Authority that is the symbolic name of the Provider and a Path that is a name that points towards the data. Every content provider methods have an argument which is URI.
Let’s understand the Content Provider URI:
content://<authority>/<path>/<optional_id>
- content:// – It’s always present, and is the scheme portion of the URI.
- authority – It is the unique name of the content provider, like photos, contacts. It’s a string that can identify the whole content provider.
- path – It is often used to identify some or the other data of the provider. The path is mostly used to identify individual tables.
- optional_id – id is used to access a single particular record of a file. We use this only in cases where we need to access only a particular record and not the complete file. It’s a numeric identifier to access a particular row of the data table.
Content provider also has two wildcards which are:
- * – Asterisk (*) is used to match valid characters irrespective of their length.
- # – Hash (#) is used to match valid numerals irrespective of their length.
Implementation of Content Provider in Android
We’ll create a file named ContentProvider and within that, we’ll create a Java file of name DataFlairProvider.java. Open the new DataFlairProvider.java and write the following code:
package com.dataflair.contentprovider;
import android.content.ContentProvider;
import android.content.ContentUris;
import android.content.ContentValues;
import android.content.Context;
import android.content.UriMatcher;
import android.database.Cursor;
import android.database.sqlite.SQLiteDatabase;
import android.database.sqlite.SQLiteException;
import android.database.sqlite.SQLiteOpenHelper;
import android.database.sqlite.SQLiteQueryBuilder;
import android.net.Uri;
import java.util.HashMap;

public class DataFlairProvider extends ContentProvider {
   static final String PROVIDER_NAME = "com.dataflair.contentprovider.UserProvider";
   static final String URL = "content://" + PROVIDER_NAME + "/users";
   static final Uri CONTENT_URI = Uri.parse(URL);

   static final String id = "id";
   static final String name = "name";
   static final int uriCode = 1;
   static final UriMatcher uriMatcher;
   private static HashMap<String, String> values;
   static {
      uriMatcher = new UriMatcher(UriMatcher.NO_MATCH);
      uriMatcher.addURI(PROVIDER_NAME, "users", uriCode);
      uriMatcher.addURI(PROVIDER_NAME, "users/*", uriCode);
   }

   @Override
   public String getType(Uri uri) {
       switch (uriMatcher.match(uri)) {
           case uriCode:
               return "vnd.android.cursor.dir/users";
           default:
               throw new IllegalArgumentException("Unsupported URI: " + uri);
       }
   }

   @Override
   public boolean onCreate() {
       Context context = getContext();
       DatabaseHelper dbHelper = new DatabaseHelper(context);
       db = dbHelper.getWritableDatabase();
       if (db != null) {
           return true;
       }
       return false;
   }

   @Override
   public Cursor query(Uri uri, String[] projection, String selection,
                       String[] selectionArgs, String sortOrder) {
       SQLiteQueryBuilder qb = new SQLiteQueryBuilder();
       qb.setTables(TABLE_NAME);

       switch (uriMatcher.match(uri)) {
           case uriCode:
               qb.setProjectionMap(values);
               break;
           default:
               throw new IllegalArgumentException("Unknown URI " + uri);
       }
       if (sortOrder == null || sortOrder == "") {
           sortOrder = id;
       }
       Cursor c = qb.query(db, projection, selection, selectionArgs, null,
               null, sortOrder);
       c.setNotificationUri(getContext().getContentResolver(), uri);
       return c;
   }
   @Override
   public Uri insert(Uri uri, ContentValues values) {
       long rowID = db.insert(TABLE_NAME, "", values);
       if (rowID > 0) {
           Uri _uri = ContentUris.withAppendedId(CONTENT_URI, rowID);
           getContext().getContentResolver().notifyChange(_uri, null);
           return _uri;
       }
       throw new SQLiteException("Failed to add a record into " + uri);
   }
   @Override
   public int update(Uri uri, ContentValues values, String selection,
                     String[] selectionArgs) {
       int count = 0;
       switch (uriMatcher.match(uri)) {
           case uriCode:
               count = db.update(TABLE_NAME, values, selection, selectionArgs);
               break;
           default:
               throw new IllegalArgumentException("Unknown URI " + uri);
       }
       getContext().getContentResolver().notifyChange(uri, null);
       return count;
   }
   @Override
   public int delete(Uri uri, String selection, String[] selectionArgs) {
       int count = 0;
       switch (uriMatcher.match(uri)) {
           case uriCode:
               count = db.delete(TABLE_NAME, selection, selectionArgs);
               break;
           default:
               throw new IllegalArgumentException("Unknown URI " + uri);
       }
       getContext().getContentResolver().notifyChange(uri, null);
       return count;
   }
   private SQLiteDatabase db;
   static final String DATABASE_NAME = "EmpDB";
   static final String TABLE_NAME = "Employees";
   static final int DATABASE_VERSION = 1;
   static final String CREATE_DB_TABLE = " CREATE TABLE " + TABLE_NAME
           + " (id INTEGER PRIMARY KEY AUTOINCREMENT, "
           + " name TEXT NOT NULL);";

   private static class DatabaseHelper extends SQLiteOpenHelper {
       DatabaseHelper(Context context) {
           super(context, DATABASE_NAME, null, DATABASE_VERSION);
       }

       @Override
       public void onCreate(SQLiteDatabase db) {
           db.execSQL(CREATE_DB_TABLE);
       }

       @Override
       public void onUpgrade(SQLiteDatabase db, int oldVersion, int newVersion) {
           db.execSQL("DROP TABLE IF EXISTS " + TABLE_NAME);
           onCreate(db);
       }
   }
}
Now, write the following code in MainActivity.java:
package com.dataflair.contentprovider;
import androidx.appcompat.app.AppCompatActivity;
import android.content.ContentValues;
import android.content.Context;
import android.database.Cursor;
import android.net.Uri;
import android.os.Bundle;
import android.view.MotionEvent;
import android.view.View;
import android.view.inputmethod.InputMethodManager;
import android.widget.EditText;
import android.widget.TextView;
import android.widget.Toast;

public class MainActivity extends AppCompatActivity {

   @Override
   protected void onCreate(Bundle savedInstanceState) {
       super.onCreate(savedInstanceState);
       setContentView(R.layout.activity_main);
   }
   @Override
   public boolean onTouchEvent(MotionEvent event) {
       InputMethodManager imm = (InputMethodManager)getSystemService(Context.INPUT_METHOD_SERVICE);
       imm.hideSoftInputFromWindow(getCurrentFocus().getWindowToken(), 0);
       return true;
   }
   public void onClickAddDetails(View view) {
       ContentValues values = new ContentValues();
       values.put(DataFlairProvider.name, ((EditText)        findViewById(R.id.txtName)).getText().toString());
       getContentResolver().insert(DataFlairProvider.CONTENT_URI, values);
       Toast.makeText(getBaseContext(), "New Record Inserted", Toast.LENGTH_LONG).show();
   }

   public void onClickShowDetails(View view) {

       TextView resultView= (TextView) findViewById(R.id.res);
       Cursor cursor = getContentResolver().query(Uri.parse("content://com.dataflair.contentprovider.UserProvider/users"), null, null, null, null);
       if(cursor.moveToFirst()) {
           StringBuilder strBuild=new StringBuilder();
           while (!cursor.isAfterLast()) {
               strBuild.append("\n"+cursor.getString(cursor.getColumnIndex("id"))+ "-"+ cursor.getString(cursor.getColumnIndex("name")));
               cursor.moveToNext();
           }
           resultView.setText(strBuild);
       }
       else {
           resultView.setText("No Records Found");
       }
   }
}
After that, open activity_main.xml, write the following code, here we’ve designed the layout of the application:
<?xml version="1.0" encoding="utf-8"?>
<LinearLayout xmlns:android="http://schemas.android.com/apk/res/android"
   android:orientation="vertical" android:layout_width="match_parent"
   android:layout_height="match_parent">

   <TextView
       android:id="@+id/textView2"
       android:layout_width="wrap_content"
       android:layout_height="wrap_content"
       android:text="DataFlair "
       android:textColor="#a4c639"
       android:layout_marginLeft="100dp"
       android:textSize="50dp"
       android:layout_centerHorizontal="true" />

   <TextView
       android:layout_width="wrap_content"
       android:layout_height="wrap_content"
       android:layout_marginLeft="50dp"
       android:layout_marginTop="50dp"
       android:text="Data Flair User" />

   <EditText
       android:id="@+id/txtName"
       android:layout_width="wrap_content"
       android:layout_height="wrap_content"
       android:layout_marginLeft="50dp"
       android:ems="10" />

   <Button
       android:id="@+id/btnAdd"
       android:layout_width="wrap_content"
       android:layout_height="wrap_content"
       android:layout_marginLeft="50dp"
       android:onClick="onClickAddDetails"
       android:text="Add User" />

   <Button
       android:id="@+id/btnRetrieve"
       android:layout_width="wrap_content"
       android:layout_height="wrap_content"
       android:layout_marginLeft="50dp"
       android:onClick="onClickShowDetails"
       android:text="Show Users" />

   <TextView
       android:id="@+id/res"
       android:layout_width="match_parent"
       android:layout_height="wrap_content"
       android:layout_marginLeft="50dp"
       android:clickable="false"
       android:ems="10" />
</LinearLayout>
In manifest.xml file, write the code given below:
<?xml version="1.0" encoding="utf-8"?>
<manifest xmlns:android="http://schemas.android.com/apk/res/android" package="com.dataflair.contentprovider">
<application
android:allowBackup="true"
android:icon="@mipmap/ic_launcher"
android:label="@string/app_name"
android:roundIcon="@mipmap/ic_launcher_round"
android:supportsRtl="true"
android:theme="@style/AppTheme">
<activity android:name="com.dataflair.contentprovider.MainActivity">
<intent-filter>
<action android:name="android.intent.action.MAIN" />
<category android:name="android.intent.category.LAUNCHER" />
</intent-filter>
</activity>
<provider
android:authorities="com.dataflair.contentprovider.UserProvider"
android:name="com.dataflair.contentprovider.DataFlairProvider">
</provider>
</application>
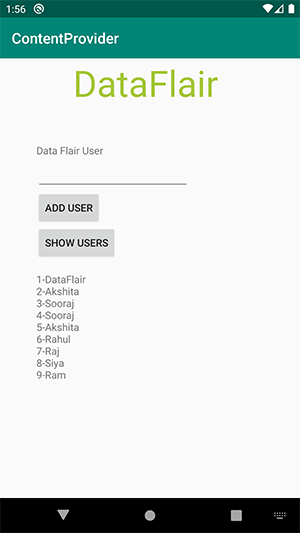
</manifest>After this, you’ll find the application like this :
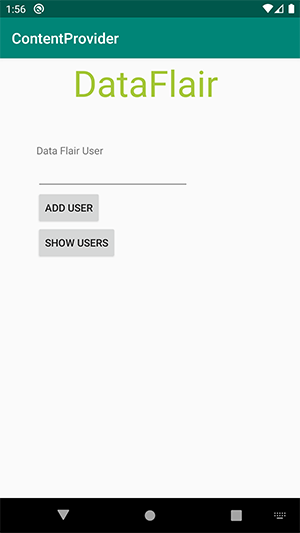
Now you can enter the data and retrieve it with the help of Content Provider:
Summary
In this article, we’ve learned what is a content provider and how it works. We’ve also seen the implementation of the content provider in Android, I hope you’ll try it out and enjoy learning Android.
Any queries in the Android content provider article? Do mention in the comment section.
Your 15 seconds will encourage us to work even harder
Please share your happy experience on Google

