Android Service Tutorial – Lifecycle, Methods & Implementation
FREE Online Courses: Click for Success, Learn for Free - Start Now!
Ever thought of a music player, as a service? Yes, the music player is a service. Not sure how? Well, it runs in the background while the user happily uses some other application, isn’t it? For a better understanding, consider an online music player that uses the internet and plays music in the background. Now, let’s understand its technical part.
What are Android Services?
Android Services are the application components that run in the background. We can understand it as a process that doesn’t need any direct user interaction. As they perform long-running processes without user intervention, they have no User Interface. They can be connected to other components and do inter-process communication (IPC).
Did you check the previous tutorial on Android activity?
Types of Android Services
When we talk about services, they can be of three types as shown in the figure below:
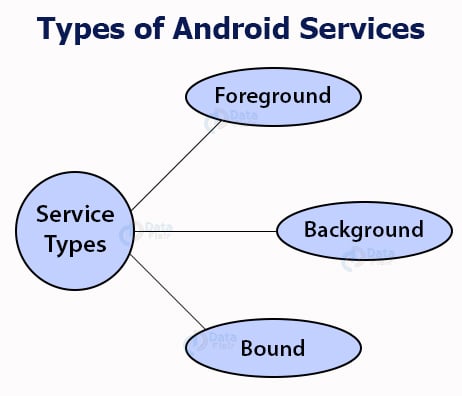
The working of these three services is below:
1. Foreground Services
Foreground services are those services that are visible to the users. The users can interact with them at ease and track what’s happening. These services continue to run even when users are using other applications.
The perfect example of this is Music Player and Downloading.
2. Background Services
These services run in the background, such that the user can’t see or access them. These are the tasks that don’t need the user to know them.
Syncing and Storing data can be the best example.
3. Bound Services
Bound service runs as long as some other application component is bound to it. Many components can bind to one service at a time, but once they all unbind, the service will destroy.
To bind an application component to the service, bindService() is used.
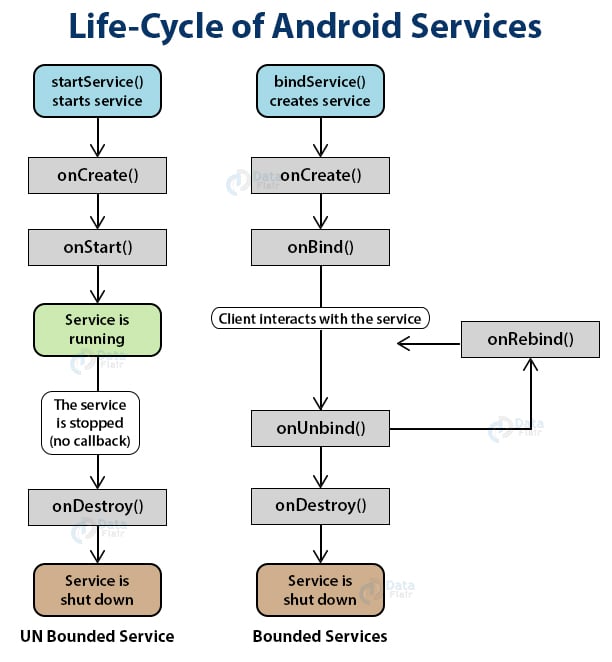
Lifecycle of Android Services
Android services life-cycle can have two forms of services and they follow two paths, that are:
- Started Service
- Bounded Service
Let us see these services and their approach.
1. Started Service
A service becomes started only when an application component calls startService(). It performs a single operation and doesn’t return any result to the caller. Once this service starts, it runs in the background even if the component that created it destroys. This service can be stopped only in one of the two cases:
- By using the stopService() method.
- By stopping itself using the stopSelf() method.
2. Bound Service
A service is bound only if an application component binds to it using bindService(). It gives a client-server relation that lets the components interact with the service. The components can send requests to services and get results.
This service runs in the background as long as another application is bound to it. Or it can be unbound according to our requirement by using the unbindService() method.
IntentService()
There’s an additional service class, that extends Service class, IntentService Class. It is a base class for services to handle asynchronous requests. It enables running an operation on a single background. It executes long-running programs without affecting any user’s interface interaction. Intent services run and execute in the background and terminate themself as soon as they are executed completely.
Certain important features of Intent are :
- It queues up the upcoming request and executes them one by one.
- Once the queue is empty it stops itself, without the user’s intervention in its lifecycle.
- It does proper thread management by handling the requests on a separate thread.
Methods of Android Services
The service base class defines certain callback methods to perform operations on applications. When we talk about Android services it becomes quite obvious that these services will do some operations and they’ll be used. The following are a few important methods of Android services :
- onStartCommand()
- onBind()
- onCreate()
- onUnbind()
- onDestroy()
- onRebind()
Let us see these methods in detail:
1. onStartCommand()
The system calls this method whenever a component, say an activity requests ‘start’ to a service, using startService().
Once we use this method it’s our duty to stop the service using stopService() or stopSelf().
2. onBind()
This is invoked when a component wants to bind with the service by calling bindService(). In this, we must provide an interface for clients to communicate with the service. For interprocess communication, we use the IBinder object.
It is a must to implement this method. If in case binding is not required, we should return null as implementation is mandatory.
3. onUnbind()
The system invokes this when all the clients disconnect from the interface published by the service.
4. onRebind()
The system calls this method when new clients connect to the service. The system calls it after the onBind() method.
5. onCreate()
This is the first callback method that the system calls when a new component starts the service. We need this method for a one-time set-up.
6. onDestroy()
This method is the final clean up call for the system. The system invokes it just before the service destroys. It cleans up resources like threads, receivers, registered listeners, etc.
Implementation of Android Services
Now we’ll implement services in our Android Studio with the following code. Along with this, we’ll see the implementation of a few of the callback methods that are required for the service implementation.
1. Now for this, we’ll create a project in our Android Studio and name it. We’re naming it as Service. Then we’ll write the following code in our activity_main.xml:
<?xml version="1.0" encoding="utf-8"?>
<LinearLayout xmlns:android="http://schemas.android.com/apk/res/android"
   android:orientation="vertical" android:layout_width="match_parent"
   android:layout_height="match_parent">

   <TextView
       android:id="@+id/textView2"
       android:layout_width="wrap_content"
       android:layout_height="wrap_content"
       android:layout_centerHorizontal="true"
       android:layout_marginLeft="100dp"
       android:text="DataFlair "
       android:textColor="@color/colorPrimaryDark"
       android:textSize="50dp" />

   <Button
       android:id="@+id/btnStart"
       android:layout_width="wrap_content"
       android:layout_height="wrap_content"
       android:layout_marginLeft="50dp"
       android:layout_marginTop="50dp"
       android:onClick="startService"
       android:text="Start Service" />

   <Button
       android:id="@+id/btnstop"
       android:layout_width="wrap_content"
       android:layout_height="wrap_content"
       android:layout_marginLeft="50dp"
       android:layout_marginTop="50dp"
       android:onClick="stopService"
       android:text="Stop Service" />
</LinearLayout>
2. After this, we’ll write the following code in MainActivity.java:
package com.DataFlair.DataFlair_Services;

import android.content.Intent;
import android.os.Bundle;
import android.view.View;
import androidx.appcompat.app.AppCompatActivity;

public class MainActivity extends AppCompatActivity {

   @Override
   protected void onCreate(Bundle savedInstanceState) {
       super.onCreate(savedInstanceState);
       setContentView(R.layout.activity_main);
   }

   public void startService(View view) {
       startService(new Intent(this, DataFlairService.class));
   }

   public void stopService(View view) {
       stopService(new Intent(this, DataFlairService.class));
   }
}
3. Now open the Manifest.xml file. Following code is to be written in the Manifest file:
<?xml version="1.0" encoding="utf-8"?>
<manifest xmlns:android="http://schemas.android.com/apk/res/android"
package="com.DataFlair.DataFlair_Services">
<application
android:allowBackup="true"
android:icon="@mipmap/ic_launcher"
android:label="@string/app_name"
android:roundIcon="@mipmap/ic_launcher_round"
android:supportsRtl="true"
android:theme="@style/AppTheme">
<activity android:name="com.DataFlair.DataFlair_Services.MainActivity">
<intent-filter>
<action android:name="android.intent.action.MAIN" />
<category android:name="android.intent.category.LAUNCHER" />
</intent-filter>
</activity>
<service android:name="com.DataFlair.DataFlair_Services.DataFlairService" />
</application>
</manifest>4. And finally, we’ll create a file, a java class, and name it. We’re naming it DataFlairService.java. After this file is created, we’ll write the following code in it:
package com.DataFlair.DataFlair_Services;
import android.app.Service;
import android.content.Intent;
import android.media.MediaPlayer;
import android.os.IBinder;
import android.provider.Settings;
import android.widget.Toast;
public class DataFlairService extends Service {
private MediaPlayer player;
@Override
public IBinder onBind(Intent intent) {
return null;
}
@Override
public void onCreate() {
Toast.makeText(this, "Service was Created", Toast.LENGTH_LONG).show();
}
@Override
public int onStartCommand(Intent intent, int flags, int startId) {
player = MediaPlayer.create(this, Settings.System.DEFAULT_RINGTONE_URI);
player.setLooping(true);
player.start();
Toast.makeText(this, "Service Started", Toast.LENGTH_LONG).show();
return START_STICKY;
}
@Override
public void onDestroy() {
super.onDestroy();
player.stop();
Toast.makeText(this, "Service Stopped", Toast.LENGTH_LONG).show();
}
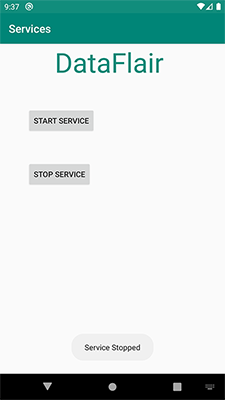
}5. After we’ve written all the codes respectively, we’ll run our app now. The following would be shown to us as our output:
This is our application wherein we can Start and Stop our service.
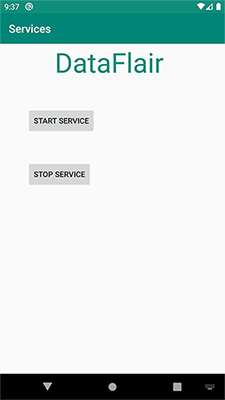
Now we’ve clicked on Start Service, therefore Service is created first.
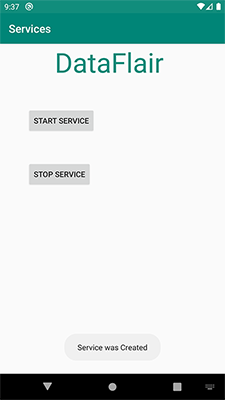
After the service is created, it will start executing.

After that, we can stop our service whenever we like to stop them.
As we can see below, the service has stopped.
Summary
Now that we’ve read about Android services, let us see it once again in brief. Android services are the long-running processes that don’t need user interaction. These services run in the background. They work either in Started mode or Bound mode. It has also got a few important methods that provide a few important operations.
How was your experience regarding the Android service tutorial? Do share in the comments.
Did you like our efforts? If Yes, please give DataFlair 5 Stars on Google


Nice tutorial