Android Notifications – ‘Coz your App is pointless without its implementation
FREE Online Courses: Dive into Knowledge for Free. Learn More!
Notifications are the messages that are visible to the users outside the app UI. These notifications can be the reminder note, message, update message, or information. These can be directly read by the users in the status bar. So here, we will read and understand Android Notification & its working, and implementation.
In this Android notification article, we will see:
- Notification Annotations
- Methods to Set Properties
- Status Bar and Notification
- Android Notifications on Device Example
- Types of Android Notifications
- NotificationCompat.Builder Class
- Implementing Android Notification
Let’s discuss the above in detail.
Android Notification Annotations
The notification shows up on the screen in such a way that the user can easily understand from which app it is. The way notification appears on the screen, it tells many things to the user such as:
- When the notification has come
- What is the context of the message
- What is there in the message
For a better understanding of Android Notification, consider the following: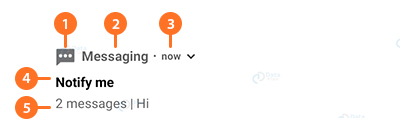
1. Application Icon: It shows the icon of the app and it is set using setSmallIcon().
2. Application Name: It shows the name of the app whose notification has come up.
3. Time Stamp: It shows the time when the notification had come. Also, it is provided by the system and can be overridden with setWhen(). It can be hidden using setShowWhen(false).
4. Title: Title is set using setContentTitle(). It is optional. It is set using setContentTitle().
5. Text: Text is the message for the user. It is optional. It is set with setContentText().
Set Android Notification Properties
The properties of Android Notifications can be set using NotificationCompat.Builder object. Few of the methods to set properties are mentioned below:
- setSmallIcon(): This method is to set the icon of the notification.
- setContentTitle(): This method is to set the title of the notification.
- setContentText(): This is to set the text that you want to show as a text message.
- setAutoCancel(): This sets the cancelable property of a notification.
- setPriority(): This sets the priority of the notifications.
Now see the following example to know how it happens:
NotificationCompat.Builder my_builder = new NotificationCompat. Builder(this). setSmallIcon(R.drawable.notification_icon).setContentTitle("This is a Sample notification").setContentText("Hi, Welcome to DataFlair.com");Status Bar and Notification
The status bar is that part of our screen wherein the android notifications are shown. Notifications can appear on our screen in various forms such as image notification, text notification, expandable notifications, and many more.
Let us see a few of them one by one:
1. Application Icons
Application icons of the application from which notification has come are shown on the left of the Status bar.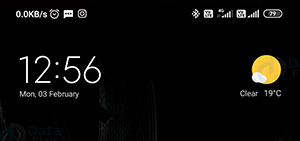
2. Notifications on the Notification Drawer
A list of all the android notifications that have come are found in the notification drawer. For example, consider the following screenshot.
3. Text Notification
Following is an example of how the notification is actually shown on the screen.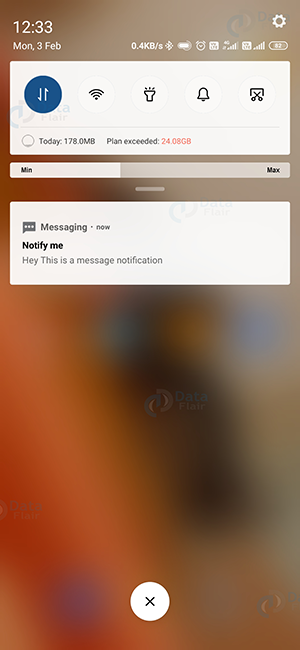
4. Expandable Notification
These notifications look just like a normal notification, but they can be expanded for further details.
Let’s have a look at the expanded notification drawer.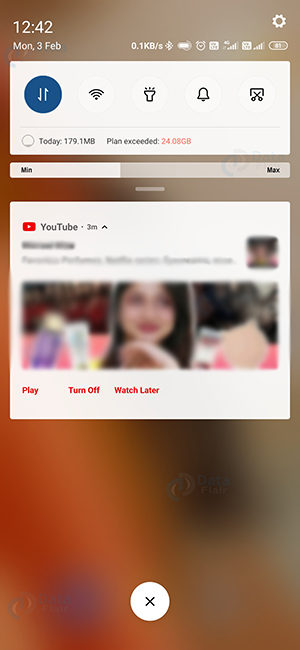
5. Notification Action
Another notification is the one where actions can be directly performed in the notification itself. As you can see in the following: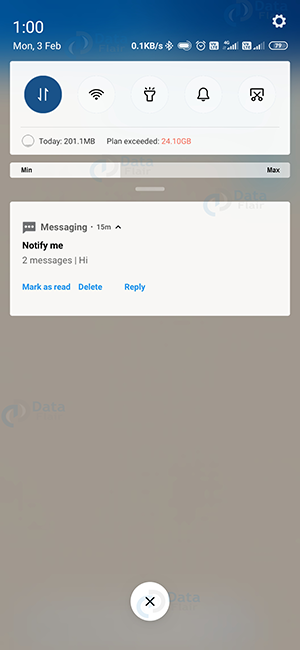
6. Lock Screen Notification
Android Notifications can also be visible on the lock screen. You can see the following for that: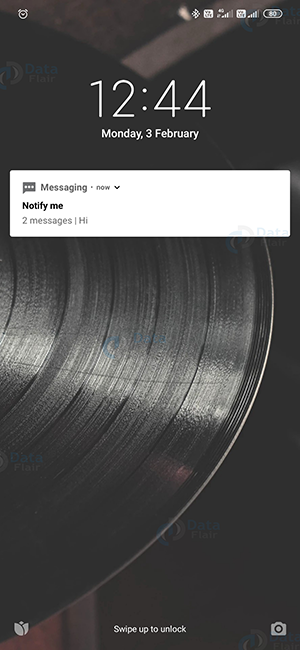
Types of Android Notifications
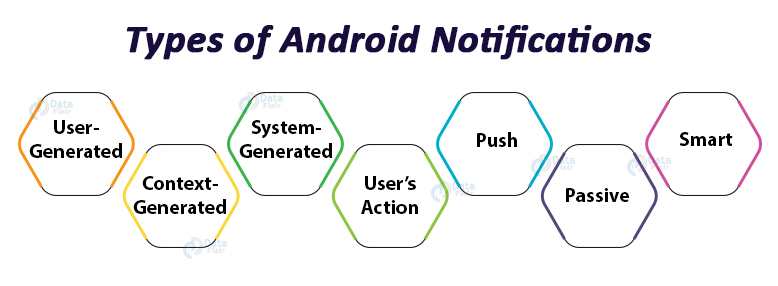
There are various types of android notifications that we are going to see now.
1. User-Generated Notifications
These notifications are generated by users. They are the most common android notifications. Messaging notification is the best example of this. Some other user-generated notification examples are post sharing, liking, commenting, etc.
2. Context-Generated Notifications
These are rapidly increasing every day. This type of android notification generates based on the permission to the applications. For example, schedules, or location-based notifications.
3. System-Generated Notifications
These notifications are those that are generated by the apps based on their own needs. For Example, consider notification of System Updates.
Learn to build your first android app with DataFlair.
4. Push Notifications
They are the notifications generated by the system. You can consider every notification to be of Push Notification types.
5. Notifications that Require User’s Action
These android notifications are those that require users to take immediate action on them. It can be an email alert or it can also be a message.
6. Passive Notification
These are the notifications that provide users with some information. There is no need to take any action on it. For example, a weather update.
7. Smart Notification
A smart notification has a unique ability that it delivers to each application.
Defining Android Notification
In Android, if we want to use Android Notification we must define it first. We can define some action or some button to the notification too. This will help the users too directly perform the activity they wish to perform.
To define it in MainActivity.java, we will write the code as follow:
NotificationCompat.Builder nBuilder = new NotificationCompat.Builder(this)
//coding part
Intent resultIntent = new Intent(this, MainActivity.class);
PendingIntent pendingIntent = PendingIntent.getActivity(this, 0, resultIntent, 0);
nBuilder.setContentIntent(pendingIntent);
Issuing the Android Notification
After we are done with the creation of the Notification we are now capable of passing a notification to the system. We can do it using the NotificationManager.notify() method. We also need to set an id to the Notification so that we can later use it to make changes in the notification.
For this, we will use the following syntax:
NotificationCompat.Builder nBuilder = new NotificationCompat .Builder(this);
// coding part
int mNotificationId = 999;
NotificationManager mNotifyMgr = (NotificationManager)getSystemService(NOTIFICATION_SERVICE);
// Builds the notification and issues it.
mNotifyMgr.notify(mNotificationId, nBuilder.build());
NotificationCompat.Builder Class
A NotificationCompat.Builder class allows easier control, as well as helps to design different design layouts for notifications. Some of the methods of NotificationCompat.Builder class as given below:
| Methods | Description | |
| 1 | build() | It combines all already set options and returns a new notification object. |
| 2 | setAutoCancel(boolean autoCancel) | It auto-cancels a notification under given condition. |
| 3 | setContent(RemoteViews views) | It sets the custom RemoteView to use. |
| 4 | setContentIntent(PendingIntent intent) | It sets a PendingIntent to work onClick. |
| 5 | ContentInfo(CharSequence info) | It sets a large text in the right of Notification |
| 6 | setContentTitle(charSequence title) | It sets the Title of the notification |
| 7 | setLargeIcon(Bitmap icon) | It sets the large icon image for the notification |
| 8 | setDefaults(int defaults) | Sets the default notification |
| 9 | setSmallIcon(int icon) | It sets a small icon for the notification layout. |
| 10 | setStyle(NotificationCompat.Style style) | It Adds a rich style to the notification |
| 11 | setVibrate(long[] pattern) | It sets a pattern of Vibration to vibrate when the notification comes |
| 12 | setTicker(charSequence tickerText) | It sets the text to display when notification comes. |
| 13 | setOngoing(boolean ongoing) | It sets in true or false whether the notification is ongoing or not. |
NotificationCompat.Builder class allows easier control over all the flags, as well as help constructing the typical notification layouts.
Implementing Android Notification in our Application
Now we will see how we can implement android notification using one example:
Step 1: First of all we will create a New Project and name it. We will write the following code in its activity_main.xml part:
<?xml version="1.0" encoding="utf-8"?>
<LinearLayout xmlns:android="http://schemas.android.com/apk/res/android"
   android:layout_width="match_parent"
   android:layout_height="match_parent"
   android:orientation="vertical">

   <TextView
       android:id="@+id/textView2"
       android:layout_width="wrap_content"
       android:layout_height="wrap_content"
       android:layout_centerHorizontal="true"
       android:layout_marginLeft="100dp"
       android:layout_marginTop="100dp"
       android:fontFamily="@font/abril_fatface"
       android:text="DataFlair "
       android:textColor="@color/colorPrimaryDark"
       android:textSize="50dp" />

   <Button
       android:id="@+id/btnShow"
       android:layout_width="wrap_content"
       android:layout_height="wrap_content"
       android:layout_marginLeft="100dp"
       android:layout_marginTop="175dp"
       android:text="Generate notification" />
</LinearLayout>
Step 2: After this, we will write the code for it’s functioning, in MainActivity.java. The code is as follows:
package com.DataFlair.dataflairnotification;

import androidx.appcompat.app.AppCompatActivity;
import androidx.core.app.NotificationCompat;
import android.app.Notification;
import android.app.NotificationChannel;
import android.app.NotificationManager;
import android.content.Context;
import android.os.Build;
import android.os.Bundle;
import android.view.View;
import android.widget.Button;


public class MainActivity extends AppCompatActivity {

   @Override
   protected void onCreate(Bundle savedInstanceState) {
       super.onCreate(savedInstanceState);
       setContentView(R.layout.activity_main);
       Button btnNotify = (Button)findViewById(R.id.btnShow);
       btnNotify.setOnClickListener(new View.OnClickListener() {
           @Override
           public void onClick(View v) {

               NotificationManager notificationManager = (NotificationManager) getSystemService(Context.NOTIFICATION_SERVICE);
               String NOTIFICATION_CHANNEL_ID = "my_channel_id_01"; // We'll add Notification Channel Id using NotificationManager.

               if (Build.VERSION.SDK_INT >= Build.VERSION_CODES.O) {
                   NotificationChannel notificationChannel = new NotificationChannel(NOTIFICATION_CHANNEL_ID, "My Notifications", NotificationManager.IMPORTANCE_HIGH);

                   // Configure the notification channel.
                   notificationChannel.setDescription("Channel description");
                   notificationChannel.enableLights(true);
                   notificationChannel.setVibrationPattern(new long[]{0, 1000, 500, 1000});
                   notificationChannel.enableVibration(true);
                                           notificationManager.createNotificationChannel(notificationChannel);
               }
               NotificationCompat.Builder notificationBuilder = new NotificationCompat.Builder(MainActivity.this, NOTIFICATION_CHANNEL_ID);

               notificationBuilder.setAutoCancel(true)
                       .setDefaults(Notification.DEFAULT_ALL)
                       .setWhen(System.currentTimeMillis())
                       .setSmallIcon(R.drawable.ic_notification)
                       .setContentTitle("DataFlair sent a notification")
                       .setContentText(" This is an example of Notification");

               notificationManager.notify(/*notification id*/1, notificationBuilder.build());

           }
       });
   }
}
Step 3: And we will now run our code as follows:
i) The Output would come like this: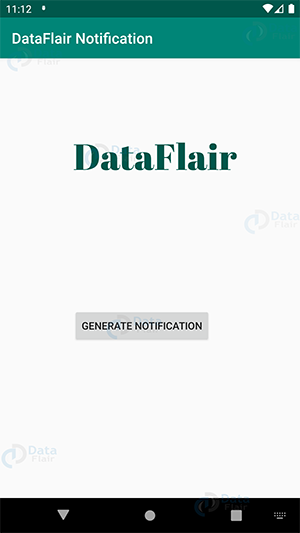
ii) After this, we will click on the “generate notification”.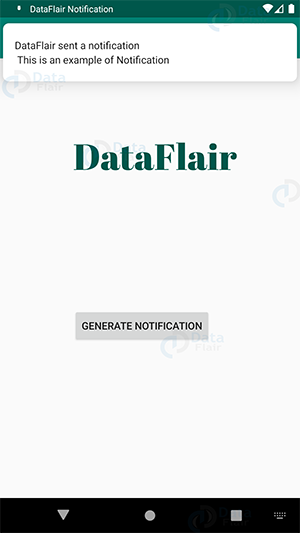
iii) You can find the notification in the Notification Drawer as follows: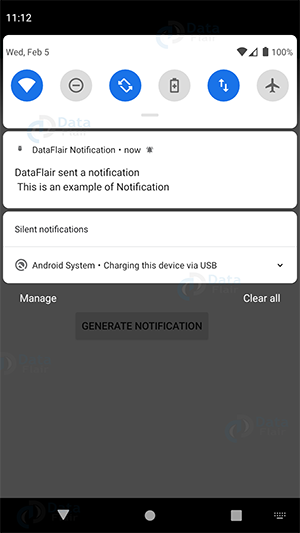
Summary
So, in this Android Notification article, we have seen what are notifications, their types, and their implementation. Other than that we have seen its different types and different appearances on the screen. Not to forget, we have seen the properties of these android notifications and how we can set them.
This was all about DataFlair’s Android Notification article. I hope you find this article helpful, do share this article on social media to help others.
Happy Learning😃
Did you like our efforts? If Yes, please give DataFlair 5 Stars on Google

