Android Media Player – Time to Control your Music
FREE Online Courses: Dive into Knowledge for Free. Learn More!
In this article, we will be learning and implementing the Android Media player using Android studio. Android framework provides support for a variety of media types as well. This enables us to integrate these audios, videos or images into our applications. For this, we can add the required files in the resource folder, in the raw file (res -> raw). Once we add them, we can open and play these using Media Player API.
Install Android Studio to set up the Android Media Player.
Important Declarations (Manifest file )
- You can also keep the device screen from dimming or the processor from sleeping. For that, you need to request in the manifest file, as:
<uses-permission android:name= “android.permission.WAKE_LOCK” />
- You can use network-based content in your application as well. For that, you need to request network access in the manifest file, as:
<uses-permission android:name= “android.permission.INTERNET” />
Android Media Player Class
A Media Player class helps us access audio and video files from the resources of the application. Here, we can play the files from the network as well. We can add certain playback options as well such as play, pause, forward, etc.
To use Media Player we add it as:
MediaPlayer my_player = MediaPlayer.create( this, R.raw. song_name);

my_player .start();
Here, we have to add the song file in the raw folder that we need to create in the res file (resource file).
There are many methods of the Media Player Class, and few of them are listed below:
- getDuration(): It helps in getting the total duration of a song in ms.
- isPlaying(): It returns true if the file is playing, else false.
- pause(): It pauses a song that is playing.
- stop(): It stops the playing song.
- reset(): It resets the song to play from the beginning.
- getTrack(): It gets the tracking information of the song.
- release(): It releases the resources associated with the Media Player object.
- setVolume(): It adjusts the volume of the media player.
Implementation of Android Media Player
Now we will see how we can implement an Android Media Player in our application. In our application, we will provide a song within the app & the facility to forward the song. It will have buttons to play, pause, forward and backward the song. So, without any delay, let us begin with our project.
1. First of all, we will create a project and name the app. I have named my application “Media Player”.
2. Now we will define the layout of the application in the activity_main.xml file as follows:
<?xml version="1.0" encoding="utf-8"?>
<RelativeLayout xmlns:android="http://schemas.android.com/apk/res/android"
   xmlns:tools="http://schemas.android.com/tools"
   android:layout_width="match_parent"
   android:layout_height="match_parent"
   android:paddingLeft="10dp"
   android:paddingRight="10dp">

   <TextView
       android:id="@+id/txtSname"
       android:layout_width="wrap_content"
       android:layout_height="wrap_content"
       android:layout_marginTop="30dp"
       android:text="Now Playing: "
       android:textAppearance="?android:attr/textAppearanceMedium" />


   <ImageView
       android:id="@+id/imgLogo"
       android:layout_width="402dp"
       android:layout_height="419dp"
       android:layout_marginTop="67dp"
       android:src="@drawable/jwm"
       tools:layout_marginLeft="40dp" />

   <ImageButton
       android:id="@+id/Backwardbtn"
       android:layout_width="wrap_content"
       android:layout_height="wrap_content"
       android:layout_alignParentBottom="true"
       android:layout_marginLeft="20dp"
       android:layout_marginBottom="44dp"
       android:src="@android:drawable/ic_media_rew" />

   <ImageButton
       android:id="@+id/Playbtn"
       android:layout_width="wrap_content"
       android:layout_height="wrap_content"
       android:layout_alignTop="@+id/Backwardbtn"
       android:layout_marginLeft="20dp"
       android:layout_toRightOf="@+id/Backwardbtn"
       android:src="@android:drawable/ic_media_play" />

   <ImageButton
       android:id="@+id/Pausebtn"
       android:layout_width="wrap_content"
       android:layout_height="wrap_content"
       android:layout_alignTop="@+id/Playbtn"
       android:layout_marginLeft="20dp"
       android:layout_toRightOf="@+id/Playbtn"
       android:src="@android:drawable/ic_media_pause" />

   <ImageButton
       android:id="@+id/Forwardbtn"
       android:layout_width="wrap_content"
       android:layout_height="wrap_content"
       android:layout_alignTop="@+id/Pausebtn"
       android:layout_marginLeft="20dp"
       android:layout_toRightOf="@+id/Pausebtn"
       android:contentDescription="@+id/imageButton3"
       android:src="@android:drawable/ic_media_ff" />

   <TextView
       android:id="@+id/StartTimebtn"
       android:layout_width="wrap_content"
       android:layout_height="wrap_content"
       android:layout_alignTop="@+id/seek_Bar"
       android:text="0 min 0 sec" />

   <SeekBar
       android:id="@+id/seek_Bar"
       android:layout_width="match_parent"
       android:layout_height="wrap_content"
       android:layout_above="@+id/Backwardbtn"
       android:layout_toLeftOf="@+id/Song_t_txtview"
       android:layout_toRightOf="@+id/StartTimebtn" />

   <TextView
       android:id="@+id/Song_t_txtview"
       android:layout_width="wrap_content"
       android:layout_height="wrap_content"
       android:layout_alignTop="@+id/seek_Bar"
       android:layout_toRightOf="@+id/Forwardbtn"
       android:text="0 min 0 sec" />
</RelativeLayout>
3. After this, we will write the java code for the functioning. We will write the following code in the MainActivity.java file.
package com.DataFlair.mediaplayer;

import android.media.MediaPlayer;
import android.os.Bundle;
import android.os.Handler;
import android.view.View;
import android.widget.ImageButton;
import android.widget.SeekBar;
import android.widget.TextView;
import android.widget.Toast;

import androidx.appcompat.app.AppCompatActivity;

import java.util.concurrent.TimeUnit;

public class MainActivity extends AppCompatActivity {
   private static int o_Time = 0, s_Time = 0, e_Time = 0, f_Time = 5000, b_Time = 5000;
   private ImageButton forward, backward, pause, play;
   private Handler handle = new Handler();
   private MediaPlayer mPlayer;
   private TextView song, start, song_time;
   private SeekBar Progress;
   private Runnable UpdateSongTime = new Runnable() {
       @Override
       public void run() {
           s_Time = mPlayer.getCurrentPosition();
           start.setText(String.format("%d min, %d sec", TimeUnit.MILLISECONDS.toMinutes(s_Time), TimeUnit.MILLISECONDS.toSeconds(s_Time) - TimeUnit.MINUTES.toSeconds(TimeUnit.MILLISECONDS.toMinutes(s_Time))));
           Progress.setProgress(s_Time);
           handle.postDelayed(this, 100);
       }
   };

   @Override
   protected void onCreate(Bundle savedInstanceState) {
       super.onCreate(savedInstanceState);
       setContentView(R.layout.activity_main);
       backward = findViewById(R.id.Backwardbtn);
       forward = findViewById(R.id.Forwardbtn);
       play = findViewById(R.id.Playbtn);
       pause = findViewById(R.id.Pausebtn);
       song = findViewById(R.id.txtSname);
       start = findViewById(R.id.StartTimebtn);
       song_time = findViewById(R.id.Song_t_txtview);
       song.setText("Mauja hi mauja");
       mPlayer = MediaPlayer.create(this, R.raw.maujahimauja);
       Progress = findViewById(R.id.seek_Bar);
       Progress.setClickable(false);
       pause.setEnabled(false);

       play.setOnClickListener(new View.OnClickListener() {
           @Override
           public void onClick(View v) {
               Toast.makeText(MainActivity.this, "Song Started...", Toast.LENGTH_SHORT).show();
               mPlayer.start();
               e_Time = mPlayer.getDuration();
               s_Time = mPlayer.getCurrentPosition();
               if (o_Time == 0) {
                   Progress.setMax(e_Time);
                   o_Time = 1;
               }
               song_time.setText(String.format("%d min, %d sec", TimeUnit.MILLISECONDS.toMinutes(e_Time), TimeUnit.MILLISECONDS.toSeconds(e_Time) - TimeUnit.MINUTES.toSeconds(TimeUnit.MILLISECONDS.toMinutes(e_Time))));
               start.setText(String.format("%d min, %d sec", TimeUnit.MILLISECONDS.toMinutes(s_Time), TimeUnit.MILLISECONDS.toSeconds(s_Time) - TimeUnit.MINUTES.toSeconds(TimeUnit.MILLISECONDS.toMinutes(s_Time))));
               Progress.setProgress(s_Time);
               handle.postDelayed(UpdateSongTime, 100);
               pause.setEnabled(true);
               play.setEnabled(false);
           }
       });
       pause.setOnClickListener(new View.OnClickListener() {
           @Override
           public void onClick(View v) {
               mPlayer.pause();
               pause.setEnabled(false);
               play.setEnabled(true);
               Toast.makeText(getApplicationContext(), "Song Paused...", Toast.LENGTH_LONG).show();
           }
       });
       forward.setOnClickListener(new View.OnClickListener() {
           @Override
           public void onClick(View v) {
               if ((s_Time + f_Time) <= e_Time) {
                   s_Time = s_Time + f_Time;
                   mPlayer.seekTo(s_Time);
               } else {
                   Toast.makeText(getApplicationContext(), "Song Over", Toast.LENGTH_LONG).show();
               }
               if (!play.isEnabled()) {
                   play.setEnabled(true);
               }
           }
       });
       backward.setOnClickListener(new View.OnClickListener() {
           @Override
           public void onClick(View v) {
               if ((s_Time - b_Time) > 0) {
                   s_Time = s_Time - b_Time;
                   mPlayer.seekTo(s_Time);
               } else {
                   Toast.makeText(getApplicationContext(), "Song not started yet...", Toast.LENGTH_LONG).show();
               }
               if (!play.isEnabled()) {
                   play.setEnabled(true);
               }
           }
       });
   }
}
4. Now after writing the code, we will run the application.
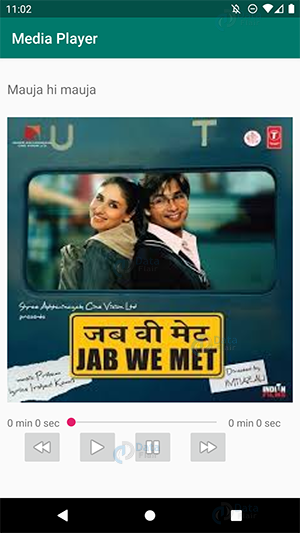
i) This is the application
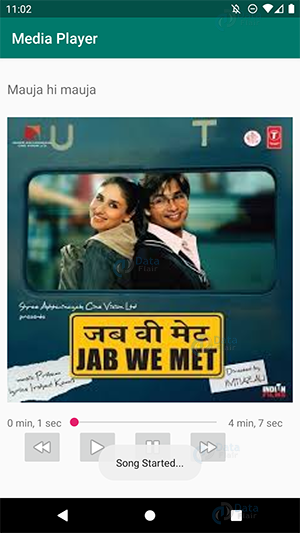
ii) Now we will start the song.
iii) We can stop the song anytime we want by pressing the pause button.

Summary
In this article, we have learned what is an Android Media player. We also saw how we can implement Media Player in Android application. I have implemented it and shown you how to do it, now it is your turn to do the same for your application. We will catch up in the next article.
I hope you liked DataFlair’s Android Media Player article. Do refer our sidebar for more Android Tutorials.
Your opinion matters
Please write your valuable feedback about DataFlair on Google


java.lang.NullPointerException: Attempt to invoke virtual method ‘void android.media.MediaPlayer.start()’ on a null object reference