Android Drag and Drop – Time to get your data on the move
FREE Online Courses: Click, Learn, Succeed, Start Now!
Android Drag and Drop framework allows the users to move data from one view to another view. This operation starts when the user makes some gestures as a signal for dragging some data. When the gesture is detected, the system uses the drag events to drag event listener objects and drag callback methods associated with the view objects in the layout. Once the user stops dragging the item, the system ends the drag operation.
Uses of this feature are:
- For dragging the data and items from one place to another.
- For making games.
- Android Drag and drop color mixing.
Components of Android Drag and Drop
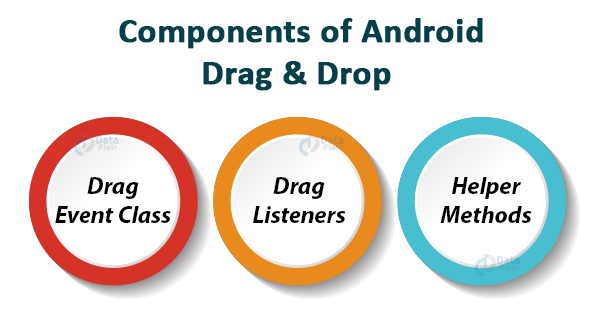
This framework consists of three important components for android drag and drop functionality:
- Drag Event Class
- Drag Listeners
- Helper Methods
Now we will go through this android drag and drop components one by one:
1. DragEvent Class
This class represents an event that is used every time a drag and drop operation takes place. This class provides some methods and constants which are important during this process.
2. Drag Listeners
Every time a view responds to the Drag event it either implements View.OnDragListener or overrides a onDragEvent() callback method. The system passes a DragEvent object when the system calls the Listener. A single View can have a listener and a callback method at the same time. When a view has both, it first calls the listener and later defines the callback method until it returns true.
3. Helper Methods
For the data that is being moved, we create ClipData and ClipData.Item. The ClipData object is supplied with MetaData. This metadata is stored in ClipDescription object within the ClipData. We can use Null instead of an object if we do not want to show the movement of the data.
After this, to create shadow, we can extend View.DragShadowBuilder or directly we can use the same for default drag shadow.
Stages of Android Drag and Drop
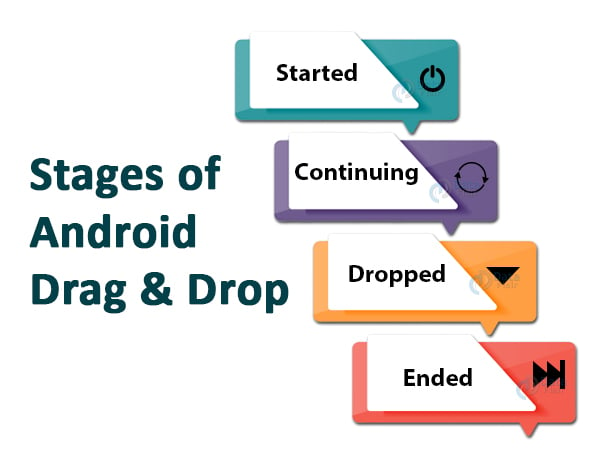
Android Drag and Drop works in four stages that are:
1. Started
When the user is about to begin a Drag, the application calls startDrag() to inform the system about the same. This argument provides the data, the metadata and a callback method to show the moving of data. The system calls back to the application to get a drag shadow & displays it on the device.
After this, the system sends the event action to event listeners for all the View objects in the current layout. The action is ACTION_DRAG_STARTED. To continue to receive the drag event, the Drag Event listener returns true. If the event listener returns false, it will not receive drag events.
2. Continuing
When the EvenListener returns a true value, the application starts dragging the data. When it is in a continuing state, the application has started the drag process. The listener can alter the appearance of the View object. For example, if drag shadow has entered the bounding box of the View, the listener can highlight its View. The action here would be ACTION_DRAG_ENTERED.
3. Dropped
If the user releases the “Drag shadow” in a bounding box that can accept the data, it is said to be dropped. To drop the data in the View, its listener receives a drag event ACTION_DROP.
This Dropped state only occurs when the data is released in the Bounding box of View whose listener is registered to receive the Drag Event. Otherwise, ACTION_DROP doesn’t work.
4. Ended
After the user releases the drag shadow, the system releases a drag event with action ACTION_DRAG_ENDED. It indicates that the drag operation is over. It is done regardless of the place the drag shadow is released.
Drag Event Actions
In the form of DragEvent object, the system sends the following six types of actions for the DragEvent object-0
| ACTION_TYPE | MEANING |
| ACTION_DRAG_STARTED | This event action is received, after the application calls startDrag(). |
| ACTION_DRAG_ENTERED | This action is received after the data enters in the Bounding Box of View. |
| ACTION_DRAG_LOCATION | This is received when the dragging takes place from one position to the other. |
| ACTION_DRAG_EXITED | This is for when ACTION_DRAG_LOCATION and ACTION_DRAG_ENTERED are received and the item moves outside the bounding box of the View. |
| ACTION_DROP | This action is for the release of the Data Item by the user. |
| ACTION_DROP_ENDED | The Drop Ended action is used when the user has released the Data Item and it has ended. |
The Drag Event Methods
| Event Methods | Their Events |
| int getAction() | This method checks the action of the Event |
| ClipData getClipData() | This method returns the ClipData object sent to the System, that was part of startDrag() |
| ClipDescription getClipDescription() | It returns ClipDescription that is there in the ClipData |
| float getX() | It takes the X coordinate of the Drag Point |
| float getY() | It takes the Y coordinate of the Drag Point |
| boolean getResult() | It returns the result of the operation in the form of Flag. |
| String toString() | Returns the String representation of the DragEvent Objects |
The Drag Event Listeners and Callback Methods
A View can receive DragEvent in either of the following two ways:
- Using Event Listeners – for this, the DragEventListener implements View.onDragListener.
- Using CallBack Methods – for this, it uses onDragEvent(DragEvent) callback method.
In both cases, the system passes a DragEvent object to them. We can also use them both at the same time. In this case, first, the system is called and next, the callback method is implemented.
The combination of both these is analogous to the combination of onTouchEvent() and View.onTouchListener for touch events.
The Drag Shadow
When the user drags an item from one place to another, the dragging actually takes place. To show the movement of the data item, we use Drag Shadow that shows data movement.
To create a drag shadow, we will declare View.DragShadowBuilder object, and pass it to the system. The View.DragShadowBuilder class has two constructors:
- View.DragShadowBuilder() – This constructor creates a Drag Shadow that is Invisible and doesn’t show the movement to the users.
- View.DragShadowBuilder(View) – This constructor creates a Drag Shadow that is visible to the users and shows the movement to the users.
Implementation of Android Drag and Drop
We will now see how to implement this interactive Android Drag and Drop feature:
Step 1. First of all, we will create and name a new project.
Step 2. Open activity_main.xml and write the code below:
<?xml version="1.0" encoding="utf-8"?>
<LinearLayout xmlns:android="http://schemas.android.com/apk/res/android"
   android:layout_width="match_parent"
   android:layout_height="match_parent">
//Here we’ll define the layout of the Activity
   <LinearLayout
       android:id="@+id/layout1"
       android:layout_width="match_parent"
       android:layout_height="match_parent"
       android:layout_weight="1"
       android:background="#E49E83"
       android:gravity="center"
       android:orientation="vertical">

       <Button //This is the draggable Button for Yes
           android:id="@+id/lbl"
           android:layout_width="wrap_content"
           android:layout_height="wrap_content"
           android:text="YES"
           android:textSize="20sp" />

       <Button//This is the draggable Button for No
           android:id="@+id/btnDrag"
           android:layout_width="wrap_content"
           android:layout_height="wrap_content"
           android:text="NO"
           android:textSize="20sp" />

       <TextView
           android:id="@+id/textView3"
           android:layout_width="match_parent"
           android:layout_height="wrap_content"
           android:layout_marginLeft="10dp"
           android:layout_marginTop="-300dp"
           android:fontFamily="@font/almendra_bold"
           android:text="Are you enjoying ?"
           android:textSize="30dp" />
   </LinearLayout>

   <LinearLayout
       android:id="@+id/layout2"
       android:layout_width="match_parent"
       android:layout_height="match_parent"
       android:layout_weight="1"
       android:background="#8ED3EB"
       android:gravity="center"
       android:orientation="vertical" >

       <TextView
           android:id="@+id/textView4"
           android:layout_width="match_parent"
           android:layout_height="wrap_content"
           android:layout_marginLeft="10dp"
           android:layout_marginTop="-40dp"
           android:fontFamily="@font/almendra_bold"
           android:text="Please drag your answer here" />
   </LinearLayout>

</LinearLayout>
Step 3: Now write the following code in MainActivity.java:
package com.DataFlair.dataflairdragdrop;

import android.content.ClipData;
import android.content.ClipDescription;
import android.graphics.Color;
import android.graphics.PorterDuff;
import android.os.Bundle;
import android.util.Log;
import android.view.DragEvent;
import android.view.View;
import android.view.ViewGroup;
import android.widget.Button;
import android.widget.LinearLayout;
import android.widget.Toast;
import androidx.appcompat.app.AppCompatActivity;
//implementing the OnDragListener nd OnClickListener
public class MainActivity extends AppCompatActivity implements View.OnDragListener, View.OnLongClickListener {
   @Override
   protected void onCreate(Bundle savedInstanceState) {
       super.onCreate(savedInstanceState);
       setContentView(R.layout.activity_main);

       Button btn1 = (Button) findViewById(R.id.lbl);
       btn1.setTag("DRAGGABLE BUTTON 1");
       btn1.setOnLongClickListener(this);

       Button btn2 = (Button) findViewById(R.id.btnDrag);
       btn2.setTag("DRAGGABLE BUTTON 2");
       btn2.setOnLongClickListener(this);

       findViewById(R.id.layout1).setOnDragListener(this);
       findViewById(R.id.layout2).setOnDragListener(this);
   }
//It will create the dragShadow on long press for the item that is draggable.
   @Override
   public boolean onLongClick(View v) {
       ClipData.Item item = new ClipData.Item((CharSequence) v.getTag());
       String[] mimeTypes = {ClipDescription.MIMETYPE_TEXT_PLAIN};
       ClipData data = new ClipData(v.getTag().toString(), mimeTypes, item);
       View.DragShadowBuilder dragshadow = new View.DragShadowBuilder(v);
       v.startDrag(data, dragshadow,v,0);
       return true;
   }
//The following method will be used to execute the Drag and Drop action
   @Override
   public boolean onDrag(View v, DragEvent event) {
       int action = event.getAction();
       switch (action) {
           case DragEvent.ACTION_DRAG_STARTED:
               if (event.getClipDescription().hasMimeType(ClipDescription.MIMETYPE_TEXT_PLAIN)) {
                   return true;
               }
               return false;
           case DragEvent.ACTION_DRAG_ENTERED:
               v.getBackground().setColorFilter(Color.GRAY, PorterDuff.Mode.SRC_IN);
               v.invalidate();
               return true;
           case DragEvent.ACTION_DRAG_LOCATION: // this will show the location of the item that is being dragged
              return true;
           case DragEvent.ACTION_DRAG_EXITED: //The Drag has been exited
               v.getBackground().clearColorFilter();
               v.invalidate();
               return true;
           case DragEvent.ACTION_DROP: // The item will be Dropped
               ClipData.Item item = event.getClipData().getItemAt(0);
               String dragData = item.getText().toString();
               Toast.makeText(this, "Dragged data is " + dragData, Toast.LENGTH_SHORT).show();
               v.getBackground().clearColorFilter();
               v.invalidate();
               View vw = (View) event.getLocalState();
               ViewGroup owner = (ViewGroup) vw.getParent();
               owner.removeView(vw);
               LinearLayout container = (LinearLayout) v;
               container.addView(vw);
               vw.setVisibility(View.VISIBLE);
               return true;
           case DragEvent.ACTION_DRAG_ENDED: // It’ll show that the Drag has Ended
               v.getBackground().clearColorFilter();
               v.invalidate();
               if (event.getResult())
                   Toast.makeText(this, "The drop was handled.", Toast.LENGTH_SHORT).show();
               else
                   Toast.makeText(this, "The drop didn't work.", Toast.LENGTH_SHORT).show();
               return true;
           default:
               Log.e("DragDrop Example", "Unknown action type received by OnDragListener.");
               break;
       }
       return false;
   }
}
Step 4: In this step, we will update the color.xml file as below:
<?xml version="1.0" encoding="utf-8"?>
<resources>
// In this we’ll add the color codes that we’ve used
   <color name="colorPrimary">#425DA5</color>
   <color name="colorPrimaryDark">#3B4494</color>
   <color name="colorAccent">#310C19</color>
</resources>
Step 5: After writing all the codes, we will finally execute it. Then the following would be your output: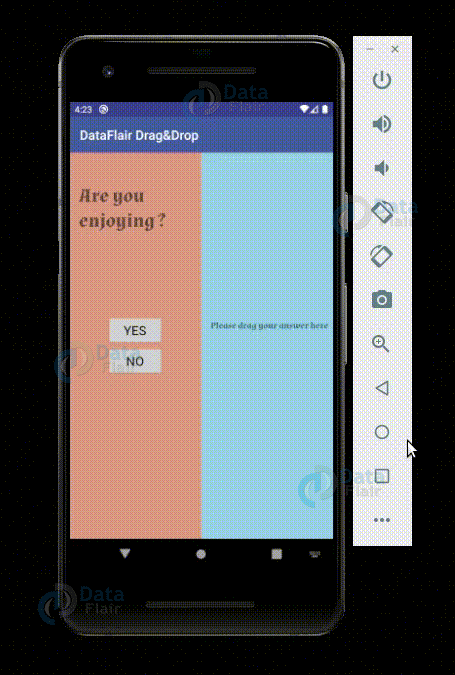
Summary
In this article, we have learned about the Drag and Drop feature of Android. We have also seen how it works, along with its components. Also, we saw its example and how we can implement it in Android Studio. Now it is your turn to implement it.
Know more about Android Studio with DataFlair.
I hope you liked DataFlair’s android drag and drop article. If you want more articles on android, do let us know in the comment section.
Happy Learning😃
Did you know we work 24x7 to provide you best tutorials
Please encourage us - write a review on Google

