Android Animations – How to make your Android App attractive?
FREE Online Courses: Your Passport to Excellence - Start Now
In Android, we have the ability to make Animations. The animation is a process in which pictures are manipulated to appear as if they are moving. It creates moving images or shapes that are in motion. Animations are useful for the changes in UI state when new actions take place. Android Animations adds a new look to the application and gives them a new feel and quality.
Learn to build your first Android App with DataFlair.
Ways to Animate User-Interface Components
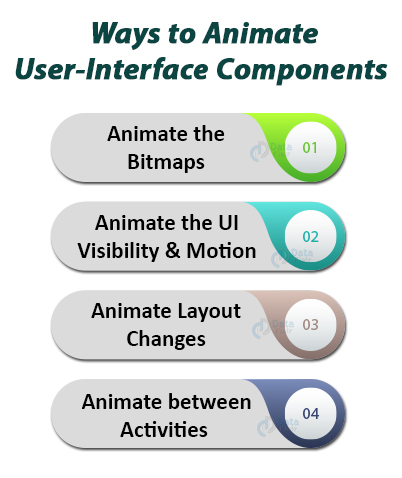
Now, in Android Animations, let’s see the different ways to animate user-interface components.
1. Animate the Bitmaps
If we want to get the bitmaps in motion, we can easily get them. We can animate the bitmaps such as icons, using drawable animation APIs. We define them statically using a drawable resource, but it can also be defined at runtime.
2. Animate the UI Visibility and Motion
Using Android animations, we can bring some changes in Visibility or position of views in a layout. To move, hide or show views within a layout, we can use the property animation system by android.animation package. This will update the properties of the view that we want to bring change in.
For this, we can enable android animations on our layout to create animations at ease.
3. Animate Layout Changes
We can apply android animations in the Layouts as well. For this, we would have to specify the starting and ending of the layout and the type of Android Animation that we want. The system will then find and execute the animation between the two layouts.
Now for this, we will store the starting and the ending of the layout in a Scene. The starting scene is usually automatically determined from the current layout. Then we will create a Transition to tell the system the required type of animation. After that, we will call TransitionManager.go() and the system then runs the Animation.
4. Animate between Activities
We can provide animation between the activities of an application. So, we can add android animations that are showing some transition from one activity to another.
For this, we will call startActivity() & pass some options provided by ActivityOptions.makeSceneTransitionAnimation(). This may include the views shared between the activities so that transition can connect them during the animation.
Tween Animation in Android
Tween Animation is basically used to make a GUI of the Activity or Application more interactive and happening. It is basically an animation that translates, rotates, and scales any type of view in Android. Tween animation takes some parameters such as values, times, duration, size, etc and performs the required animation on that object. It applies to all types of objects.
In order to perform this animation, we will call static function loadAnimation() of AnimationUtils. The syntax is:
Animation myanimation = AnimationUtils.loadAnimation(getApplicationContext(), R.anim.this_animation);
To apply animation to an object, we call startAnimation() method of the object, as follows:
TextView text = (TextView)findViewById(R.id.tv1);
text.startAnimation(animation);
This Animation class has the following functions that are very useful:
| Method | Description |
| start() | It starts the animation |
| setDuration(long duration) | It sets the time duration of the animation |
| getDuration() | It gets the method to be set by the above. |
| end() | It ends the animation that was started |
| cancel() | It cancels the working of animation |
Interpolator in Android
An interpolator by name means to alter, intercept or insert between two things. Similarly, Interpolator applies some additional effects between the start() and the end() values of a property of an object. It also defines the rate of change in animation.
Types of Interpolators in Android
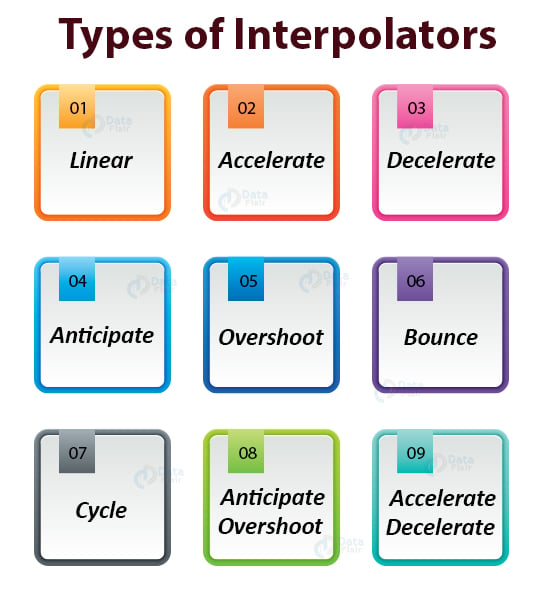
Interpolators can be of 9 types as shown in the following:
1. Linear Interpolator – It is the default interpolator of all android animations. It states that the rate of change is constant.
2. Accelerate Interpolator – It accelerates the movement of a view. It starts slowly and accelerates gradually.
3. Decelerate Interpolator – It does the reverse of an accelerator and decreases the speed gradually.
4. Anticipate Interpolator – It moves the animation backward prior to its start.
5. Overshoot Interpolator – It does the reverse of Anticipate interpolator.
6. Bounce Interpolator – It gives a bouncing view to the animation.
7. Cycle Interpolator – It repeats the animations for a number of cycles.
8. Anticipate Overshoot Interpolator – It combines both the Anticipate and overshoot interpolators.
9. Accelerate Decelerate Interpolator – It keeps the animation slow in the beginning and fast in the middle. It again slows it down at the end.
Implementation of Android Animations
Step 1: First of all we will create a new project and name it.
After that, we will create the layout of our application, in the acitvity_main.xml file.
<?xml version="1.0" encoding="utf-8"?>
<RelativeLayout
   xmlns:android="http://schemas.android.com/apk/res/android"
   xmlns:tools="http://schemas.android.com/tools"
   android:layout_width="match_parent"
   android:layout_height="match_parent"
   tools:context=".MainActivity">

   <TextView
       android:id="@+id/tV1"
       android:layout_width="wrap_content"
       android:layout_height="wrap_content"
       android:layout_centerHorizontal="true"
       android:layout_marginLeft="90dp"
       android:layout_marginTop="40dp"
       android:fontFamily="@font/aclonica"
       android:text="DataFlair "
       android:textColor="@color/colorPrimaryDark"
       android:textSize="50dp" />


   <ImageView
       android:id="@+id/imageView"
       android:layout_width="89dp"
       android:layout_height="124dp"
       android:layout_centerHorizontal="true"
       android:layout_marginLeft="-19dp"
       android:layout_marginTop="130dp"
       android:layout_marginRight="19dp"
       android:src="@drawable/ic_android" />

   <Button
       android:id="@+id/button"
       android:layout_width="wrap_content"
       android:layout_height="wrap_content"
       android:layout_below="@id/imageView"
       android:layout_marginLeft="150dp"
       android:layout_marginTop="78dp"
       android:background="@android:color/white"
       android:onClick="zoom"
       android:text="zoom"
       android:textColor="@android:color/black" />

   <Button
       android:id="@+id/button2"
       android:layout_width="wrap_content"
       android:layout_height="wrap_content"
       android:layout_below="@id/imageView"
       android:layout_marginLeft="150dp"
       android:layout_marginTop="21dp"
       android:background="@android:color/white"
       android:onClick="rotate"
       android:text="rotate"
       android:textColor="@android:color/black" />

   <Button
       android:id="@+id/button3"
       android:layout_width="wrap_content"
       android:layout_height="wrap_content"
       android:layout_below="@id/imageView"
       android:layout_marginLeft="150dp"
       android:layout_marginTop="137dp"
       android:background="@android:color/white"
       android:onClick="fade"
       android:text="fade"
       android:textColor="@android:color/black" />

   <Button
       android:layout_width="wrap_content"
       android:layout_height="wrap_content"
       android:layout_below="@id/imageView"
       android:layout_marginLeft="150dp"
       android:layout_marginTop="203dp"
       android:background="@android:color/white"
       android:onClick="blink"
       android:text="blink"
       android:textColor="@android:color/black" />

   <Button
       android:id="@+id/button5"
       android:layout_width="wrap_content"
       android:layout_height="wrap_content"
       android:layout_below="@id/imageView"
       android:layout_marginLeft="150dp"
       android:layout_marginTop="260dp"
       android:background="@android:color/white"
       android:onClick="move"
       android:text="move"
       android:textColor="@android:color/black" />

   <Button
       android:id="@+id/button6"
       android:layout_width="wrap_content"
       android:layout_height="wrap_content"
       android:layout_below="@id/imageView"
       android:layout_marginLeft="150dp"
       android:layout_marginTop="321dp"
       android:onClick="slide"
       android:text="slide"
       android:background="@android:color/white"
       android:textColor="@android:color/black" />

</RelativeLayout>
Step 2: Then we will write code for MainAcitivty.java file.
package com.DataFlair.myanime;
import android.app.Activity;
import android.os.Bundle;
import android.view.View;
import android.view.animation.Animation;
import android.view.animation.AnimationUtils;
import android.widget.ImageView;

public class MainActivity extends Activity {
   @Override
   protected void onCreate(Bundle savedInstanceState) {
       super.onCreate(savedInstanceState);
       setContentView(R.layout.activity_main);
   }

   public void zoom(View view){
       ImageView image = (ImageView)findViewById(R.id.imageView);
       Animation animation = AnimationUtils.loadAnimation(getApplicationContext(),
               R.anim.myanimation);
       image.startAnimation(animation);
   }

   public void rotate(View view){
       ImageView image = (ImageView)findViewById(R.id.imageView);
       Animation animation1 =                AnimationUtils.loadAnimation(getApplicationContext(),
               R.anim.clockwise);
       image.startAnimation(animation1);
   }

   public void fade(View view){
       ImageView image = (ImageView)findViewById(R.id.imageView);
       Animation animation1 =
               AnimationUtils.loadAnimation(getApplicationContext(),
                       R.anim.fade);
       image.startAnimation(animation1);
   }

   public void blink(View view){
       ImageView image = (ImageView)findViewById(R.id.imageView);
       Animation animation1 =
               AnimationUtils.loadAnimation(getApplicationContext(),
                       R.anim.blink);
       image.startAnimation(animation1);
   }

   public void move(View view){
       ImageView image = (ImageView)findViewById(R.id.imageView);
       Animation animation1 =
               AnimationUtils.loadAnimation(getApplicationContext(), R.anim.move);
       image.startAnimation(animation1);
   }

   public void slide(View view){
       ImageView image = (ImageView)findViewById(R.id.imageView);
       Animation animation1 =
               AnimationUtils.loadAnimation(getApplicationContext(), R.anim.slide);
       image.startAnimation(animation1);
   }
}
Step 3: Now we will write codes for zoom, rotate, slide, etc. in res/anim/ files:
- res/anim/zoom
<set xmlns:android="http://schemas.android.com/apk/res/android">

   <scale xmlns:android="http://schemas.android.com/apk/res/android"
       android:fromXScale="0.5"
       android:toXScale="3.0"
       android:fromYScale="0.5"
       android:toYScale="3.0"
       android:duration="6000"
       android:pivotX="50%"
       android:pivotY="50%" >
   </scale>

   <scale xmlns:android="http://schemas.android.com/apk/res/android"
       android:startOffset="6000"
       android:fromXScale="3.0"
       android:toXScale="0.5"
       android:fromYScale="3.0"
       android:toYScale="0.5"
       android:duration="6000"
       android:pivotX="50%"
       android:pivotY="50%" >
   </scale>

</set>- res/anim/slide
<?xml version="1.0" encoding="utf-8"?>
<set xmlns:android="http://schemas.android.com/apk/res/android"
android:fillAfter="true" >

   <scale
       android:duration="800"
       android:fromXScale="1.0"
       android:fromYScale="1.0"
       android:interpolator="@android:anim/linear_interpolator"
       android:toXScale="1.0"
       android:toYScale="0.0" />
</set>- res/anim/rotate
<?xml version="1.0" encoding="utf-8"?>
<set xmlns:android="http://schemas.android.com/apk/res/android">

   <rotate xmlns:android="http://schemas.android.com/apk/res/android"
       android:fromDegrees="0"
       android:toDegrees="360"
       android:pivotX="50%"
       android:pivotY="50%"
       android:duration="2000" >
   </rotate>

   <rotate xmlns:android="http://schemas.android.com/apk/res/android"
       android:startOffset="5000"
       android:fromDegrees="360"
       android:toDegrees="0"
       android:pivotX="50%"
       android:pivotY="50%"
       android:duration="2000" >
   </rotate>

</set>- res/anim/fade
<?xml version="1.0" encoding="utf-8"?>
<set xmlns:android="http://schemas.android.com/apk/res/android"
   android:interpolator="@android:anim/accelerate_interpolator" >

   <alpha
       android:fromAlpha="0"
       android:toAlpha="1"
       android:duration="3000" >
   </alpha>

   <alpha
       android:startOffset="2000"
       android:fromAlpha="1"
       android:toAlpha="0"
       android:duration="3000" >
   </alpha>

</set>- res/anim/blink
<?xml version="1.0" encoding="utf-8"?>
<set xmlns:android="http://schemas.android.com/apk/res/android">
   <alpha android:fromAlpha="0.0"
       android:toAlpha="1.0"
       android:interpolator="@android:anim/accelerate_interpolator"
       android:duration="600"
       android:repeatMode="reverse"
       android:repeatCount="infinite"/>
</set>- res/anim/move
<?xml version="1.0" encoding="utf-8"?>
<set
   xmlns:android="http://schemas.android.com/apk/res/android"
   android:interpolator="@android:anim/linear_interpolator"
   android:fillAfter="true">

   <translate
       android:fromXDelta="0%p"
       android:toXDelta="75%p"
       android:duration="2000" />
</set>
Step 5: After we run the app we will see the following in the output:
Summary
So in this article, we have learned the different kinds of android animations that can be provided in an application. And we have seen the methods that are required for it. Other than that we also read various types of android Animations and where they can be applied. At the end, we also implemented it in our application as well. That was all for this article.
If you have any queries in DataFlair’s Android Animations article, mention them in the comment section. We will be happy to help you.
Happy Learning😃
Did you like this article? If Yes, please give DataFlair 5 Stars on Google

