Real-time Pedestrian Detection using Python & OpenCV
Free Machine Learning courses with 130+ real-time projects Start Now!!
Pedestrian detection or in simpler terms person detection in streets and footpaths is an essential part of some very prominent tasks. Tasks such as intelligent video surveillance, traffic control systems, and the mighty AI in self-autonomous vehicles that are completely self-driving or just obstacle avoidance and automatic braking systems.
Robots are also capable of using these computer vision techniques for handling the way they interact with the environment.
There are several methods for tackling this problem: using digital cameras, using infrared or heat sensing sensors, TOF or time of flight sensor, etc. All of these work by collecting data about the surroundings and then predict or estimate where a person’s location is with respect to the sensor. The way that data collection takes place by different sensors is what differentiates the methods.
About Python Pedestrian Detection
There have been notable rise of interest in human detection, object detection in general because of its use in several fields.
Out of all the available methods, we are gonna use images / videos from a camera for our task of pedestrian detection, because these are abundant everywhere and mostly available for our use case. Like there are security cameras on streets, cars are being equipped with parking cameras and cameras all around them nowadays. It is a fairly easy system to build, cost-effective, and with satisfactory speed and accuracy.
In this project, we are going to use a pre-trained machine learning model for detecting people / pedestrian from a video feed, using either a webcam or video file. The pre-trained model that we are going to use for this task is the yolov4-tiny. We are not going to train a model from scratch as obviously we will not be able to match the speed and accuracy of a sota pre-trained model, which is very important in such tasks. Also, the yolo models are available freely for all kinds of tasks including academic, research, and commercial use. So we need not worry about any violation.
The model and its cfg file can be downloaded from the below downloads section.
Yolov4-tiny is the fourth version of the famous You Only Look Once (YOLO) model, stripped down compressed version for prioritizing speed over accuracy. Yolo was developed by Joseph Redmon as one of the best real-time object detection models.
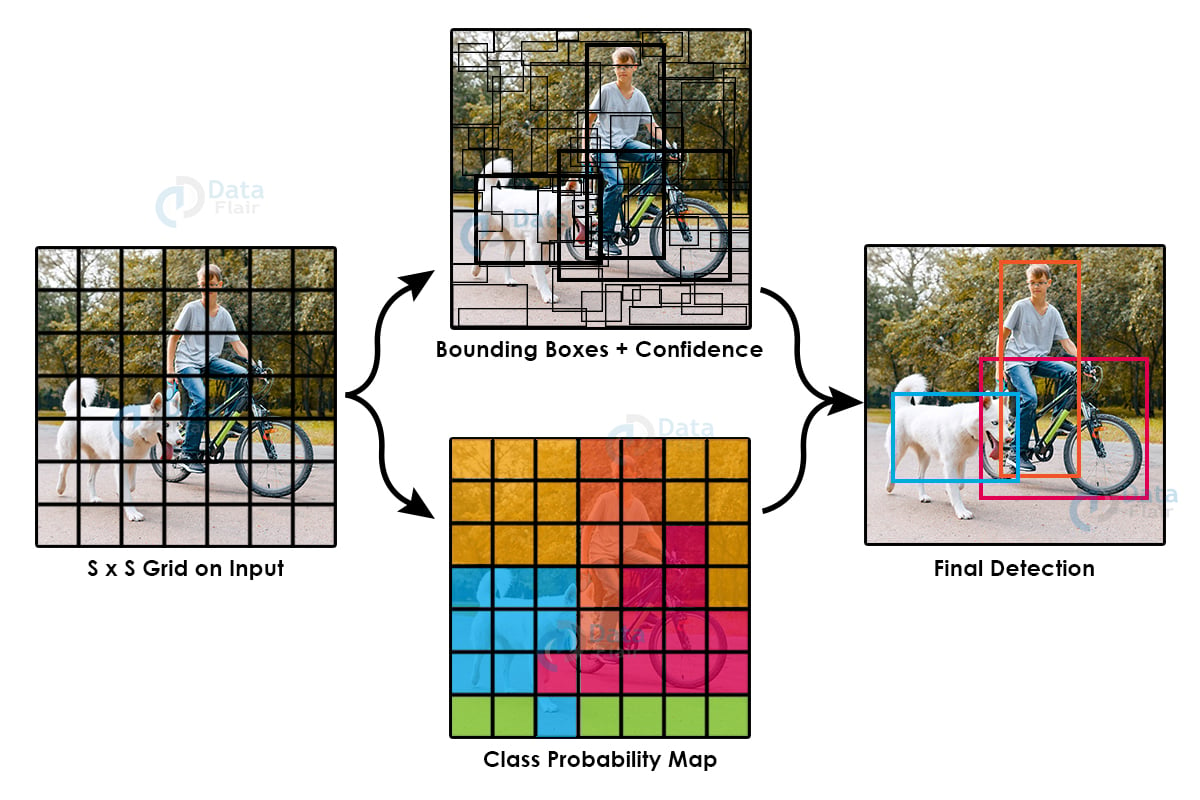
Prior to Yolo, most models calculated high scoring regions using localizers and classifiers, applying them at multiple scales and locations on an image. The high scoring regions marked as predictions. Yolo on the other hand sees the whole image at once hence the name yolo, applying a single neural network to the entire image, dividing it into boxes or regions and then calculating probabilities for each region. Because the image looked at by the model all at once, it is pretty fast and retains global context.
Yolov4-tiny trained on 29 pre-trained convolutional layers and is almost eight times faster than normal yolov4 that has 129 pre-trained convolutional layers.
We tried this with some different models as well like yolov3 and the mobilenetssd, resnet models. Although mobilenetssd gave better speed but lacked accuracy; Resnet was neither as accurate nor fast, yolov3 was accurate but slow, yolov3-tiny was as fast but lacked accuracy. So yolov4-tiny turned out to be the perfect choice.
Download Pedestrian Detection Project Code and Pre-trained Model
Please download the source code of pedestrian detection in python & opencv along with yolov4-tiny pre-trained model: Pedestrian Detection Machine Learning Project
Steps to Develop Pedestrian Detection using Python & OpenCV
1. Import the necessary packages
- Numpy is used for all data storing, retrieving from the model, and working with it.
- Opencv is used to read frames from our video file or our webcam feed, resize and reshape it according to the model requirement. It also provides the dnn module which we will use to work with our deep neural network model. Also draw the bounding boxes on the image and show it back to the user.
- Os for working with files reading paths and stuff.
- Imutils is another great library for performing different actions on images. It acts as a helper library providing some very useful functions to opencv which already is a vast library.
import numpy as np
import cv2
import os
import imutils
Declaring some threshold variables that we will use later. Nms threshold is the threshold for separating overlapping predictions, more about nms ahead. Min confidence is the threshold for confidence score returned by the model above which a prediction is considered true.
NMS_THRESHOLD=0.3
MIN_CONFIDENCE=0.2
2. Pedestrian Detection Function
Now we define the most important function that we will use for pedestrian detection. It takes the image frame by frame from opencv either from a webcam or video file, the model, output layer name from which we will get output, and a variable personidz.
We get the dimensions of the frame passed and initialize an array that will hold the result from the model.
def pedestrian_detection(image, model, layer_name, personidz=0):
  (H, W) = image.shape[:2]
  results = []
Construct a blob with the frame we received and then pass it to the yolo model performing a forward pass, which will return the bounding box for the detections and the confidence scores for each. Model.forward will return the output from the layer that was passed to it, ie: the output layer.
blob = cv2.dnn.blobFromImage(image, 1 / 255.0, (416, 416),
  swapRB=True, crop=False)
model.setInput(blob)
layerOutputs = model.forward(layer_name)
Create arrays for holding the resulting bounding box, centroid, and confidence associated with.
boxes = []
centroids = []
confidences = []
LayerOutputs is a list of lists containing outputs. Each list in layer output contains details about single prediction like its bounding box confidence etc. So together all the predictions are in the form of a list of lists, we loop through it.
for output in layerOutputs:
  for detection in output:
From the individual detection we get the scores for all the predictions, classid and confidence for the class id with maximum score.
scores = detection[5:]
classID = np.argmax(scores)
confidence = scores[classID]
3. Getting the Detection
Now we need to get the detection that we need. The class id for detecting a person is 0 in yolo format, so we check that and also that the confidence is above the threshold so that we don’t use false positives.
Yolo returns the centroid of the bounding box with the height and width of the box instead of the top-left coordinate of the box.
if classID == personidz and confidence > MIN_CONFIDENCE:
  box = detection[0:4] * np.array([W, H, W, H])
  (centerX, centerY, width, height) = box.astype("int")
Now because we don’t have the top right coordinate of the bounding box we will calculate that by subtracting half of the width and height from centroid x and centroid y point respectively.
Now that we have all the things that we need we will add them to the lists that we created earlier.
x = int(centerX - (width / 2))
y = int(centerY - (height / 2))
boxes.append([x, y, int(width), int(height)])
centroids.append((centerX, centerY))
confidences.append(float(confidence))
Out of the loop here we do nms or non maxima suppression to remove overlapping and weak bounding boxes. Because neighboring windows of the actual detection also contain high scores, hundreds of predictions pop up that we need to clean. We use the opencv’s dnn module provided nmsboxes function for this
idzs = cv2.dnn.NMSBoxes(boxes, confidences, MIN_CONFIDENCE, NMS_THRESHOLD)
Check if we have any detection, and loop through it. Extract the bounding box coordinates, the width, and height and add all the details to our results list that we created earlier. Finally, return that list and end the function.
if len(idzs) > 0:
  for i in idzs.flatten():
    (x, y) = (boxes[i][0], boxes[i][1])
    (w, h) = (boxes[i][2], boxes[i][3])

    res = (confidences[i], (x, y, x + w, y + h), centroids[i])
    results.append(res)
return results
Here we load the labels that the model was trained on. It has 80 class labels in coco.names file and coco format. Set the path to weights and cfg file for our model. Remember that these are relative paths, and in this case because the files are in the same folder we just use the name as paths.
Now we load the model using opencvdnn module into the model variable.
labelsPath = "coco.names"
LABELS = open(labelsPath).read().strip().split("\n")
weights_path = "yolov4-tiny.weights"
config_path = "yolov4-tiny.cfg"

model = cv2.dnn.readNetFromDarknet(config_path, weights_path)
If your Opencvdnn compiled with cuda and you want to run this on the GPU uncomment these lines to use cuda enabled GPUs.
'''
model.setPreferableBackend(cv2.dnn.DNN_BACKEND_CUDA)
model.setPreferableTarget(cv2.dnn.DNN_TARGET_CUDA)
'''
We need the name of the last layer of deep learning to get the output from it. After this, initialize the videocapture from opencv. If you want to use the webcam pass 0 instead of the filename to the videocapture function.
layer_name = model.getLayerNames()
layer_name = [layer_name[i[0] - 1] for i in model.getUnconnectedOutLayers()]

cap = cv2.VideoCapture("streetup.mp4")
writer = None
4. Reading the frames and processing it
Now, start an infinite loop, and read the frames from videocapture. If the frames end, ie: video ends we break the infinite loop.
Resize the image according to requirements without changing the aspect ratio of the image with imutils resize function.
Pass the image model output layer name, and classid for label person to the pedestrian_detection function we created.
while True:
  (grabbed, image) = cap.read()
  if not grabbed:
    break
  image = imutils.resize(image, width=700)
  results = pedestrian_detection(image, model, layer_name,
    personidz=LABELS.index("person"))
Getting back the results from the function we loop through it, and draw the bounding box rectangles on the predictions and show it to the user. We capture the esc key press with the waitkey function from opencv and break the loop. Finally releasing the capture and closing all windows.
  for res in results:
    cv2.rectangle(image, (res[1][0],res[1][1]), (res[1][2],res[1][3]), (0, 255, 0), 2)

  cv2.imshow("Detection",image)

  key = cv2.waitKey(1)
  if key == 27:
    break

cap.release()
cv2.destroyAllWindows()
Python – OpenCV Pedestrian Detection Output
Summary
We have successfully developed pedestrian detection using python & opencv. Now that we have our pedestrian detection machine learning model, we can implement it in other functions and other use cases. Add this to a raspberry pie, create a standalone device or connect it to the cctv cameras and use it as a video surveillance method or alarm system. The use of computer vision and machine learning or deep learning is causing a shift in many industries and these are the most influenced ones.
If you are Happy with DataFlair, do not forget to make us happy with your positive feedback on Google


One of the best lesson I’ve ever read.
Thanks 🙏.
thnx.
Unfortunate small error : layer_name = [layer_name[i[0] – 1] for i in model.getUnconnectedOutLayers()]
–>
layer_name = [layer_name[i – 1] for i in model.getUnconnectedOutLayers()]
For the above error: just use ” [layer_name[i – 1] for i in model.getUnconnectedOutLayers()] ” code instead of the original code ” [layer_name[i[0] – 1] for i in model.getUnconnectedOutLayers()] “
Try return [layersNames[i – 1] for i in net.getUnconnectedOutLayers()]
It seems that the getUnconnectedOutLayers function returns different numpy format in different versions of opencv.
Hi, we are working on a project and would love to consult with you if you have time next week.
Thanks for sharring this amazing code. Can someone provide any information about the training set used?